Publish Ready-to-Run Actor Behaviors for Reuse and Simulation Performance
This topic explains how to generate ready-to-run actor behaviors using the publishActor
function, as well as general considerations when creating ready-to-run packages. For more
information about simulating RoadRunner scenarios with MATLAB® and Simulink®, see Overview of Simulating RoadRunner Scenarios with MATLAB and Simulink.
You can generate ready-to-run actor behaviors from your Simulink models using RoadRunner scenario blocks or MATLAB System (Simulink) blocks. Using ready-to-run
packages as your actor behaviors enables you to associate the same behavior with multiple
actors in your scenario, modify behavior parameters locally for each actor, and improve
simulation performance. This topic uses a simple Simulink model to explain the workflow. You can follow similar steps for other
behaviors that use MATLAB System blocks by opening the example and using the
mUpdateXDirectionWithMATLABSys.slx model.
This topic assumes that you have:
Simulink and Simulink Coder™ licenses.
A RoadRunner license, and the product is installed. For more information, see Install and Activate RoadRunner (RoadRunner).
A RoadRunner Scenario license, and the product is installed.
A RoadRunner project folder named
MyRoadRunnerProject. For more information, see RoadRunner Project and Scene System (RoadRunner).The RoadRunner scene file
SceneWithMutipleLanes.rrsceneand scenario fileLaneswithMultipleActors.rrscenarioin your projectMyRoadRunnerProject. You can access these files in your working folder after you open the example in this topic.
Open Simulink Model for Moving Actors
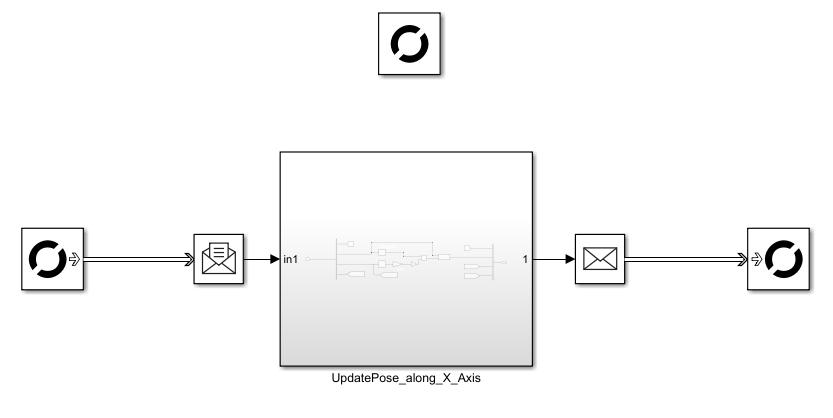
Open mUpdateXDirection. This is a simple Simulink model with RoadRunner Scenario Reader, RoadRunner Scenario Writer, and RoadRunner Scenario block and the UpdatePose_along_X_Axis component.
In this model:
A Receive (Simulink) block converts messages from RoadRunner Scenario Reader block to bus signals.
UpdatePose_along_X_Axiscomponent processes the signals.The signals from
UpdatePose_along_X_Axiscomponent are converted to messages using a Send (Simulink) block.The messages are communicated with RoadRunner scenario using RoadRunner Scenario Writer block.
UpdatePose_along_X_Axis component processes the Pose element of the BusActorRuntime bus signal by updating the x-direction displacement of the actor. SpeedFactor parameter defines the magnitude of the displacement.
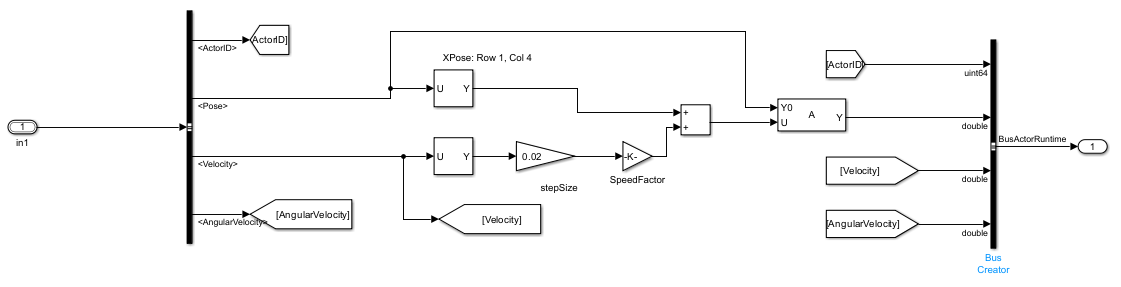
In the model, the SpeedFactor parameter is configured to be a tunable parameter by RoadRunner. The steps for this configuration are identical to the case when you expose a model argument as a tunable parameter on the Model block at each level of the model hierarchy. For more information, see Configure Instance-Specific Values for Block Parameters in a Referenced Model (Simulink).

Generate Ready-to-Run Package from the Simulink Behavior Model
This section describes the steps to create the
LaneswithMultipleActors.rrscenario
RoadRunner scenario file in your example. To create this scenario, use the publishActor function to generate ready-to-run actor behaviors from the
Simulink model. The section also shows how to associate the behavior with two
vehicles in LaneswithMultipleActors.rrscenario.
Use this code to generate the package for your behavior model. This command publishes
mUpdateXDirectionas a ready-to-run package and creates anmUpdateXDirection.zipfile in your current directory.Simulink.publish.publishActor('mUpdateXDirection',PackageType='ReadyToRun')
In RoadRunner, open
LaneswithMultipleActors.rrscenarioand in the Library Browser, select theBehaviorsfolder.To create a new behavior, right-click an empty space in the list of behaviors, pause on New, then select Behavior. Enter a name for your new behavior, such as
MyNewBehavior. This animation shows how to complete these steps.
On the Attributes pane, set Platform to
MATLAB/Simulink. Specify File Name asmUpdateXDirection.zip.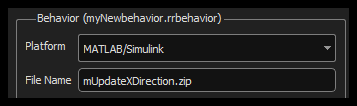
Select Add Parameter, and add
SpeedFactoras a parameter.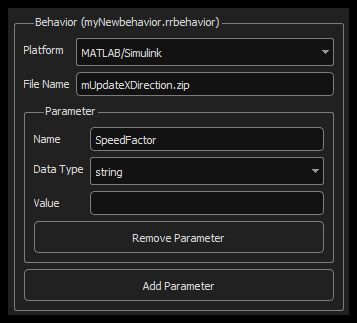
Associate the behavior
MyNewBehaviorwith the two vehicles in your scenario. For more information, see Overview of Simulating RoadRunner Scenarios with MATLAB and Simulink.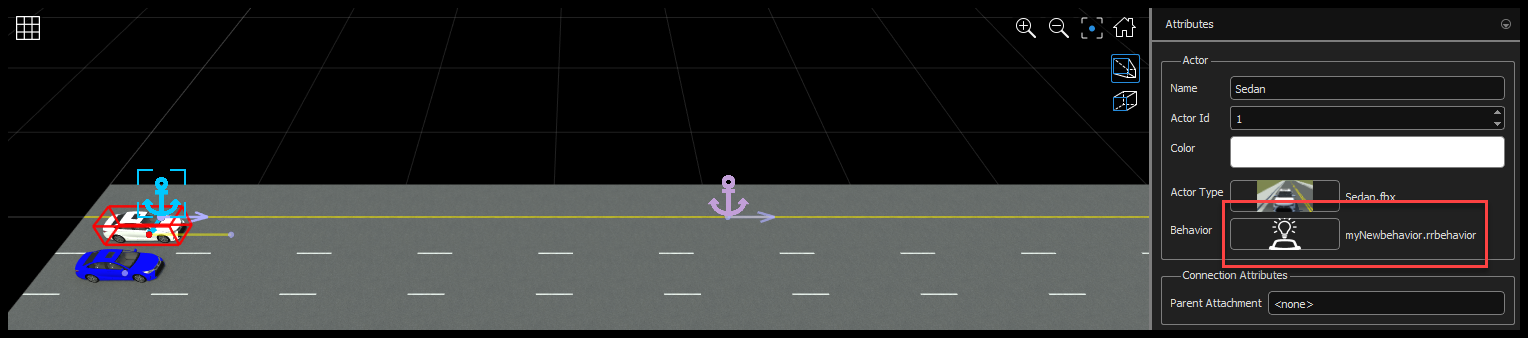
From the Logic editor, select the
Sedanaction phase, and add aChange Behavior Parameteraction that sets the value ofSpeedFactorparameter for each actor in your model. For this example, inLaneswithMultipleActors.rrscenarioscenario, the white sedanSedanhas aSpeedFactorvalue of1, and the blue sedanSedan2has aSpeedFactorvalue of2.
Simulate the Scenario and Observe the Actor Behavior
This section uses LaneswithMultipleActors.rrscenario scenario file from the
example, and describes the steps to simulate the scenario.
Specify the path to your RoadRunner installation folder using these commands, replacing
MyInstallationFolderwith the path to your RoadRunner installation. You need to run the commands in this step only the first time you are setting up the connection between RoadRunner and your MATLAB installation.RRInstallationFolder = "MyInstallationFolder"; s = settings; s.roadrunner.application.InstallationFolder.PersonalValue = RRInstallationFolder; s.roadrunner.application.InstallationFolder.TemporaryValue = RRInstallationFolder;Note
Specify the full path to the folder containing the
AppRoadRunner.exeexecutable. The default location of this executable on Windows® isC:\Program Files\RoadRunner R2022b\bin\win64, whereC:\Program Files\RoadRunner R2022bis your RoadRunner installation folder. The folder could be different on your computer.To
MyRoadRunnerProjectfrom MATLAB, use this command.rrApp = roadrunner('MyProjectLocation');Open
LaneswithMultipleActors.rrscenarioscenario file.openScenario(rrApp,'LaneswithMultipleActors.rrscenario');Create the simulation object to control the simulation from MATLAB.
rrSim = createSimulation(rrApp);
Start the simulation from the command line.
set(rrSim, 'SimulationCommand','Start');
Observe the difference in vehicle behavior because of the
SpeedFactorparameter.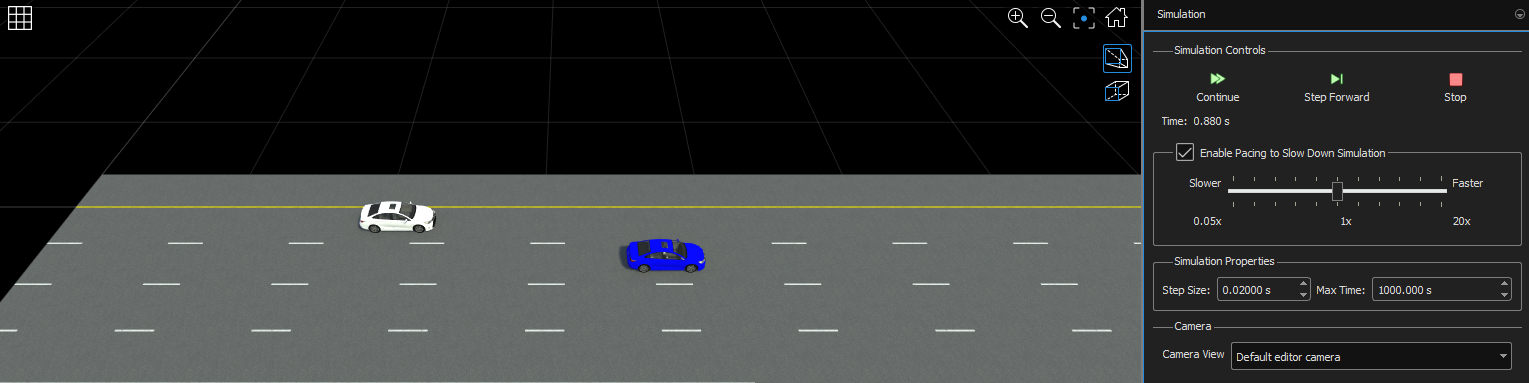
General Considerations for Generating Ready-to-Run Actor Behaviors
Consider these factors when you generate ready-to-run actor behaviors from Simulink models using RoadRunner scenario blocks or MATLAB System blocks:
To generate ready-to-run actor behaviors, you must use a fixed-step solver for your model.
To generate a behavior for a MATLAB System object™ you must use a MATLAB System block and a RoadRunner Scenario block. Open the
mUpdateXDirectionWithMATLABSys.slxmodel, which uses a MATLAB System block with thehUpdatePoseAlongX.mSystem object file.Based on your RoadRunner Scenario Reader block configuration, the block outputs a specific bus, such as
BusActorRuntime. To see the bus data type, on the Debug tab, select Information Overlays, enable Bus Data Type, and update your model.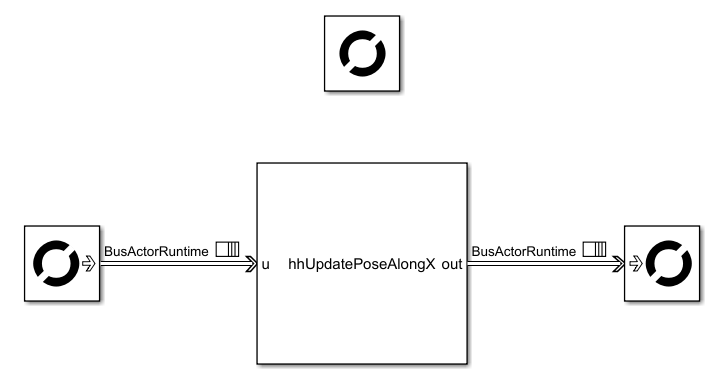
To process this data in a MATLAB System block, use the
Simulink.ActorSimulation.loadfunction to learn bus type and the elements of the bus. For example:Simulink.ActorSimulation.load("BusActorRuntime");To generate code for your ready-to-run actor behavior using a MATLAB System block, you must provide a default
structdata to your bus. For example,hUpdatePoseAlongX.muses theSimulink.ActorSimulation.createMATLABStructfunction to providestructdata forBusActorRuntime.function out = stepImpl(obj,u) % Construct default output struct out = Simulink.ActorSimulation.createMATLABStruct('BusActorRuntime'); % Get ActorID actorSim = Simulink.ScenarioSimulation.find( ... 'ActorSimulation','SystemObject',obj); actorID = getAttribute(actorSim,"ID"); if ~isempty(u) pose = u(end).Pose; velocity = u(end).Velocity; displacement = velocity*obj.stepSize*obj.SpeedFactor; % Update pose pose(1,4) = pose(1,4) + displacement(1); % x % Update output out.Pose = pose; out.Velocity = velocity; out.ActorID = castIntToFi(actorID); end end
Consider these factors when you generate ready-to-run actor behaviors from MATLAB System object actor behaviors.
If you incorporated the
getAttributefunction of theActorSimulationobject, or thegetAttributefunction of theActorModelobject, then do not use thenumelfunction to count the number of elements in the arrays returned by these functions. Instead, check for structure fields of array elements that specifically count the number of other array elements. For example, see theNumBulbConfigurationfield of theSignalConfigurationstructure in the TrafficSignalRuntime structure.If you used the
getActionfunction to read a path action, then the maximum number of path points you can read is 500.
See Also
publishActor | publishActorBehavior | publishCustomAction | publishCustomEvent