Simulate RoadRunner Scenarios with Actors Modeled in Simulink
You can use a Simulink® model to program the behavior of an actor in RoadRunner Scenario. In the Simulink actor behavior model, you can use standard Simulink blocks from the Library Browser or Custom Blocks (Simulink) that are capable of defining more complex logic for vehicle or other actor movements.
Note
All Simulink actor behavior models must have a RoadRunner Scenario block at the top level or, in the case of a hierarchical subsystem structure, one level lower.
You can then associate the Simulink behavior model with an actor in RoadRunner Scenario to take control of the actor during simulation. For more information, see Associate Actor Behavior in RoadRunner and Simulate Scenario. Then, to execute the Simulink actor behavior model, connect RoadRunner and MATLAB®. This page contains examples that highlight different actor behaviors modeled in Simulink.
Model Actor Behavior Using Simulink
In this example, you will learn to create a Simulink actor behavior model that updates the pose of an actor in RoadRunner Scenario at each time step. The Simulink model retrieves the actor pose of a vehicle from RoadRunner Scenario, and increments it by a 4-by-4 double matrix, gainArg. For more information about actor pose, see What Is a RoadRunner Pose Matrix?.
To achieve this goal, you must first get the current position of the vehicle, and then add a 4-by-4 double matrix that represents the constant, incremental change in position.
The Simulink actor behavior model uses these blocks to complete the goal:
RoadRunner Scenario
The RoadRunner Scenario block must be mandatorily present in Simulink models that are intended to program the behavior of actors in RoadRunner Scenario. This block allows you to configure settings that determine how a Simulink model interfaces with a scenario in RoadRunner.
RoadRunner Scenario Reader
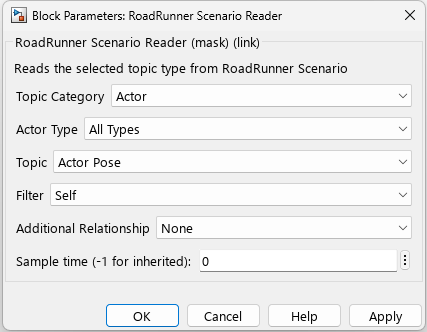
The RoadRunner Scenario Reader block reads the selected topic from a scenario in RoadRunner, and outputs data in the form of messages. To specifically retrieve the topic Actor Pose, set these block parameter values in the RoadRunner Scenario Reader block:
Topic Category — Actor. Reads actor information from a scenario.
Actor Type — All types. Enables retrieval of actor data; does not output wheel data unlike the Vehicle Actor type.
Topic — Actor Pose. Retrieves dynamic data associated with the actor, such as Pose, Velocity, and Angular Velocity.
Filter — Self. Outputs data for the actor associated with the Simulink model.
Once you set the above values, the RoadRunner Scenario Reader block outputs the Actor Pose Topic in the form of Simulink Messages. These messages are then processed further within the Simulink model.
Receive
The Receive (Simulink) block converts a Simulink message to a collection of signals grouped together (bus) for processing by other downstream Simulink blocks.
Bus Selector
The Bus Selector (Simulink) block is used to extract specific signals from the output signal of the Receive block. Each output from the Bus Selector corresponds to one of the elements of the incoming bus, such as Actor ID, Pose, Velocity and Angular Velocity. For the purposes of this example, extract the Pose and ActorID of the vehicle.
Model Logic
The Constant (Simulink) block supplies a gain value to the Sum (Simulink) block. The Sum block updates the actor pose by adding the gain factor gainArg, which is a 4-by-4 double matrix defined in the Model Workspace, to the incoming Actor Pose signal. By adjusting the gain, you can tune actor pose data over time to better meet your simulation needs. These operations are designed to influence the behavior of the associated actor which is visible in the graphical interface of the RoadRunner Scenario application.
Bus Creator
The Bus Creator (Simulink) block combines multiple input signals for the ActorID, Pose, Velocity, and Angular Velocity into a single, composite bus signal in the respective order as expected by RoadRunner Scenario.
The expected structure for the updated values is defined in BusActorRuntime.
Send
The Send (Simulink) block converts the input bus to a Simulink Message for use by the downstream RoadRunner Scenario Writer block, that expects a message as input.
RoadRunner Scenario Writer
The RoadRunner Scenario Writer block receives data in the form of Simulink messages and writes the updated information back to the connected scenario in RoadRunner.
To enable writing to a scenario, you must first load the required bus types into the MATLAB® base workspace by clicking the load function in the Block Parameters dialog box. This action loads multiple, bus definitions, that is, the name of a bus along with its elements, that are specific to RoadRunner Scenario. For example, the bus named BusActorPose contains elements such as Actor ID, Velocity, Roll, Pitch, and Yaw. If you had used the roll, pitch, or yaw values in your model logic, and want to write the updated values back to the scenario, then this bus must be loaded into the MATLAB base workspace. Only if this bus is loaded into the base workspace, does the RoadRunner Scenario Writer block recognize an incoming bus signal in this format, constructed by the Bus Creator block, as valid input.
Fill in the following block parameters for the RoadRunner Scenario Writer block to ensure that the updated actor pose is written back to the scenario. These values must match with the block parameters of the RoadRunner Scenario Reader block:
Topic Category — Actor. Writes actor data to the scenario.
Actor Type — All types. Enables writing actor data back to the scenario; does not output wheel data unlike the Vehicle Actor type.
Topic — Actor Pose. Writes dynamic data associated with the actor, such as Actor Pose back to the scenario.
Hence, the RoadRunner Scenario Writer block transmits updated values for actor pose, calculated by the model logic at every time step, back to the scenario in RoadRunner.
Most Simulink actor behavior models follow some variation of the above structure where the RoadRunner Scenario Reader block collects input from the connected scenario in RoadRunner and passes on required information to the core logic of the Simulink model which then performs calculations and returns updated values to write back to the scenario in RoadRunner. The transmission of messages back and forth across the scenario and Simulink model happens at every time step, thus controlling the visible movement of a vehicle in RoadRunner Scenario.
Model Actor Behavior Using User-Defined Actions
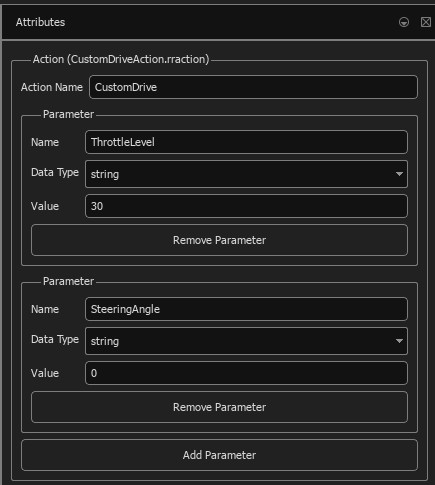
A user-defined action allows you to define an action type in RoadRunner Scenario with custom parameters relevant to the action. The parameters fulfill the
purpose of the user-defined action. For example, to turn a vehicle, you might need to
adjust the steering angle, which is how sharply the vehicle turns, and the angular
velocity, which is the rate at which the vehicle rotates about its vertical axis. You
can then choose to assign the steering angle and angular velocity as parameters of a
user-defined action designed to turn a vehicle. Name the user-defined action and its
parameters appropriately. For example, a user-defined action
TurnVehicle may contain the parameters
SteeringAngle and AngularVelocity.
In RoadRunner Scenario, you can set up a user-defined action and assign initial values to its
parameters. In a Simulink actor behavior model, design the core logic to respond to the user-defined
action over the course of the scenario simulation. When the Simulink model completes processing the user-defined action, you must send an
Action Complete event to RoadRunner Scenario through the RoadRunner Scenario Writer block.
Create Bus Object for User-Defined Action
To use a user-defined action in a Simulink actor behavior model:
Create a user-defined action in RoadRunner Scenario. Configure an action phase in the scenario to dispatch the user-defined action when certain conditions are met. For more information, see User-Defined Actions (RoadRunner Scenario).
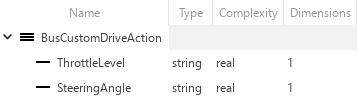
Create a
Simulink.Busobject with the same elements as the parameters of the user-defined action.Use the Type Editor (Simulink) to construct a bus object for the user-defined action. The bus object must replicate the parameter information of the user-defined action as specified in RoadRunner Scenario. Add a
Simulink.BusElementobject to the bus that corresponds to each parameter. You can then define properties such as data type, dimension, and complexity.Note
User-defined action parameters support all data types supported by RoadRunner Scenario. For more information, see Parameter Data Types (RoadRunner Scenario).
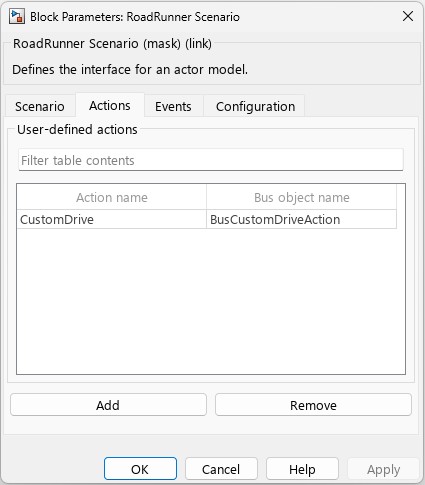
Map the name of the user-defined action in RoadRunner Scenario to the bus object in Simulink from the RoadRunner Scenario block.
Process User-Defined Actions Using Simulink
Create a Simulink model that processes user-defined actions dispatched from RoadRunner Scenario and uses the parameter values to update actor behavior.
This example shows the Simulink model hUDA_SL.slx, which contains the following blocks:
RoadRunner Scenario — Associate the Action Name in RoadRunner Scenario with the name of the bus object in Simulink.
RoadRunner Scenario Reader — Reads the user-defined action from RoadRunner Scenario at run-time. Set Topic Category to Action and Action Type to User-Defined. Enter the name of the action in the Action Name box. The corresponding bus object is read at every time step during scenario simulation. Use a second RoadRunner Scenario Reader block to input the actor parameters of the associated vehicle in RoadRunner Scenario by setting Topic Category to Actor, Actor Type to Vehicle, and Topic to Vehicle Pose.
Message Triggered Subsystem — Unpacks the parameters of user-defined action CustomDrive, and passes it on to the MATLAB function y. Here, you can manipulate the steering angle and throttle input values to determine the movement of the associated vehicle.
RoadRunner Scenario Writer — Conveys completion of a user-defined action to the scenario simulation by publishing an Action Complete event. To do so, set Topic Category to Event and Event Type to Action Complete. Upon receiving an Action Complete event, the simulation proceeds to the next action phase with the changed actor behavior. Use a second RoadRunner Scenario Writer block to update the behavior of the vehicle actor.
model_name = 'hUDA_SL.slx';
open_system(model_name);

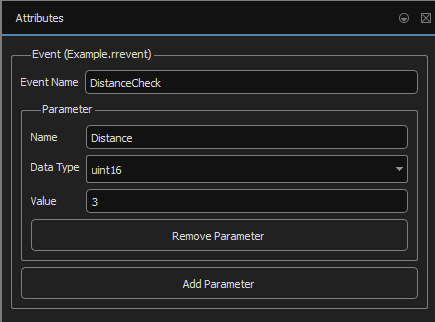
Model Actor Behavior Using User-Defined Events
A user-defined event is a mechanism to send information from one actor to all other actors in a RoadRunner scenario, or from the scenario logic to all actors. A user-defined event is broadcast at the instant of a particular occurrence to the relevant actors. A user-defined event contains custom parameters that have a name, value, and data type. You can program actors receiving a broadcast user-defined event to act on the event or ignore the event. For example, you can use user-defined events to guide an ambulance on the move. Based on the location of the ambulance, you can program a MATLAB or Simulink actor to broadcast the arrival of the ambulance as an event to all other vehicles in the scenario, so that they can move to an adjacent lane and make way for the ambulance.
Create Bus Object for User-Defined Event
To use a user-defined event in a Simulink actor behavior model:
Create a user-defined event in RoadRunner Scenario. Configure an action phase in the scenario to send the user-defined event if a certain condition is met. For more information, see User-Defined Events (RoadRunner Scenario).
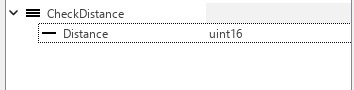
Create a
Simulink.Busobject with the same elements as the parameters of the user-defined event.Use the Type Editor (Simulink) to construct a bus object for the user-defined event. The bus object must replicate the parameter information of the user-defined event as specified in RoadRunner Scenario. Add a
Simulink.BusElementobject to the bus that corresponds to each parameter. You can then define properties such as data type, dimension, and complexity.Note
User-defined event parameters support all data types supported by RoadRunner Scenario. For more information, see Parameter Data Types (RoadRunner Scenario).
Map the name of the user-defined event in RoadRunner Scenario to the bus object in Simulink from the RoadRunner Scenario block.
Process User-Defined Events Using Simulink
Create a Simulink model that processes user-defined events dispatched from RoadRunner Scenario and uses the parameter values to update actor behavior.
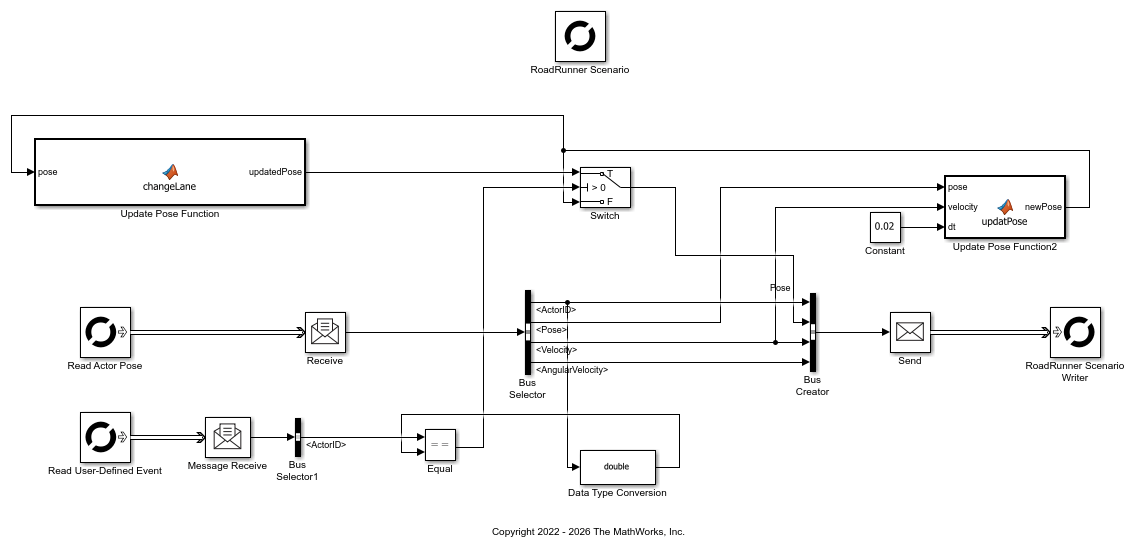
This example displays the Simulink model UDEVehicle_Final.slx, that represents the white sedan in example Design Vehicle Following User-Defined Events Scenario (RoadRunner Scenario) which contains the following blocks:
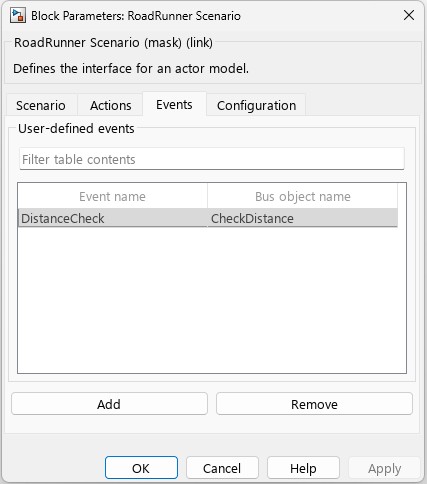
RoadRunner Scenario — In the Events tab, associate the Event Name in RoadRunner Scenario with the name of the bus object in Simulink.
RoadRunner Scenario Reader — Reads the user-defined event dispatched from RoadRunner Scenario at run-time if you set Topic Category to Event and Event Type to User-Defined. Enter the name of the event in the Event name box. The corresponding bus object is read during scenario simulation. Use a second RoadRunner Scenario Reader block to input the actor parameters of the associated vehicle in RoadRunner Scenario by setting Topic Category to Actor, Actor Type to All Types, and Topic to Actor Pose.
MATLAB Function — Updates the actor pose such that the associated vehicle changes lanes by moving left by a specified unit. This action occurs when the ID dispatched by the hMATLAB_Agent MATLAB System object that represents the ambulance satisfies a condition programmed by the Switch block. If the condition is not satisfied, then the associated vehicle, the white sedan, continues to move as before.
RoadRunner Scenario Writer — Updates the behavior of the white sedan to continue onwards in a straight path or move to the lane on the left.
model_name = 'UDEVehicle_Final.slx';
open_system(model_name);
Associate Actor Behavior in RoadRunner and Simulate Scenario
In your RoadRunner scenario, select the Library Browser and then the
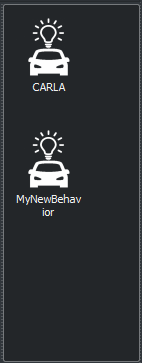
Behaviorsfolder.To create a new behavior, right-click an empty space in the list of behaviors, pause on New, then select Behavior. Enter a name for your new behavior, such as
MyNewBehavior. This animation shows how to complete these steps.
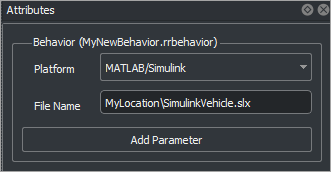
On the Attributes pane, set Platform to
MATLAB/Simulink. As the File Name, use the location of your fileSimulinkVehicle.slxorhUDA_SL.slx.If your Simulink model file is in your working folder, you can enter the name of your file together with its extension such as
.slx.You can also use the full path to enter the location of your file, for example
MyLocation\SimulinkVehicle.slx.
This action creates a new behavior that you can attach to actors in your scenario.
Add a new
CompactCarto your scenarioMyExampleScenario.To associate the Simulink model behavior to a RoadRunner actor, select
CompactCar. Then, in the Attributes section, in the Behavior box, addMyNewBehaviortoCompactCarby clicking and dragging the behavior icon to the box. Save your scenario.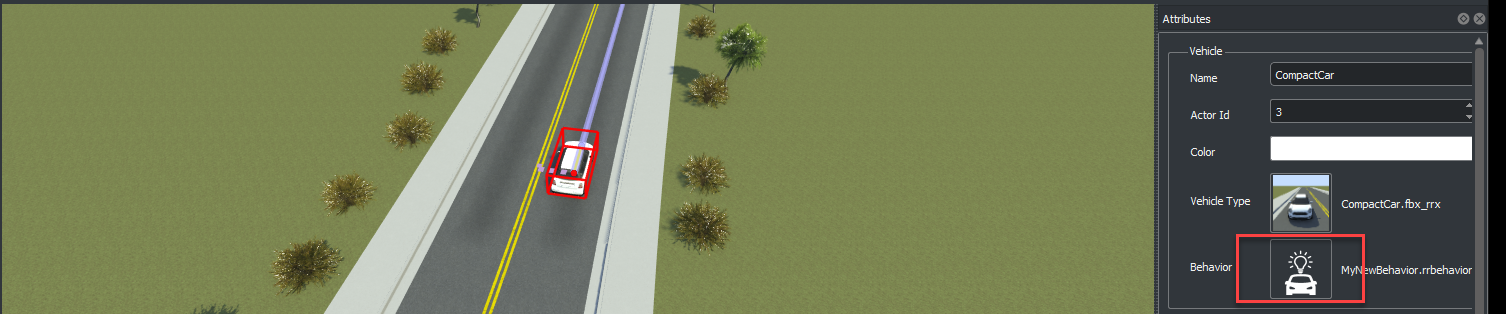
Specify the path to your RoadRunner installation folder using these commands, replacing
MyInstallationFolderwith the path to your RoadRunner installation. You need to run the commands in this step only the first time you are setting up the connection between RoadRunner and your MATLAB installation.RRInstallationFolder = "MyInstallationFolder"; s = settings; s.roadrunner.application.InstallationFolder.PersonalValue = RRInstallationFolder; s.roadrunner.application.InstallationFolder.TemporaryValue = RRInstallationFolder;Note
Specify the full path to the folder containing the
AppRoadRunner.exeexecutable. The default location of this executable on Windows® isC:\Program Files\RoadRunner R2022b\bin\win64, whereC:\Program Files\RoadRunner R2022bis your RoadRunner installation folder. The folder could be different on your computer.To open the RoadRunner project
MyRoadRunnerProjectfrom MATLAB, use this command.rrApp = roadrunner('MyProjectLocation');Open the scene
MyExampleScene.openScene(rrApp, 'MyExampleScene');Open the scenario
MyExampleScenario.openScenario(rrApp, 'MyExampleScenario');Get the simulation object to control simulation from MATLAB.
rrSim = createSimulation(rrApp);
Start the simulation from the command line.
set(rrSim, 'SimulationCommand','Start');
Tip
When debugging cosimulations using the MATLAB or Simulink debugger, the simulation might time out. Check the simulation timeout setting using this code.
By default, the simulation times out after 300 seconds, or 5 minutes. If you expect the simulation to take more than 5 minutes between simulation steps, set a higher timeout value using this code, which sets the timeout to 600 seconds (10 minutes) in the current MATLAB session.s = settings; s.roadrunner.application.Timeout.ActiveValue
s = settings;
s.roadrunner.application.Timeout.TemporaryValue = 600;
If the simulation times out, the current
ScenarioSimulationobject becomes invalid. If theScenarioSimulationobject is invalid, RoadRunner generates an error if you attempt to start the simulation. To restart the simulation, delete theScenarioSimulationobject and recreate it using this code. ReplacerrSimwith the name of yourScenarioSimulationobject andrrAppwith the name of yourroadrunnerobject.delete(rrSim) rrSim = createSimulation(rrApp);
If a simulation is unresponsive, you can end the simulation by pressing Ctrl+C in the MATLAB Command Window.
For more information about simulating your scenario in RoadRunner or controlling a scenario simulation using MATLAB, see Overview of Simulating RoadRunner Scenarios with MATLAB and Simulink.
Start Simulation of RoadRunner Scenario Interactively from Simulink Actor Behavior Model
You can start the simulation of a RoadRunner scenario interactively from a Simulink actor behavior model. To do so, in the Simulink model, specify the necessary block parameters such as the scenario filename and actor ID in the Scenario tab of the RoadRunner Scenario block, and then simulate the model. When you simulate the model, the specified scenario is launched in a new RoadRunner Scenario window with the Simulink behavior attached to the required actor for the duration of the simulation. By using this workflow, you can attach the Simulink behavior to one actor at a time.
Note
Tuning of model parameters is not supported when you start the simulation of a RoadRunner scenario interactively from a Simulink behavior.
Use these steps to start the simulation of a RoadRunner scenario interactively from a Simulink actor behavior model, without manually opening the RoadRunner application:
Open the SLX file of a Simulink behavior. Double-click the RoadRunner Scenario block in the model to open its Block Parameters dialog box.
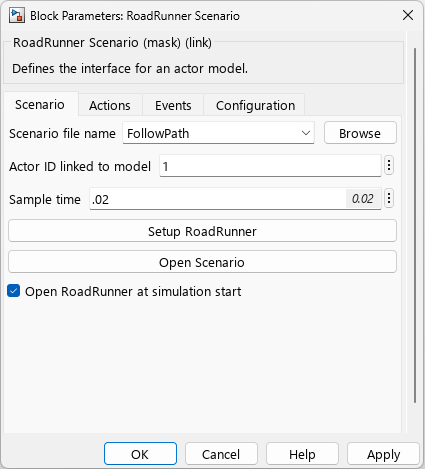
To set up the current project and installation folders, click Setup RoadRunner in the Scenario tab. In the RoadRunner Setup window, set RoadRunner Project Folder to the path of the project that contains the required scenario. Set the RoadRunner Installation Folder to the path to your local RoadRunner installation.
Set Scenario file name to the name of the scenario that you want to associate with the Simulink behavior. You can also click Browse to locate and select the scenario file, or type the filename directly.
Note
If the file is not located in the path specified by RoadRunner Project Folder in the Setup RoadRunner window, Simulink reports an error.
If required, view the specified scenario by clicking Open Scenario.
Set the Actor ID linked to model to the ID of the actor to which you want to associate the Simulink behavior. The value must represent a valid actor in the chosen scenario.
Enter the required sample time in the Sample time box. This value overrides the sample time set from the RoadRunner Scenario application interface for the duration of the simulation.
Select Open RoadRunner at simulation start to enable the specified scenario to open and run the in a new RoadRunner Scenario window. This is the default mode and allows you to view the scenario.
If you clear the check box, RoadRunner opens in Console Mode (RoadRunner).
To save the changes, click OK or Apply.
Start simulation of the RoadRunner scenario interactively from the Simulink behavior in one of these ways:
Click Run or Step Forward in the Simulink Toolstrip.
Set the
SimulationCommandmodel configuration parameter to"start"by using theset_param(Simulink) function in the MATLAB Command Window:model_name = "driveleft"; set_param("driveleft","SimulationCommand","start")
Note
The
simcommand does not support the simulation of a RoadRunner scenario interactively from a Simulink behavior.
If you start the simulation of a RoadRunner scenario interactively from a Simulink behavior, the block parameter values in the Scenario tab of the RoadRunner Scenario block override certain aspects of the scenario. For example, the Simulink behavior is attached to the actor with the specified ID in RoadRunner Scenario, overriding any behavior previously attached to that actor. If you run the scenario from the RoadRunner Scenario application instead, the behavior attached to this actor in the application interface is applied.
See Also
Topics
- Overview of Simulating RoadRunner Scenarios with MATLAB and Simulink
- Connect MATLAB and RoadRunner to Control and Analyze Simulations
- Add Sensors to RoadRunner Scenario Using Simulink
- Simulate RoadRunner Scenarios with Actors Modeled in MATLAB
- Add Sensors to RoadRunner Scenario Using MATLAB
- Publish Ground Truth and Sensor Data from RoadRunner Scenario to ROS 2 Network (ROS Toolbox)
- Publish Actor Behavior as Proto File, Package, Action Asset or Event Asset