Explore 3-D Labeled Volumetric Data with Volume Viewer
This example shows how to explore 3-D labeled volumetric data using the Volume Viewer app. Using the app, you can view the labeled volume by itself or view the labels as an overlay on the intensity volume. To illustrate, the example loads an intensity volume that shows the human brain with labeled areas that show the location and type of tumors found in the brain.
Load Labeled Volume and Intensity Volume
Load the MRI intensity data of a human brain and the labeled volume from MAT files into the workspace. The MRI data is a modified subset of the BraTS data set [1]. This operation creates two variables in the workspace: vol and label.
datadir = fullfile(toolboxdir("images"),"imdata","BrainMRILabeled");
load(fullfile(datadir,"images","vol_001.mat"));
load(fullfile(datadir,"labels","label_001.mat"));
whos
  Name           Size                    Bytes  Class     Attributes

  datadir        1x1                       380  string
  label        240x240x155             8928000  uint8
  vol          240x240x155            17856000  uint16
Open the Volume Viewer app. From the MATLAB® toolstrip, open the Apps tab and under Image Processing and Computer Vision, click Volume Viewer. You can also open the app using the volumeViewer command.
volumeViewer(vol,label)
Load the labeled volume into the Volume Viewer app. Click Import Labeled Volume to open the labeled volume. You can load an image in a file name or load a variable from the workspace. (If you have volumetric data in a DICOM format that uses multiple files to represent a volume, you can specify the DICOM folder name.) For this example, choose the Import From Workspace option.

Select the workspace variable associated with the labeled volume data in the Import from Workspace dialog box and click OK.

View Labeled Volume in Volume Viewer
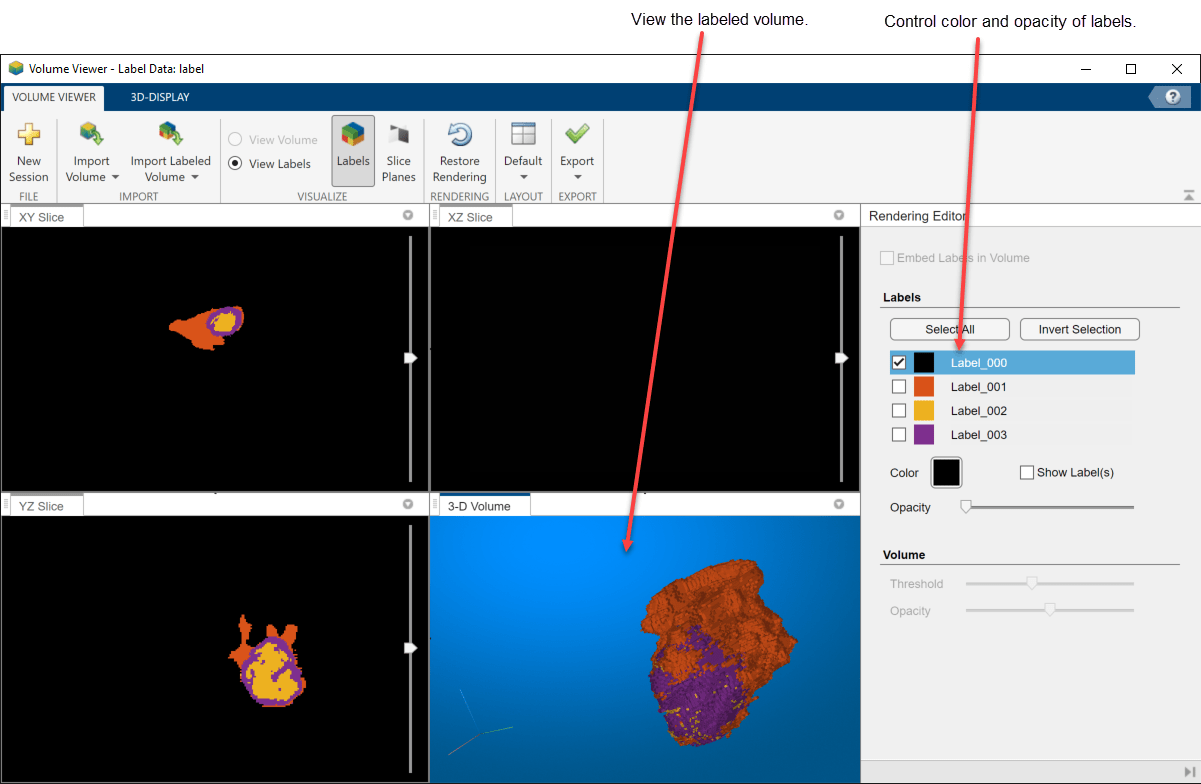
View the labeled volume in the Volume Viewer app. By default, the Volume Viewer displays the data as a labeled volume but you can also view it as slice planes. To explore the labeled volume, zoom in and out on the image using the mouse wheel or a right-click. You can also rotate the volume by positioning the cursor in the image window, pressing and holding the mouse, and moving the cursor. You are always zooming or rotating around the center of the volume. The position of the axes in the Orientation Axes window reflects the spatial orientation of the labeled volume as you rotate it.

Refine your view of the labeled volume using the Rendering Editor part of the Volume Viewer. You can use the Rendering Editor to view certain labels and hide others, change the color, and modify the transparency of the labels. Label 000 is the background and it is typically not visible. When you select the background label, the Show Labels check box is clear, by default. To select all the visible labels at once, select the background label and click Invert Selection. To change the color of a label (or all the labels), select the label in the Rendering Editor and specify the color in the Color selector. You can also control the transparency of the label using the Opacity slider.
Embed Labeled Volume with Intensity Volume
In this part of the example, you view the labeled volume and the intensity volume in the Volume Viewer at the same time. Viewing the labeled volume overlaid on the intensity volume can provide context for the data.
With the labeled volume already in the Volume Viewer, load the intensity volume into the app. Click Import Volume and choose the Import From Workspace option.

Select the workspace variable associated with the intensity volume in the Import from Workspace dialog box and click OK.

The Volume Viewer displays the labeled volume over the intensity volumetric data. By default, the Volume Viewer displays the label data and the intensity data as volumes but you can also view it as slice planes. To explore the labeled and intensity volumes, zoom in and out using the mouse wheel or a right-click. You can also rotate the volumes by positioning the cursor in the image window, pressing and holding the mouse, and moving the cursor. To view only the intensity volume, and hide the labeled volume, click View Volume.

Refine your view of the labeled volume and the intensity volume using options in the Rendering Editor. To only view the labeled volume, and hide the intensity volume, clear the Embed Labels in Volume check box. In the Labels area of the Rendering Editor, you can select any of the labels and change its color or transparency. Label 000 is the background. By default, the background is set to black and is not visible. The Show Labels check box is clear. To select all the labels, click on the background and then click Invert Selection. If the intensity volume is visible, you can modify the threshold value and transparency using the sliders in the Volume area of the Rendering Editor.

References
[1] Medical Segmentation Decathlon. "Brain Tumours." Tasks. Accessed May 10, 2018. http://medicaldecathlon.com/.
The BraTS data set is provided by Medical Segmentation Decathlon under the CC-BY-SA 4.0 license. All warranties and representations are disclaimed. See the license for details. MathWorks® has modified the subset of data used in this example. This example uses the MRI data of one scan from the original data set, saved to a MAT file.