Set Up Speedgoat for HITL Simulation with PX4
R2026bThis topic describes how to set up Speedgoat® and its connected hardware for hardware-in-the-loop (HITL) simulation with PX4®. After completing this setup, you can:
Simulate a UAV plant model and its sensors in real time on Speedgoat.
Deploy a UAV controller model to PX4 Autopilot.
Run photorealistic visualization in Unreal Engine® using plant states from Speedgoat.
Execute an obstacle avoidance algorithm on Jetson™ using depth camera data simulated in Unreal Engine.
Prerequisites
Hardware
Speedgoat Baseline with IO397 module
IO397 Terminal board
A supported PX4 Autopilot board with a Class 10 microSD card
Micro USB type-B cable
USB-to-Ethernet converter
Pixhawk® UART-to-jumper male converter
2 x FTDI USB-to-serial adapter units
(Optional, for obstacle avoidance) Jetson Xavier or Nano connected to the autopilot over UART
Software
Simulink® Real-Time™ toolbox. For more information, see Get Started with Simulink Real-Time (Simulink Real-Time).
Simulink IO Blockset (available from Speedgoat with a Speedgoat account)
IO397 Configuration package, version 4.1 or later (available from Speedgoat with a Speedgoat account). For more information, see Speedgoat Software.
Overview
This diagram shows the hardware connections and information flow for HITL simulation with Speedgoat.
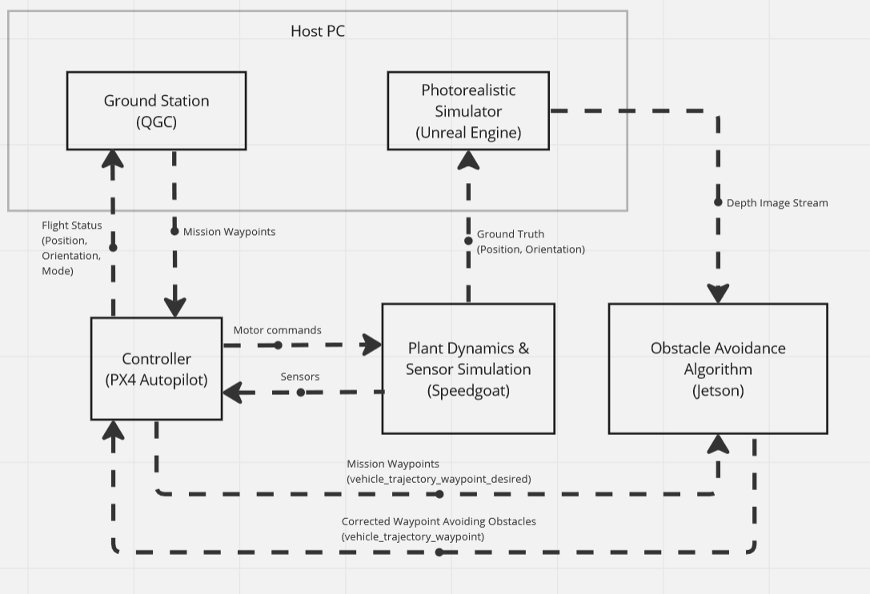
A plant model and its sensors are modeled in Simulink and deployed to a Speedgoat Real-Time Target machine. During simulation, PX4 Autopilot sends motor commands to the plant model on Speedgoat, which returns simulated sensor data. The plant model also shares the UAV ground truth (position and orientation) with the photorealistic simulator on the host PC. QGroundControl, also running on the host PC, sends mission waypoints to PX4 Autopilot and displays flight status.
The photorealistic simulator renders the UAV's movement in 3D and simulates its depth camera. If onboard obstacle avoidance is enabled, the simulator streams depth images to a Jetson onboard computer, which computes a corrected waypoint and sends it back to PX4 Autopilot.
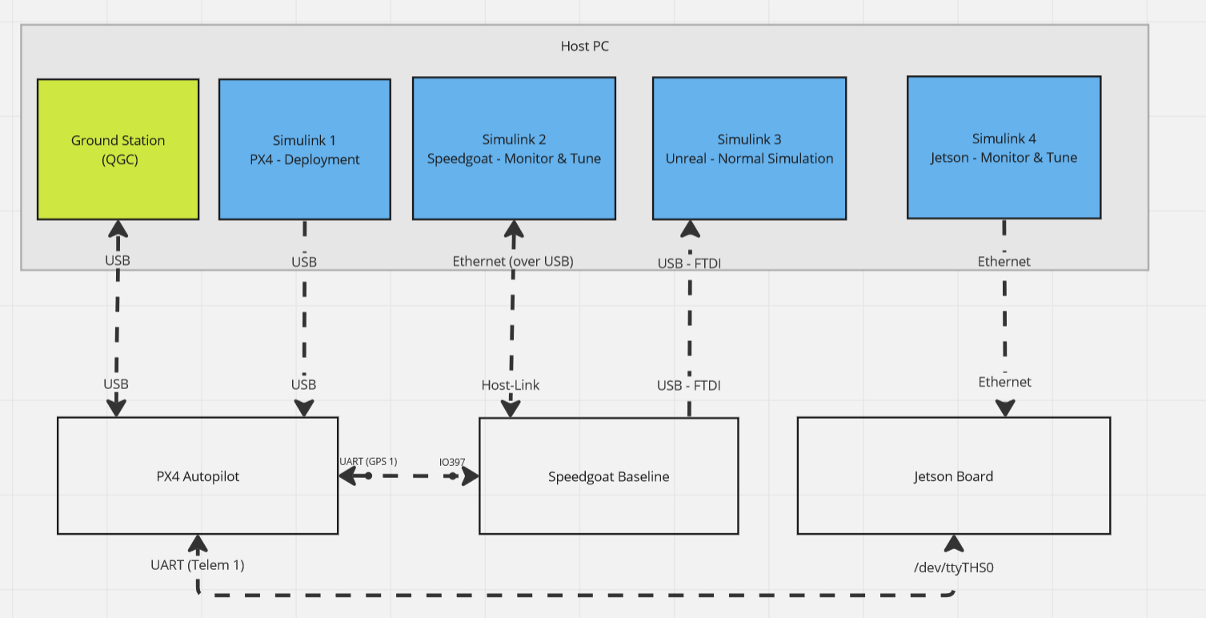
This diagram shows all hardware connections for this setup. The Jetson connection is only required for onboard obstacle avoidance.
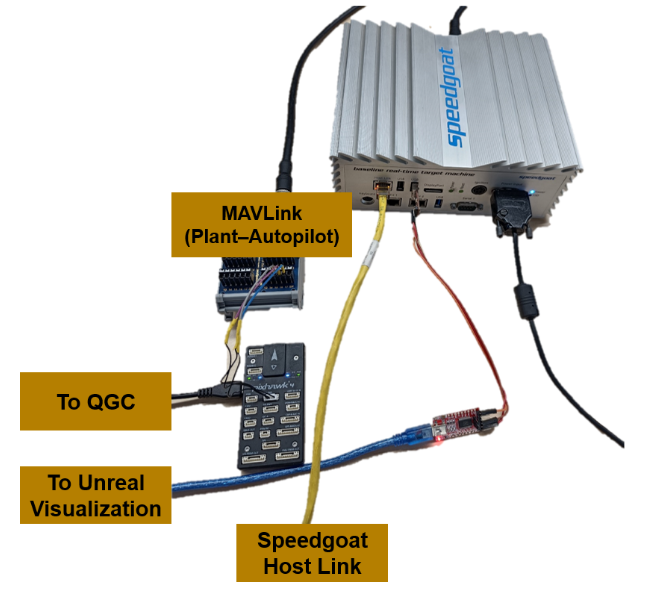
This image shows the physical connections from Pixhawk to Speedgoat and the host PC.
Connect Speedgoat to PX4 Autopilot
Connect the Pixhawk GPS 1 port to the Speedgoat IO397 Terminal board using this pin mapping.
| Pixhawk (GPS 1) | IO397 Terminal board |
|---|---|
| Tx | 16b |
| Rx | 15b |
| GND | 17b |
Connect Speedgoat to Unreal Visualization
The Unreal visualization model runs on the same host PC as QGroundControl and Simulink Real-Time. Connect Speedgoat to the host PC for Unreal visualization using FTDI adapters:
Connect an FTDI adapter to the USB port on the right side of the Speedgoat.
Connect the TX of the first FTDI to the RX of a second FTDI, and vice versa. Also connect GND.
Connect the second FTDI adapter to the host PC.
Configure Network Connection to Speedgoat
Connect the Speedgoat machine to the host PC over an Ethernet-USB converter.
Depending on the operating system installed on the host PC, use these links to configure your network adapter to communicate with Speedgoat.
For Windows: Enable Development Computer Communication (Windows) (Simulink Real-Time)
For Linux: Enable Development Computer Communication (Linux) (Simulink Real-Time)
Open
slrtExplorer, configure the IP address, and update the Speedgoat firmware. For more details, see the Configure Target, Update, and Reboot (Simulink Real-Time) example.If you are not yet connected to the target computer, click Disconnected to change it to Connected.
Set PX4 Parameters in QGroundControl
Set the parameter values in QGroundControl as shown in this table.
| Parameter | Value |
|---|---|
SER_GPS1_BAUD | 921600 8N1 |
SER_TEL1_BAUD | 230400 8N1 |
MAV_0_CONFIG | TELEM 1 |
MAV_0_FORWARD | 1 |
MAV_0_MODE | Onboard |
MAV_0_RADIO_CTL | 1 |
MAV_0_RATE | 1200 B/s |
MAV_1_CONFIG | GPS1 |
MAV_1_FORWARD | 0 |
MAV_1_MODE | Config |
MAV_1_RATE | 0 B/s |
Next Steps
After completing the hardware setup, configure your Simulink plant model with the appropriate Speedgoat serial port driver blocks for communication with PX4 Autopilot and Unreal visualization. For a complete example, see Run PX4 Hardware‑in‑the‑Loop Simulation with Quadcopter Plant on Speedgoat.

