PX4 Autopilot in Hardware-in-the-Loop (HITL) Simulation with Speedgoat in Simulink
This example shows how you the use the UAV Toolbox Support Package for PX4® Autopilots to deploy a quadcopter plant dynamics model into Speedgoat Real-Time target machine and perform hardware-in-the-loop simulation. Additionally, you can validate your control logic running on PX4 Autopilot against nominal and adverse conditions such as sensor failures.
In summary, this example demonstrates the following workflows.
Real-Time simulation of plant and sensors in Speedgoat®.
Controller deployment to PX4 Autopilot.
Photorealistic simulation using Unreal Engine®, based on plant states obtained from Speedgoat.
The plant model establishes communication with PX4 Autopilot to exchange sensor and actuator data. Furthermore, it shares the UAV ground truth, including position and orientation, with the host PC running the photorealistic simulation.
Prerequisites
If you are new to Simulink®, watch the Simulink Quick Start video.
Complete the Speedgoat and Simulink Real-Time Setup instructions to setup Speedgoat and Simulink Real-Time™.
Configure and set up Pixhawk® in HITL mode. For more information, see Setting Up PX4 Autopilot in Hardware-in-the-Loop (HITL) Mode from QGroundControl.
Setup the PX4 Firmware as mentioned in Set Up PX4 Firmware for Hardware-in-the-Loop (HITL) Simulation. In the Select a PX4 Autopilot and Build Target screen, select any Pixhawk Series board as the PX4 Autopilot board and corresponding build target having
_multicopterkeyword from the drop-down list.
Required Third-Party Software
This example requires this third-party software:
Launch First Session of MATLAB and MATLAB Project
1. Launch first session of MATLAB®.
2. Open the px4demo_HITLSimulinkPlantSpeedgoat project.
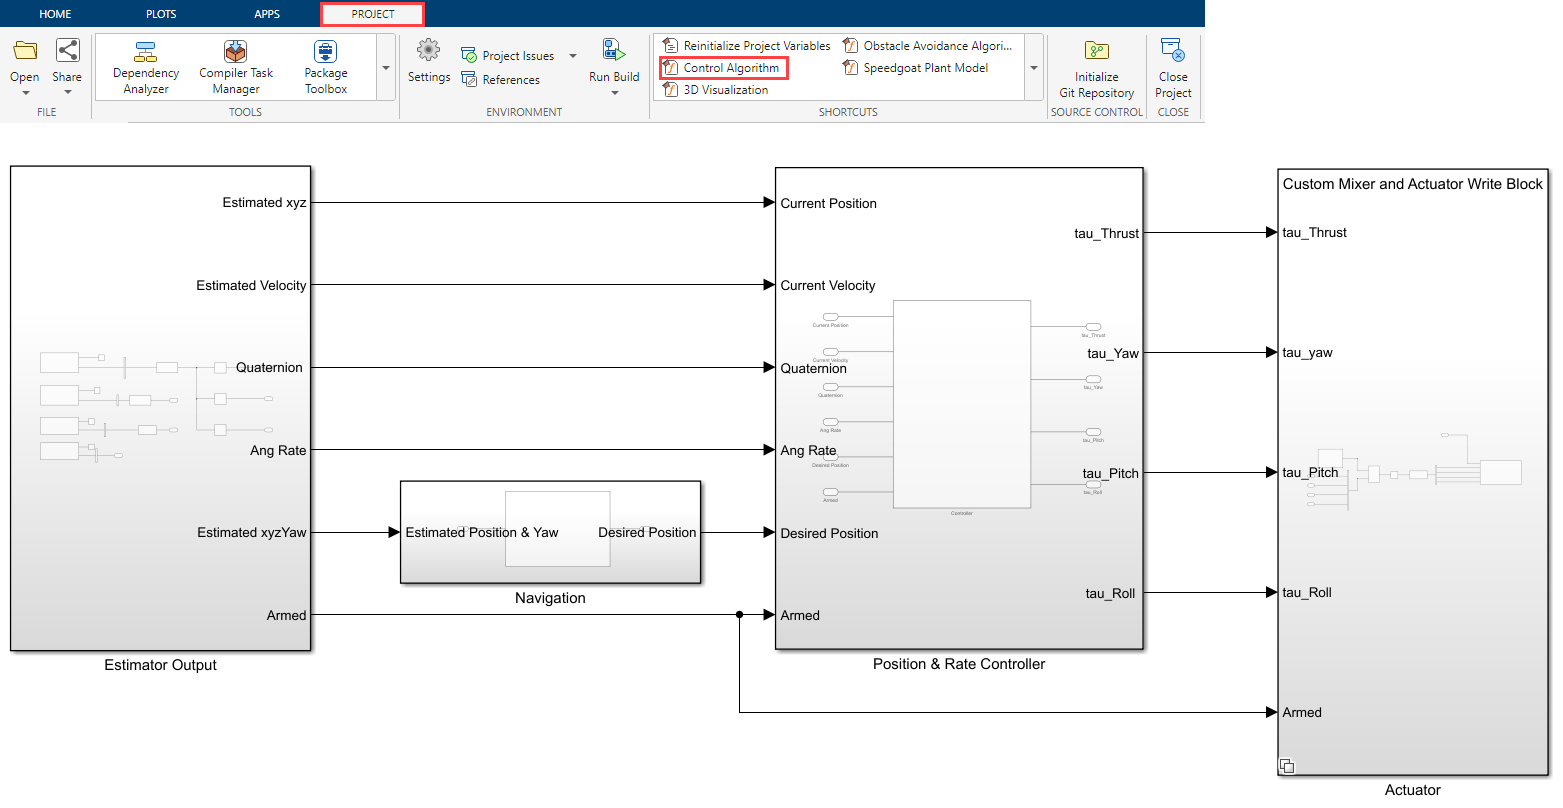
3. Once you open the project, click the Project tab on the MATLAB toolstrip and click Control Algorithm to launch the controller model (Quadcopter_ControllerWithNavigation).
4. In the Project tab, click Speedgoat Plant Model to launch the Simulink plant model (UAV_Dynamics_Speedgoat).

Configure Simulink Controller Model for HITL Mode
1. The controller model is configured to run in HITL mode. If you are not using this example model, follow the instructions as described in Configure Simulink Model for Deployment in Hardware-in-the-Loop (HITL) Simulation.
Note: This step is not required in the pre-configured model. Complete this step if you have changed the hardware or not using the pre-configured model.
2. Click Build, Deploy & Start from Deploy section of Hardware tab in the Simulink Toolstrip for the Controller model Quadcopter_ControllerWithNavigation.

This deploys the controller code on the Pixhawk hardware and launches the QGroundControl (QGC).
Note: If you are using Ubuntu®, QGC might not launch automatically. To launch QGC, open Terminal and go to the location where QGC is downloaded and run the following command:
./QGroundControl.AppImage
Launch Second Session of MATLAB and Open the Flight Visualization Model
1. Launch second instance of the same MATLAB version.
2. Open the px4demo_HITLSimulinkPlantSpeedgoat project.
3. In the Project tab, click 3D Visualization to launch the Flight Visualization model named Unreal_3DVisualization.


4. Open Read Serial Port helper block and select the serial port connecting Speedgoat with host PC.
5. On the Simulation tab, click Run to simulate the model. Once the model start running, you will see the Unreal® simulation environment getting launched.
Deploy Plant Model to Speedgoat
1. In the Project tab, click Speedgoat Plant Model to launch the Simulink plant model (UAV_Dynamics_Speedgoat).

2. In the Real-Time tab on the Simulink toolstrip, select the Speedgoat kit under Target Platform.
3. In the Simulink toolstrip, on the Simulation tab, click Run to simulate the model.

4. On the Hardware tab, in the Mode section, select Run on board and then click Monitor & Tune to deploy the Plant model.
Upload Mission from QGroundControl and Fly the Autopilot
1. In the QGC, configure the actuators. For more information, see Configure and Assign Actuators in QGC.

2. Navigate to the Plan View.

3. Create a mission. For information on creating a mission, see Plan View.
After you create a mission, it will be visible in QGC.
4. Click Upload button in the QGC interface to upload the mission from QGroundControl.
5. Navigate to Fly View to view the uploaded mission.
6. Start the Mission in QGC. The PX4 Autopilot should follow the mission path.
Other Things to Try
Try testing the controller in adverse conditions such as GPS failure and so on.