Reading GPS Data from PX4 Autopilot
This example shows how to obtain the data from a GPS device connected to PX4 flight controller, using UAV Toolbox Support Package for PX4® Autopilots.
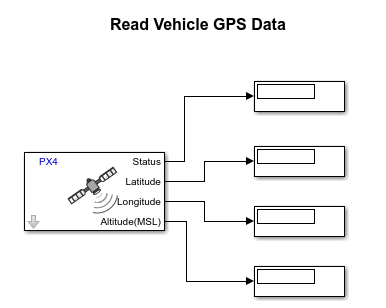
The example uses a pre-defined Simulink model (px4demo_readGPS) that contains the GPS block. The GPS block gets the GPS data by reading the sensor_gps uORB message.
Prerequisites
If you are new to Simulink®, watch the Simulink Quick Start video.
Perform the initial Setup and Configuration of the support package using Hardware Setup screens.
Required Hardware
To run this example, you will need the following hardware:
Pixhawk® Series flight controller
Micro USB type-B cable
GPS device
Micro-SD card (already used during the Performing PX4 System Startup from SD Card)
Micro-SD card reader
Configure and Deploy the Model
In this task, you will configure and run the pre-defined Simulink model (px4demo_readGPS) to verify the GPS data. While running the model, you can select either Monitor and Tune option or the Connected IO option. This model contains the GPS block that reads sensor_gps uORB topic. After you verify the GPS data, you deploy the model to the PX4 hardware board.
1. Open the px4demo_readGPS model.

In the example model, the GPS block is used to read GPS values. This block accepts signals from the sensor_gps uORB message, and outputs the required values.
2. Double-click the GPS block. By default, signals corresponding to Latitude, Longitude, and Altitude(MSL) are selected as outputs. You can add the other signals as output by selecting the corresponding checkboxes.
Note: The Status output indicates if the uORB message was received during a previous time step or not. A value of 0 indicates that the uORB data at the output is the latest, and a value of 1 indicates that the uORB data was received during the previous time step. This output can be used to trigger subsystems for processing new messages received in the uORB network.
3. In the Modeling tab, click Model Settings.
4. In the Configuration Parameters dialog box, navigate to the Hardware Implementation pane:
Set the Hardware board to the same PX4 hardware board that you selected during Hardware Setup screens.
In the Target Hardware Resources section, set the Build options to Build, load and run to automatically download the generated binary file on to the connected Pixhawk Series flight controller.
Enter the serial port of the host computer to which the Pixhawk Series flight controller is connected, in the Serial port for firmware upload field.
In the External mode pane, select the option Use the same host serial port for External mode as used for firmware upload.
5. Navigate to Solver pane and select the option Treat each discrete rate as a separate task. Click OK.
6. In the Simulation tab, specify the stop time for parameter tuning simulation. The default value for the Stop time parameter is 10.0 seconds. To run the model for an indefinite period, enter inf.
7. Connect the USB cable from the PX4 flight controller to the host computer.
8. Run the model using one of the following options.
Monitor & Tune: To run the model for signal monitoring and parameter tuning, on the Hardware tab, in the Mode section, select Run on board and then click Monitor & Tune to start signal monitoring and parameter tuning.

Wait for the code generation to be completed. Whenever the dialog box appears instructing you to reconnect the flight controller to the serial port, click OK and then reconnect the PX4 Autopilot on the host computer.

The lower left corner of the model window displays status while Simulink prepares, downloads, and runs the model on the hardware.
Connected IO: To run this model in the Connected I/O mode, on the Hardware tab, in the Mode section, select Connected IO and then click Run with IO.

If the Connected IO firmware is not deployed on the hardware, then the dialog box instructing you to reconnect the flight controller to the serial port appears otherwise the dialog box is not displayed. If the dialog box appears, click OK and then reconnect the PX4 Autopilot on the host computer.
9. Verify the output GPS values in the Scope display. The values correspond to the current GPS position of the PX4 flight controller.
10. Stop the Monitor and Tune operation by clicking Stop in the Hardware tab.
11. On the Hardware tab, in the Mode section, select Run on board and then click Build, Deploy & Start. The model is deployed to the PX4 hardware board.