System Composer Comparison Tool
Description
The Comparison Tool in System Composer™ is an interactive tool for visualizing and merging differences between two System Composer architecture models and their associated data.
Using the Comparison Tool, you can:
Compare and review changes in architecture model files.
Visualize and highlight changes in the System Composer Editor.
In R2026a: Export the comparison results to send for peer review.
In R2026a: Use merge mode to port or restore changes in different architecture models.
The comparison report shows differences for these types of architectural data:
Model structural differences (components, ports, and connectors)
Different types of supported components and ports
Data dictionaries
Owned port interfaces
Applied stereotypes and property value changes on model elements
Profiles (since R2025a)
Architecture views
Sequence diagrams (since R2025a)
Parameters
Simulink® properties
Rows in the comparison report are highlighted according to the type of difference:
Insertion
 — Added elements to the right side that did not exist
on the left side
— Added elements to the right side that did not exist
on the left sideDeletion
 — Removed elements that did exist on the left side but
not on the right side
— Removed elements that did exist on the left side but
not on the right sideModification
 — Changes to existing elements that exist on both the
left and right sides
— Changes to existing elements that exist on both the
left and right sides
For the Simulink version of this tool, see Comparison Tool.

Open the System Composer Comparison Tool
You can select files and folders on disk to compare using one of these methods:
Files or Project panel — To compare two files on disk, select both files. Then, right-click and select Compare Selected Files/Folders. The Comparison Tool opens the file you select first on the left.
Command Window — Use the
visdifffunction.
For files under source control, you can open the Comparison Tool to understand differences between revisions using one of the following methods.
Files or Project panel — To compare a file to its ancestor, select Source Control > View Changes. To compare the file to a different revision, right-click the file and select Show Revisions. In the Log dialog box, select the revision and click Compare to Local.
Source Control panel — To compare a file to its ancestor, in the Modified Files section, right-click the file and select View Changes. To compare the file to a different revision, right-click the file and select Show Revisions. In the Log dialog box, select the revision and click Compare to Local.
Branch Manager — To inspect changes in a file between two Git™ revisions, open the Branch Manager. Right-click and select Source Control > Branch Manager. In the Commit Differences pane, right-click a file and select Show Differences.
Examples
This example shows how to use the System Composer Comparison Tool to compare two Simulink® data dictionary (.sldd) files. You can view and merge the differences in the resulting comparison report.
The System Composer™ Comparison Tool shows a report that includes the differences between data stored in each section of the data dictionary.
The Design Data section of the report includes changes to MATLAB® variables, Simulink parameters, Simulink signals, and Simulink objects.
The Architectural Data section of the report includes changes to interfaces and their elements, value types, and other defined types, such as alias, numeric, and enumerated types.
The Configurations section of the report includes changes to the parameters of the configuration set.
The data dictionary in this example stores data for a quadcopter architecture. For more information about the quadcopter architecture, see Develop and Verify a Quadcopter System Architecture.
Compare Data Dictionary Differences
A colleague made changes to the dictionary QuadData and saved the resulting dictionary as QuadDataEdited. Use the visdiff function to compare the data dictionary files.
visdiff("QuadData.sldd","QuadDataEdited.sldd");
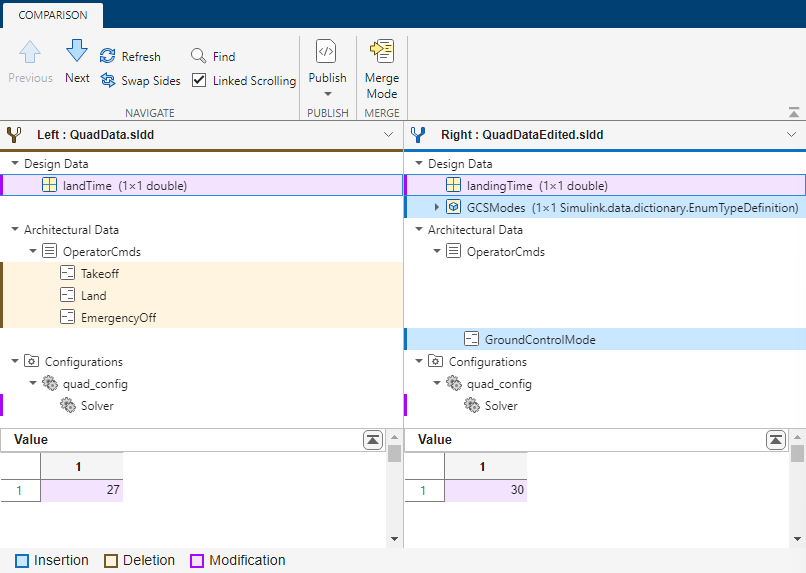
The System Composer Comparison Tool shows a report that includes differences between data stored in the data dictionary. In this example report, the tool selects the landTime node and shows the details in a pane on the bottom of the report. In the details pane, the Value property of the variable is changed to 30.
Go through the comparison report to explore the differences in these dictionary files. To step through the differences, on the Comparison tab, in the Navigate section, use the Next and Previous buttons.
The comparison report displays:
In the Design Data section, an enumerated type called
GCSModesis added. To show the structure of the enumerated type, expand theGCSModesnode.In the Architectural Data section, the
OperatorCmdsdata interface is changed. TheTakeoff,Land, andEmergencyOffelements are deleted, and a new element calledGroundControlModeis added.In the Configurations section, the StopTime parameter value is changed to
20.
To learn more about specific changes, you can select a row in the comparison report. The tool shows the details in a pane on the bottom of the report.
Merge Changes in Data Dictionaries
You can use merge mode to port changes between data dictionary files using two-way merge.
In the Comparison toolstrip, click Merge Mode. The Comparison Tool expands the first change and opens a Target pane at the bottom of the report. This action also creates a third file,
targetFile, which can contain the changes from either the left data dictionary (QuadData) or right data dictionary (QuadDataEdited).Use the buttons in the Target tree to select the differences to keep in the target file.
Click Next to navigate to the next difference.
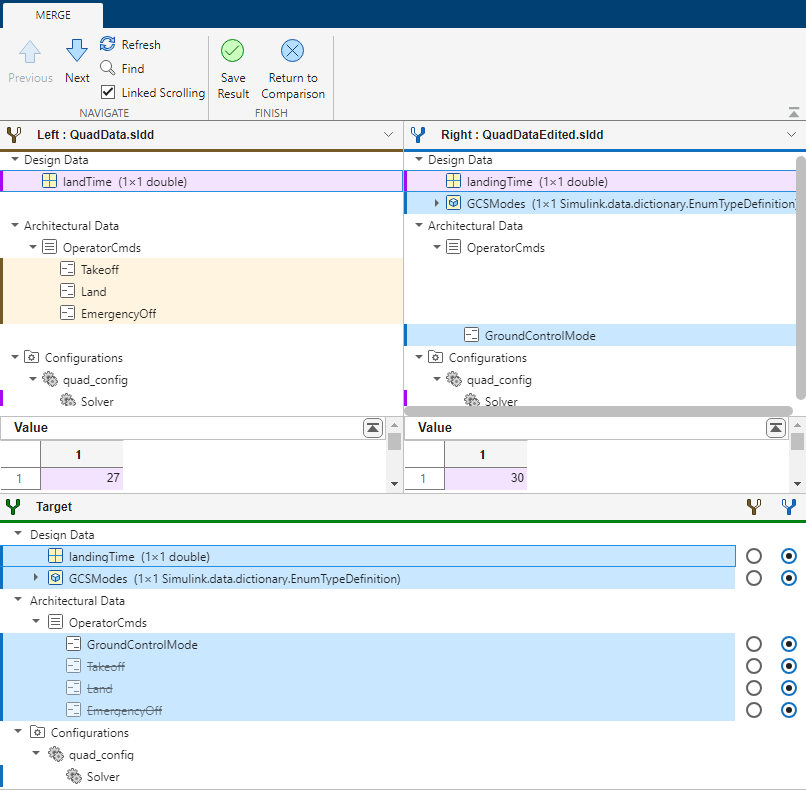
When you finish merging changes, save your choices in the temporary targetFile file using the Save Result button. To cancel all operations instead, click Return to Comparison without saving the file. Inspect your changes in the Model Explorer.
Since R2025a
This example shows how to use the System Composer Comparison Tool to compare two System Composer™ profiles. You can view and merge the profile differences in the resulting comparison report.
The model in this example represents a mobile robot hardware architecture, and the profile defines stereotypes and properties to extend element types with metadata. For more information about the model, see Compose and Analyze Systems Using Architecture Models. For more information about profiles, see Extend System Composer Language Elements Using Profiles.
Compare Profile Differences
A colleague made changes to the profile MobileRobotProfile and saved the resulting profile as MobileRobotProfileEdited. To compare the profile files, in the Files panel, select the two files. Right-click either file and select Compare Selected Files/Folders.
The System Composer Comparison Tool shows a report that includes the differences between profiles to include stereotypes and their properties. In this example report, the tool selects the CriticalProcess node and shows the details in a pane on the bottom of the report. In the details pane, the newly added CriticalProcess stereotype properties are listed.

Go through the comparison report to explore the differences in these profile files. To step through the differences, on the Comparison tab, in the Navigate section, use the Next and Previous buttons.
The comparison report displays:
The <Default> property value of the
TypeOfConnectionproperty ofDataConnectorstereotype is changed to'USB'.A new property called
Manufactureris added to theMechanicalComponentstereotype.A new property called
UnitCostis added to theMechanicalComponentstereotype.A new stereotype called
PhysicalPortis added.The
PowerSupplystereotype is deleted.
To learn more about specific changes, you can select a row in the comparison report. The tool shows the details in a pane on the bottom of the report.
Merge Changes in Profiles
You can use merge mode to port changes between profile files using two-way merge.
In the Comparison toolstrip, click Merge Mode. The Comparison Tool expands the first change and opens a Target pane at the bottom of the report. This action also creates a third file,
targetFile, which can contain the changes from either the left profile (MobileRobotProfile) or right profile (MobileRobotProfileEdited).Use the buttons in the Target tree to select the differences to keep in the target file.
Click Next to navigate to the next difference.

When you finish merging changes, save your choices in the temporary targetFile file using the Save Result button. To cancel all operations instead, click Return to Comparison without saving the file. Inspect your changes in the Profile Editor.
Since R2025a
This example shows how to use the System Composer Comparison Tool to compare two System Composer™ sequence diagrams. You can view the differences between diagram elements such as lifelines, fragments, operands, messages, annotations, and duration constraints.
The model and sequence diagram in this example describes scenarios related to a pedestrian crossing an intersection with traffic lights. For more information about authoring sequence diagrams, see Author Sequence Diagrams Interactively.
Compare Diagram Element Differences
A colleague made changes to the sequence diagram of the architecture model SequenceDiagramComparisons and saved the resulting model as SequenceDiagramComparisonsEdited. Use the vissdiff function to compare the architecture models.
visdiff("SequenceDiagramComparisons.slx","SequenceDiagramComparisonsEdited.slx");
The System Composer Comparison Tool shows a report that includes the differences between sequence diagram elements. The report does not include differences between model elements because no model elements changed between the two models. In this example report, the tool selects the Inhibit_v1 node and shows the details in a pane on the bottom of the report. In the details pane, the Name property value is changed to Inhibit_v2.

Go through the comparison report to explore the differences in these sequence diagrams. To step through the differences, on the Comparison tab, in the Navigate section, use the Next and Previous buttons.
The comparison report displays:
The
When inhibit is trueannotation is deleted.A new duration constraint is added with the Expression property value set to
t > 12msecbetween thepedRequestandswitchPedmessage events.The Condition property of the first message is modified to be
rising(sw-1){sw==1}.
To learn more about specific changes, select a row in the comparison report. The tool shows the details in a pane on the bottom of the report.