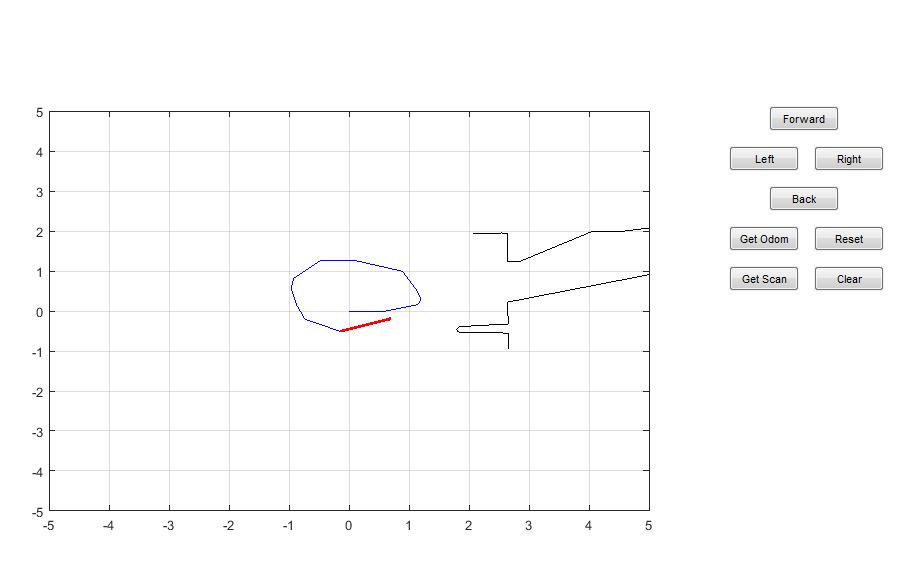
Create a UI for TurtleBot
This example shows how to create a UI for collecting sensor data and controlling a TurtleBot® robot. You can use the UI to get and display odometry data and laser scan readings and to teleoperate the robot by sending it velocity commands.
For this example, specify all code and dependent callback functions in a single MATLAB® function file.
Set Up the UI and Its Components
Create a function that sets up the UI for controlling the robot. Specify the dimensions of the buttons and the callbacks associated with each button.
Specify the function header for the UI.
function turtlebot_UICreate the UI and hide it as you build it.
f = figure('Visible','off','Position',[50,50,900,570]);
Add the components for the different buttons and for the axes used to plot data. It is important to specify the 'Callback' name-value pair with the correct function handles. These functions are specified at the end.
hforward    = uicontrol('Style','pushbutton',...
                 'String','Forward','Position',[770,440,70,25],...
                 'Callback',@forwardCB);
hleft   = uicontrol('Style','pushbutton',...
                 'String','Left','Position',[730,400,70,25],...
                 'Callback',@leftCB);
hright  = uicontrol('Style','pushbutton',...
                 'String','Right','Position',[815,400,70,25],...
                 'Callback',@rightCB);
hback  = uicontrol('Style','pushbutton',...
                 'String','Back','Position',[770,360,70,25],...
                 'Callback',@backCB);
hgetOdom    = uicontrol('Style','pushbutton',...
                 'String','Get Odom','Position',[730,320,70,25],...
                 'Callback',@getOdomCB);
hreset    = uicontrol('Style','pushbutton',...
                 'String','Reset','Position',[815,320,70,25],...
                 'Callback',@resetCB);
hgetScan    = uicontrol('Style','pushbutton',...
                 'String','Get Scan','Position',[730,280,70,25],...
                 'Callback',@getScanCB);
hclear    = uicontrol('Style','pushbutton',...
                 'String','Clear','Position',[815,280,70,25],...
                 'Callback',@clearCB);
ha = axes('Units','pixels','Position',[50,60,600,400]);
Show the UI after adding all the components by setting Visible to 'on'.
% Make UI visible
    f.Visible = 'on';
Connect to Robot
Connect to your TurtleBot robot using its specific IP address. Your simulated or real TurtleBot must be on the same ROS network as the computer running MATLAB.
ipaddress = '192.168.192.130'; % IP address of your robot
tbot = turtlebot(ipaddress,11311);
tbot.Velocity.TopicName = '/cmd_vel';
Initialize the variables needed for sensor data. Reset the odometry of the TurtleBot.
odomList = [];
scanPts = [];
resetOdometry(tbot);
Specify Callback Functions for UI Buttons
Each UI button has a callback function that activates when the button is pressed. You specify these functions inside your turtlebot_UI function file.
Create directional button callbacks for controlling the robot.
    function forwardCB(source,eventdata)
        setVelocity(tbot,0.25,0)
    end

    function leftCB(source,eventdata)
        setVelocity(tbot,0,0.25)
    end

    function rightCB(source,eventdata)
        setVelocity(tbot,0,-0.25)
    end

    function backCB(source,eventdata)
        setVelocity(tbot,-0.25,0)
    end
The inputs to setVelocity are the interface object, turtlebot, and the linear and angular velocities.
Create callbacks to get and clear odometry and laser scan data. plotOdom and plotScan are convenience functions for plotting odometry and laser scan to the current axes.
    function getOdomCB(source,eventdata)
        plotOdom
    end
    function resetCB(source,eventdata)
        resetOdometry(tbot);
        odomList = [];
        plotOdom
    end
    function getScanCB(source,eventdata)
        plotOdom
        hold on
        plotScan
        hold off
    end
    function clearCB(source,eventdata)
        scanPts = [];
        plotOdom
    end
Specify the plotOdom and plotScan functions, which plot the sensor data on the current axes in the UI.
function plotOdom
    % Gets and plots current and saved odometry
        odom = getOdometry(tbot);
        odomList = [odomList; odom.Position(1) odom.Position(2)];
        plot(odomList(:,1),odomList(:,2),'b')
        hold on
        quiver(odom.Position(1),odom.Position(2),...
                cos(odom.Orientation(1)),sin(odom.Orientation(1)),'r',...
                'LineWidth',2)
        hold off
        xlim([-5,5])
        ylim([-5,5])
        grid on
    end

    function plotScan
    % Plots laser scan data on top of current odometry
         [scan,scanMsg] = getLaserScan(tbot);
         odom = getOdometry(tbot);
         cart = readCartesian(scanMsg);
         scanPts = [cart(:,1)+odom.Position(1) cart(:,2)+odom.Position(2)];
         yaw = odom.Orientation(1);
         R = [cos(yaw) -sin(yaw);  sin(yaw) cos(yaw)];
         scanPts = (R*scanPts')';
         plot(scanPts(:,1),scanPts(:,2),'k')
         xlim([-5,5])
         ylim([-5,5])
         grid on
    end
End the turtlebot_UI function. Make sure that all the example code is between this end and the function header.
endRun UI and Control the Robot
Call turtlebot_UI to run the function. The UI is created and connects to the robot. Set up your robot before running the UI.
turtlebot_UI
Use the buttons to move the robot. Click Get Odom to plot a new odometry point (blue) or Get Scan to plot the current laser scan data (black).

See Also
turtlebot | getOdometry | getLaserScan | setVelocity