Automate Labeling in Medical Image Labeler
This example shows how to implement a deep learning automation algorithm for labeling tumors in breast ultrasound images by using the Medical Image Labeler app.
Semantic segmentation assigns a class label to every pixel in an image. The Medical Image Labeler app provides manual, semiautomated, and automated tools to label medical images for semantic segmentation. Using automation, you can create and apply custom segmentation functions that use image processing or deep learning. For an example that shows how to train the network used in this example, see Breast Tumor Segmentation from Ultrasound Using Deep Learning.
Download Pretrained Network
Create a folder to store the pretrained network and image data set.
dataDir = fullfile(tempdir,"BreastSegmentation");
if ~exist(dataDir,"dir")
    mkdir(dataDir)
end
Download the pretrained DeepLab v3+ network and test image by using the downloadTrainedNetwork helper function. The helper function is attached to this example as a supporting file.
pretrainedNetwork_url = "https://www.mathworks.com/supportfiles/"+ ...
    "image/data/breast_seg_deepLabV3_v2.zip";
downloadTrainedNetwork(pretrainedNetwork_url,dataDir);
Download Image Data
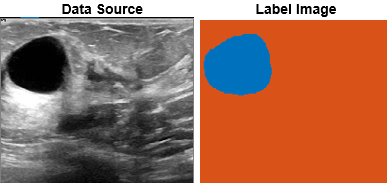
This example uses a subset of the Breast Ultrasound Images (BUSI) data set [1]. The BUSI data set contains 2-D ultrasound images stored in the PNG file format. The total size of the data set is 197 MB. The data set contains 133 normal scans, 487 scans with benign tumors, and 210 scans with malignant tumors. This example uses images from the tumor groups only. Each ultrasound image has a corresponding tumor mask image. The tumor mask labels have been reviewed by clinical radiologists [1].
Run this code to download the data set from the MathWorks® website and unzip the downloaded folder.
zipFile = matlab.internal.examples.downloadSupportFile("image", ...
    "data/Dataset_BUSI.zip");
filepath = fileparts(zipFile);
unzip(zipFile,filepath)
The imageDir folder contains the downloaded and unzipped data set.
imageDir = fullfile(filepath,"Dataset_BUSI_with_GT");Extract a subset of 20 benign tumor images to a new folder, dicomDir. Write the copied images in the DICOM file format, which the Medical Image Labeler supports.
imds = imageDatastore(fullfile(imageDir,"benign","*).png"));

dicomDir = fullfile(dataDir,"images");
if ~exist(dicomDir,"dir")
    mkdir(dicomDir)
    for i = 1:20
        I = imread(imds.Files{i});
        [~,filename,~] = fileparts(imds.Files{i});
        dicomwrite(I,fullfile(dicomDir,filename+".dcm"));
    end
end
Load Data Source Images into Medical Image Labeler
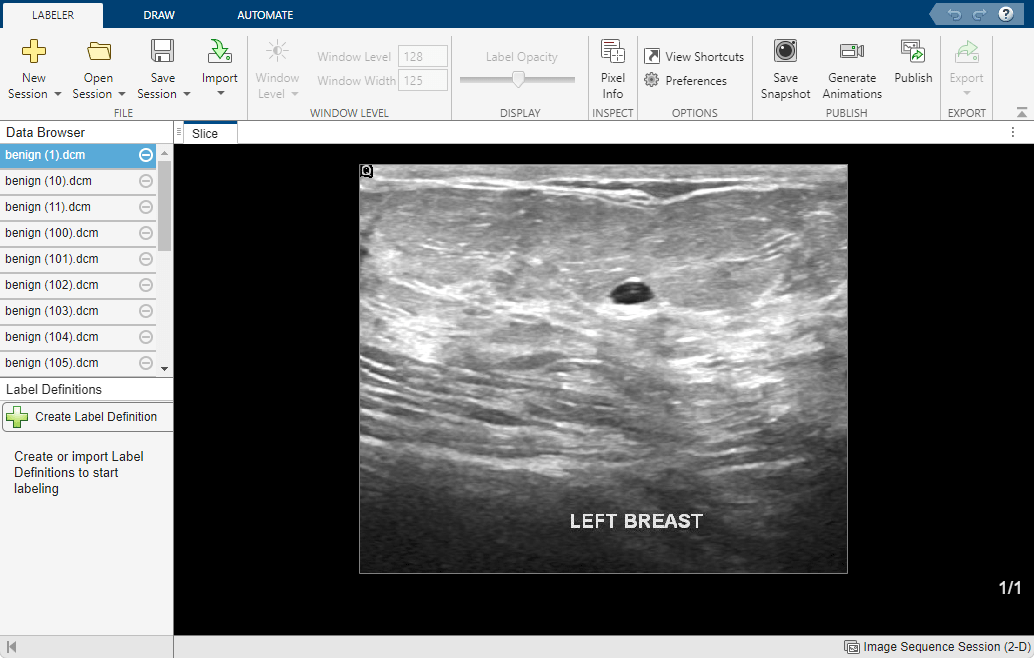
Run this code to open the Medical Image Labeler app and create a new 2-D image session. The app launches and opens the Create a new session folder dialog box. In the dialog box, specify a location to save the new session folder by entering a path or selecting Browse and navigating to your desired location. Then, select Create Session.
medicalImageLabeler("Image")To load the ultrasound images into the app, on the app toolstrip, click Import. Then, under Data, select From File. Browse to the location of dicomDir. You can find the value of dicomDir in the workspace. Select all of the files by clicking the first filename, pressing Shift, and clicking the last filename. Click Open. The app loads the files and lists the names in the Data Browser pane.
Create Label Definition
A label definition specifies the name, color, and numeric index of a label. In the Label Definitions pane, select Create Label Definition to create a label with the default name Label1. To change the name of the label, click the label and enter a new name. The label name must be a valid MATLAB® variable name with no spaces. For this example, specify the name of the label as tumor.

Create Automation Algorithm
In the Automate tab of the app toolstrip, click Add Algorithm and select New > Function Template. In the function template, enter code for the automation algorithm and click Save. This example uses the default name for the algorithm, myalgorithm, but you can specify any name. The automation function must have two inputs, I and MASK.
Iis the input data source image, which in this example is the ultrasound image. When you run the algorithm, the app automatically passes the data source image selected in the Data Browser to the algorithm asI.MASKis the initial label image. When you run the algorithm, the app automatically passes the currently selected label in the Label Definitions pane to the algorithm asMASK. The label image can be empty or contain some labeled pixels.
The automation function must return one output, MASK, which is the final label image. The MASK image must be a logical array of the same size as I, with pixels valued as true where the label is present.
The algorithm function used in this example, myalgorithm, performs these steps:
Resize the input image
Ito the input size of the network.Load the pretrained network.
Apply the network to the input image
Iby using thesemanticsegfunction. The network returns the segmented image,segmentedImg, as a categorical array with labels"tumor"and"background".Convert the categorical label matrix to a binary image that is
truewithin thetumorlabel region.Resize the logical label mask,
MASK, back to the original size of the input image.
function MASK = myalgorithm(I,MASK)
%Medical Image Processing Function
%
% I      - RGB or grayscale image I that corresponds to the image data of
%          the slice during automation.
% MASK   - A logical array where the first two dimensions match the first
%          two dimensions of input image I. If the user has already created
%          a labeled region, MASK may have pixels labeled as true when
%          passed to this function.
%

%--------------------------------------------------------------------------
% Auto-generated by the Medical Image Labeler App.
%
% When used by the App, this function will be called for every slice of the
% volume as specified by the user.
%
%--------------------------------------------------------------------------


% Replace the sample below with your code----------------------------------
imsize = size(I);
networkSize = [256 256];
I = imresize(I,networkSize);

persistent trainedNet

if isempty(trainedNet)
pretrainedFolder = fullfile(tempdir,"BreastSegmentation");
savedData = load(fullfile(pretrainedFolder,"breast_seg_deepLabV3_v2.mat"));
trainedNet = savedData.trainedNet;
end

classNames = ["tumor","background"];
segmentedImg = semanticseg(I,trainedNet,Classes=classNames);
MASK = segmentedImg=="tumor";
MASK = imresize(MASK,imsize(1:2));

%--------------------------------------------------------------------------

end
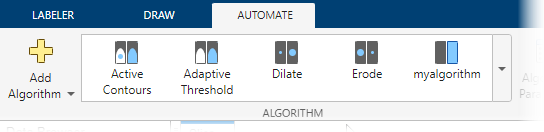
Close the function template. In the Automate tab of the app toolstrip, your new algorithm appears in the Algorithm gallery.
Run Automation Algorithm
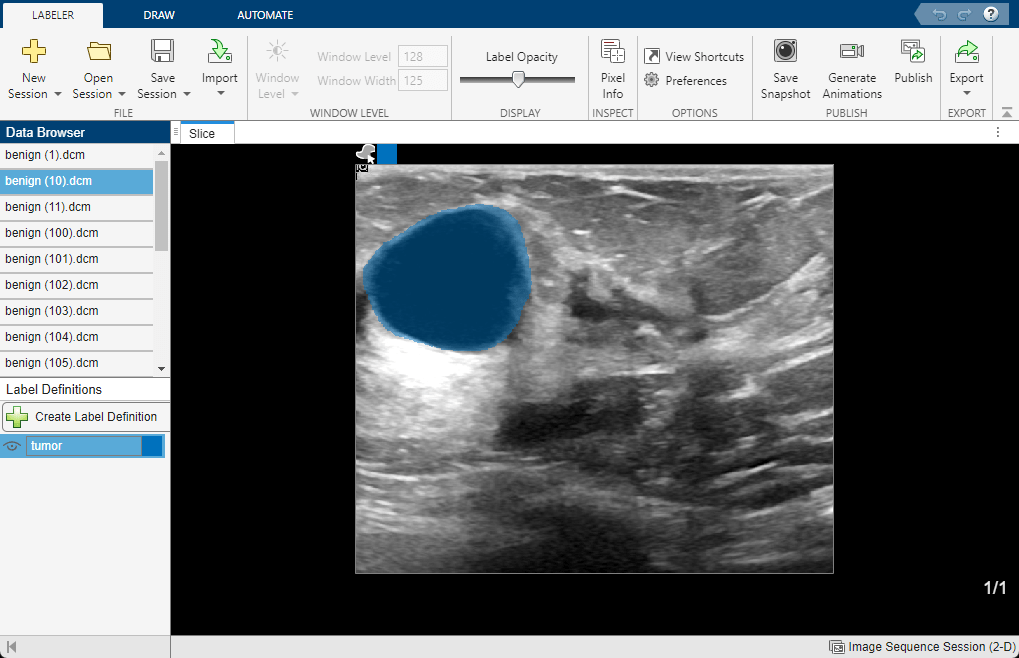
Select the image to run the algorithm on in the Data Browser pane. Make sure that the tumor label definition is selected in the Label Definitions pane. In the Automation tab of the app toolstrip, in the Algorithm gallery, select myAlgorithm and select Run. If your data is a multiframe image series, you can adjust the Direction settings to specify whether the algorithm is applied to the current frame, from the current frame back to the first frame, or from the current frame to the last frame. Alternatively, you can directly enter a custom frame range using the Start and End text boxes.
When the algorithm finishes running, the label image appears in the Slice panel. View the label image to visually check the network performance.

If you need to update the algorithm, reopen the function template in the location you specified when you saved the function template. Before rerunning an updated algorithm, you can remove labels from the first iteration by right-clicking on the filename in the Data Browser and selecting Remove Labels.
Apply Algorithm to Batch of Images
Once you are satisfied with your automation algorithm, you can apply it to each image loaded in the app one by one by selecting the next file in the Data Browser and selecting Run.
Alternatively, if you have many images to label, applying the algorithm outside the app can be faster. To apply the algorithm outside the app, first export the app data as a groundTruthMedical object. On the Labeler tab of the app toolstrip, select Export. Under Ground Truth, select To File. In the Export Ground Truth dialog box, navigate to the folder specified by dataDir and click Save.
After you export the ground truth data, run this code to load the groundTruthMedical object into the MATLAB workspace.
load(fullfile(dataDir,"groundTruthMed.mat"))Extract the list of label images in the groundTruthMedical object.
gTruthLabelData = gTruthMed.LabelData;
Find the data source images that contain no labels.
idxPixel = gTruthLabelData == "";
imagesNotProcessedIdx = find(idxPixel);
imageProcessedIdx = find(~idxPixel,1);
Find the name of the directory that contains the label images.
labelDataLocation = fileparts(gTruthLabelData(imageProcessedIdx));
Find the numeric pixel label ID for the tumor label definition.
idxPixel = strfind(gTruthMed.LabelDefinitions.Name,"tumor");
pixID = gTruthMed.LabelDefinitions.PixelLabelID(idxPixel);
Loop through the data source files with no labels, applying the myalgorithm function to each image. Write each output label image as a MAT file to the directory specified by labelDataLocation. Add the filenames of the new label images to the list gTruthLabelData.
for i = imagesNotProcessedIdx'

    imageFile = gTruthMed.DataSource.Source{i};

    medImage = medicalImage(imageFile);
    labels = zeros(size(medImage.Pixels,1:3),"uint8");

    for j = 1:medImage.NumFrames
    tumorMask = myalgorithm(extractFrame(medImage,j),[]);
    temp = labels(:,:,j);
    temp(tumorMask) = pixID;
    labels(:,:,j) = temp;
    end

    [~,filename] = fileparts(imageFile);
    filename = strcat(filename,".mat");
    labelFile = fullfile(labelDataLocation,filename);
    save(labelFile,"labels")

    gTruthLabelData(i) = string(labelFile);

end
Create a new groundTruthMedical object that contains the original ultrasound images and label definitions plus the new label image names.
newGroundTruthMed = groundTruthMedical(gTruthMed.DataSource, ...
    gTruthMed.LabelDefinitions,gTruthLabelData);
View the fully labeled data set by loading the new groundTruthMedical object in the Medical Image Labeler app. Upon launching, the app opens the Create a new session folder dialog box. You must use the dialog box to create a new app session to view the update groundTruthMedical object data.
medicalImageLabeler(newGroundTruthMed);
View different images by clicking filenames in the Data Browser. Running the algorithm on the batch of images is complete, so all of the images have tumor labels.
References
[1] Al-Dhabyani, Walid, Mohammed Gomaa, Hussien Khaled, and Aly Fahmy. “Dataset of Breast Ultrasound Images.” Data in Brief 28 (February 2020): 104863. https://doi.org/10.1016/j.dib.2019.104863.
See Also
Medical Image
Labeler | groundTruthMedical