Line
R2026bDescription
A Line object labels interactive lines in a
Viewer object. The properties of the object control the appearance and
behavior of the line annotation.
Interactive viewer-based ROIs enable you to draw, edit, and
measure regions of interest on images and volumes displayed using imageshow
and volshow. Interactive ROIs support dragging, resizing, event callbacks,
and measurement labels. Use interactive viewer-based ROIs to manually annotate an image, build
annotation workflows in apps, or respond to user interactions with ROI shapes. For a comparison
of interactive viewer-based ROIs with other ROIs, see Choose Approach to Annotate ROIs in Images.
Creation
You can create a Line object in these ways. For more information, see
Create Interactive Viewer-Based ROIs.
Interactively draw a line in a
Viewerobject. From the viewer toolbar, select the draw annotations icon , then select the draw line icon
 . Click the image to place the first endpoint, drag to
draw the line, and release to place the second endpoint. To export the line to the
workspace as a
. Click the image to place the first endpoint, drag to
draw the line, and release to place the second endpoint. To export the line to the
workspace as a Lineobject, right-click the ROI and select Export annotation to workspace.Use the
uidrawfunction to interactively draw the ROI in a specified viewer and create the ROI object.Use the
images.ui.graphics.roi.Linefunction described here. After you create the ROI, you can display it by adding the object to theAnnotationsproperty of aViewerobject.
Description
l = images.ui.graphics.roi.Line creates a Line
object with default property values. Use l to query and modify
properties of the Line object after you create it.
l = images.ui.graphics.roi.Line(Name=Value) sets one or more
writable properties using name-value
arguments.
Example: images.ui.graphics.roi.Line(Position=[35 3 1010; 40 80
1080]) creates a line annotation with endpoints at the
xyz-coordinates (35, 3, 1010) and (40, 80, 1080).
Properties
Shape and Position
Position of the ROI, specified as a 2-by-3 numeric matrix or a 2-by-2 numeric matrix. Each row defines the coordinates of one endpoint.
2-by-3 matrix — Specify each row as a set of xyz-coordinates in the form [
x y z].2-by-2 matrix — Specify each row as a set of xy-coordinates in the form [
x y]. The object sets the z-coordinate of each point to1.
The object always stores this property value as a 2-by-3 matrix.
This property is read-only.
Distance between the endpoints of the line, represented as a numeric scalar.
Color and Styling
ROI color, specified as an RGB triplet, a hexadecimal color code, a color name, or a short color name.
These are the RGB triplets for the default colors used in 2-D and 3-D
Viewer scenes.
| RGB Triplet | Appearance | Default Use |
|---|---|---|
[0 0.5610 1] |
| This is the default color when creating an ROI in a 2-D
Viewer object from the toolbar or by using the
uidraw function. |
[0.8660 0.3290 0] |
| This is the default color when creating an ROI in a 3-D
Viewer object from the toolbar or by using
uidraw. This color is also the default when you
create an ROI in any Viewer object by using an object
constructor function such as
images.ui.graphics.roi.Circle. |


For a custom color, specify an RGB triplet or a hexadecimal color code.
An RGB triplet is a three-element row vector whose elements specify the intensities of the red, green, and blue components of the color. The intensities must be in the range
[0,1], for example,[0.4 0.6 0.7].A hexadecimal color code is a string scalar or character vector that starts with a hash symbol (
#) followed by three or six hexadecimal digits, which can range from0toF. The values are not case sensitive. Therefore, the color codes"#FF8800","#ff8800","#F80", and"#f80"are equivalent.
Alternatively, you can specify some common colors by name. This table lists the named color options, the equivalent RGB triplets, and the hexadecimal color codes.
| Color Name | Short Name | RGB Triplet | Hexadecimal Color Code | Appearance |
|---|---|---|---|---|
"red" | "r" | [1 0 0] | "#FF0000" |
|
"green" | "g" | [0 1 0] | "#00FF00" |
|
"blue" | "b" | [0 0 1] | "#0000FF" |
|
"cyan"
| "c" | [0 1 1] | "#00FFFF" |
|
"magenta" | "m" | [1 0 1] | "#FF00FF" |
|
"yellow" | "y" | [1 1 0] | "#FFFF00" |
|
"black" | "k" | [0 0 0] | "#000000" |
|
"white" | "w" | [1 1 1] | "#FFFFFF" |
|








This table lists the default color palettes for plots in the light and dark themes.
| Palette | Palette Colors |
|---|---|
Before R2025a: Most plots use these colors by default. |
|
|
|


You can get the RGB triplets and hexadecimal color codes for these palettes using the
orderedcolors and rgb2hex
functions. For example, get the RGB triplets for the "gem" palette
and convert them to hexadecimal color
codes.
RGB = orderedcolors("gem");
H = rgb2hex(RGB);
Example: Color="r"
Example: Color="green"
Example: Color=[0 0.4470 0.7410]
Example: Color="#00FFFF"
ROI visibility, specified as "on" or "off", or as
. A value of "on" is equivalent to
true, and "off" is equivalent to
false. The value is stored as an on/off logical value of type
OnOffSwitchState.
| Value | Description |
|---|---|
"on" | Display the ROI. |
"off" | Hide the ROI without deleting it. You can still access the properties of an invisible ROI. |
ROI label, specified as a string scalar or character vector. By default, the label
shows the distance between the line endpoints with no units. If the parent
Viewer has a nondefault value for the
SpatialUnits property, such as "mm", then
the label includes the specified units.
To display a custom label, specify the label to display as a string scalar or
character vector. To display no label, specify the Label value as
"".
Interactivity
Interactivity of the ROI, specified as one of the values in this table.
| Value | Description |
|---|---|
"all" | You can fully interact with the ROI. Reshape the ROI by changing the position of individual drag points on the boundary of the ROI, or translate (move) the entire ROI. |
"none" | You cannot interact with the ROI or access the context menu. No drag points are visible. |
"reshape" | You can reshape the ROI by changing the position of individual drag points on the boundary of the ROI. |
"translate" | You can translate the entire ROI within the drawing area. No drag points are visible, and you cannot reshape the ROI. |
"click" | You can click the ROI, but you cannot translate the ROI
interactively. After you click the ROI, the parent
Viewer broadcasts the
AnnotationMoved event.
|
Identifiers
Tag to associate with the ROI, specified as a character vector or string scalar. This property has no effect on the display, and the viewer does not use this property. You can use this property to track annotations for app building.
Data to associate with the ROI, specified as any MATLAB data. For example, you can specify a scalar, vector, matrix, cell array, string, character array, table, or structure. This property has no effect on the display, and the viewer does not use this property. You can use this property to append metadata to the ROI for app building.
Object Functions
createMask | Create binary mask image from ROI |
Examples
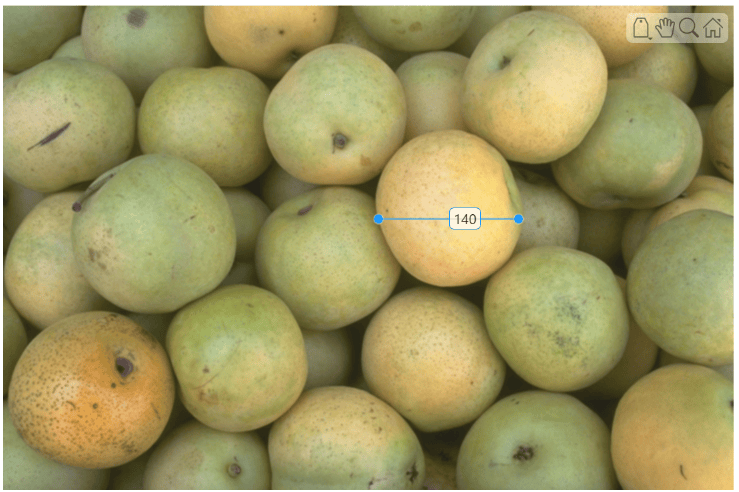
Display an image in a Viewer object. The viewer v is the parent of the image object created by imageshow.
img = imageshow("pears.png");
v = img.Parent;
Create a linear ROI on the image, using the Position property to specify the endpoints of the line.
position = [376 214; 516 214];
color = [0 0.5610 1];
l = images.ui.graphics.roi.Line(Position=position,Color=color);
Display the ROI by adding it to the Annotations property of the Viewer object.
v.Annotations = [v.Annotations; l];
Create a new viewer object by displaying a 10-by-10-by-10 cube.
V = ones(10,10,10);
vol = volshow(V);
Get a handle to the viewer window that contains the volume.
viewer = vol.Parent;
Create a line annotation object with default properties.
line1 = images.ui.graphics.roi.Line
line1 =
  Line with properties:

    Position: [2×3 single]
       Color: [0.8660 0.3290 0]

    Distance: 0
Create a line annotation with a custom position and color.
line2 = images.ui.graphics.roi.Line(Position=[11 1 11; 1 11 11],Color="magenta")line2 =
Line with properties:
Position: [2×3 single]
Color: [1 0 1]
Distance: 14.1421
Add the annotations to the viewer. Because both endpoints of the default line, in orange, are at (0, 0, 0), the length of the line is 0.
viewer.Annotations = [line1 line2];
To append spatial units to length labels, update the SpatialUnits property of the viewer.
viewer.SpatialUnits = "mm";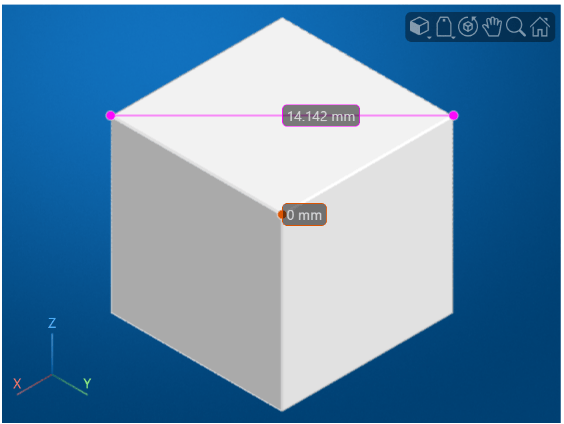
Tips
The
Lineobject supports these forms of interactivity.Behavior Interaction Add annotation From the viewer toolbar, select the draw annotations icon
, then select the draw line icon
. Click to place the first endpoint, drag to
draw the line, and release to place the second endpoint.Make drawn line snap at 15 degree angles Hold Shift while drawing. Move annotation To reposition one endpoint, drag the endpoint.
To reposition the whole line, including both endpoints, drag the line or hold Ctrl while you drag one of the endpoints.
Edit annotation label Right-click the line. From the context menu, select Edit label. When the label text highlights, type new text for the label. To finish editing, click outside the label. Remove annotation Right-click the line. From the context menu, select Remove annotation to remove the selected annotation. Select Remove all annotations to remove all annotations in the viewer. When placing annotations, consider zooming in or, for 3-D viewers, snapping to an orthogonal view for greater spatial accuracy. Zoom in using the scroll wheel or by selecting the zoom icon
 from the viewer toolbar. Snap to an orthogonal view by
clicking the orientation axes labels in the lower-left corner of the viewer.
from the viewer toolbar. Snap to an orthogonal view by
clicking the orientation axes labels in the lower-left corner of the viewer.

