Import Zenrin Japan Map API 3.0 (Itsumo NAVI API 3.0) into Driving Scenario
Zenrin Japan Map API 3.0 (Itsumo NAVI API 3.0) 1 , developed by ZENRIN DataCom CO., LTD., is a web service that enables you to access map data for areas in Japan. Using the Driving Scenario Designer app, you can import map data from the Zenrin Japan Map API 3.0 (Itsumo NAVI API 3.0) service and use it to generate roads for your driving scenarios.
This example focuses on importing map data in the app. Alternatively, to import
Zenrin Japan Map API 3.0 (Itsumo NAVI API 3.0) data into a drivingScenario object, use the roadNetwork
function.
Set Up Zenrin Japan Map API 3.0 (Itsumo NAVI API 3.0) Credentials
To access the Zenrin Japan Map API 3.0 (Itsumo NAVI API 3.0) service, you must enter valid credentials from ZENRIN DataCom CO., LTD. Set up these credentials by using the zenrinCredentials function. At the MATLAB® command prompt, enter:
zenrinCredentials setupIn the Zenrin Japan Map API 3.0 (Itsumo NAVI API 3.0) Credentials dialog box, enter a valid Client ID and Secret Key. To save your credentials for future MATLAB sessions on your machine, in the dialog box, select Save my credentials between MATLAB sessions and click OK. The credentials are now saved for the rest of your MATLAB sessions on your machine.
If you need to change your credentials, you can delete them and set up new ones by
using the zenrinCredentials function.
Specify Geographic Coordinates
To select the roads you want to import, you need to specify a region of interest from which to obtain the road data. To define this region of interest, specify latitude and longitude coordinates that are near that road data. You can specify coordinates for a single point or a set of points, such as ones that make up a driving route.
Specify the coordinates from a driving route.
Load a sequence of latitude and longitude coordinates that make up a driving route. At the MATLAB command prompt, enter these commands:
data = load('tokyoSequence.mat');
lat = data.latitude;
lon = data.longitude;
Open the app.
drivingScenarioDesigner
On the app toolstrip, select Import and then Zenrin Japan Map API 3.0 (Itsumo NAVI API 3.0). If you previously entered or saved Zenrin Japan Map API 3.0 (Itsumo NAVI API 3.0) credentials, then the dialog box opens directly to the page where you can specify geographic coordinates.
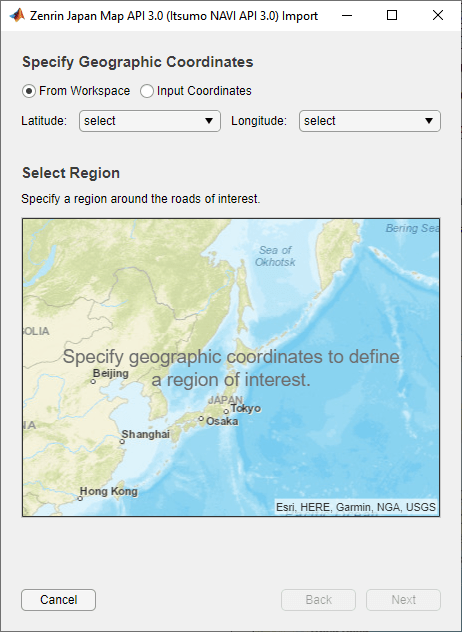
Leave From Workspace selected, and then select the variables for the route coordinates.
Set the Latitude parameter to
lat.Set the Longitude parameter to
lon.
This table describes the complete list of options for specifying latitude and longitude coordinates.
Specify Geographic Coordinates Parameter Value Description Latitude Parameter Value Longitude Parameter Value From Workspace Specify a set of latitude and longitude coordinates, such as from a driving route obtained through a GPS. These coordinates must be stored as variables in the MATLAB workspace.
Workspace variable containing vectors of decimal values in the range [–90, 90]. Units are in degrees.
Latitude and Longitude must be the same size. After you select a Latitude variable, the Longitude list includes only variables of the same size as your Latitude selection.
Workspace variable containing vectors of decimal values in the range [–180, 180]. Units are in degrees.
Latitude and Longitude must be the same size. After you select a Longitude variable, if you select a Latitude variable of a different size, the dialog box clears your Longitude selection.
Input Coordinates Specify latitude and longitude coordinates for a single geographic point.
Decimal scalar in the range [–90, 90]. Units are in degrees. Decimal scalar in the range [–180, 180]. Units are in degrees.
Select Region Containing Roads
After you specify the latitude and longitude coordinates, the Select Region section of the dialog box displays these coordinates in orange on a map. The geographic reference point, which is the first coordinate in the driving route, is also displayed. This point is the origin of the imported scenario. Click this point to show or hide the coordinate data.
The coordinates are connected in a line. A rectangular region of interest displays around the coordinates. In the next page of the dialog box, you select the roads to import based on which roads are at least partially within this region.
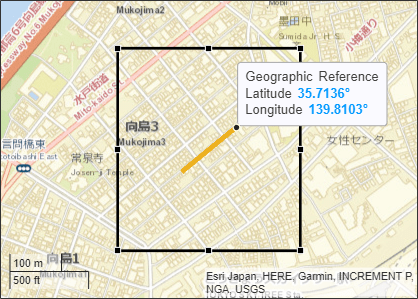
You can change the size of this region or move it around to select different roads. To zoom in and out of the region, use the buttons in the top-right corner of the map display.
With the coordinates still enclosed within the region, click Next.
Select Roads to Import
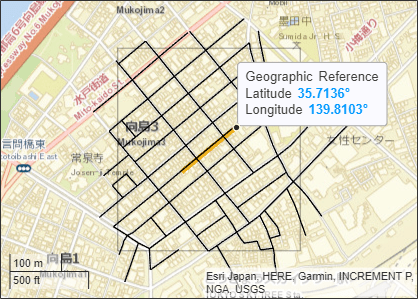
After you select a region, the Select Roads section of the dialog box displays selectable roads in black.
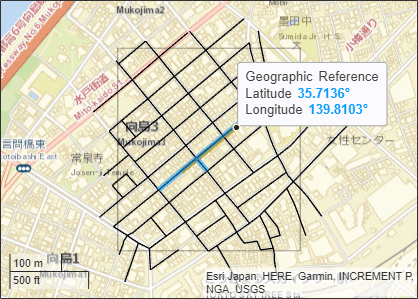
Using the selected region, select the roads that are nearest to the driving route by clicking Select Nearest Roads. The selected roads are overlaid onto the driving route and appear in blue.
This table describes additional actions you can take for selecting roads from a region.
| Goal | Action |
|---|---|
| Select individual roads from the region. | Click the individual roads to select them. |
| Select all roads from the region. | Click Select All. |
| Select all but a few roads from the region. | Click Select All, and then click the individual roads to deselect them. |
| Select roads from the region that are nearest to the specified coordinates. | Click Select Nearest Roads. Use this option when you have a sequence of nonsparse coordinates. If your coordinates are sparse or the underlying data for those coordinates are sparse, then the app might not select the nearest roads. |
| Select a subset of roads from a region, such as all roads in the upper half of the region. | In the top-left corner of the map display, click the Select
Roads button
|
Note
The number of roads you select has a direct effect on app performance. Select the fewest roads that you need to create your driving scenario.
Import Roads
With the roads nearest to the route still selected, click Import. The app imports the Zenrin Japan Map API 3.0 (Itsumo NAVI API 3.0) data and generates a road network.
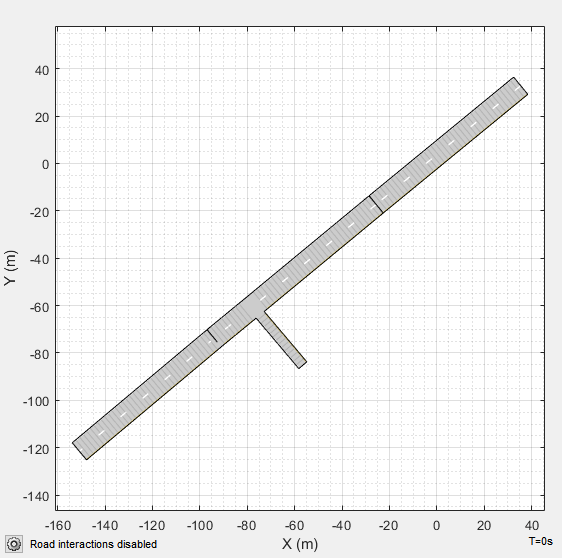
To maintain the same alignment with the geographic map display, the X-axis of the Scenario Canvas is on the bottom and the Y-axis is on the left. In driving scenarios that are not imported from maps, the X-axis is on the left and the Y-axis is on the bottom. This alignment is consistent with the Automated Driving Toolbox™ world coordinate system.
The origin of the scenario corresponds to the geographic reference point and is the first point specified in the driving route. Even if you select roads from the end of a driving route, the origin is still anchored to this first point. If you specified a single geographic point by using the Input Coordinates option, then the origin is that point.
By default, road interactions are disabled. Disabled road interactions prevent you
from accidentally modifying the network and reduces visual clutter by hiding the road
centers. If you want to modify the roads, in the bottom-left corner of the
Scenario Canvas, click the Configure the Scenario Canvas button
![]() . Then, select Enable road
interactions.
. Then, select Enable road
interactions.
Note
In some cases, the app is unable to import all selected roads. The app pauses the import, and the dialog box highlights the nonimportable roads in red. To continue importing all other selected roads, click Continue.
Compare Imported Roads Against Map Data
The generated road network in the app has several differences from the actual Zenrin Japan Map API 3.0 (Itsumo NAVI API 3.0) road network. For example, when the Zenrin Japan Map API 3.0 (Itsumo NAVI API 3.0) service provides information using a range, such as by specifying a road with two to three lanes or a road between 3–5.5 meters wide, the generated road network uses scalar values instead.
For more details about limitations of road networks generated from Zenrin Japan Map API 3.0 (Itsumo NAVI API 3.0) data, see the Limitations section of the Driving Scenario Designer app reference page.
Save Scenario
Save the scenario file. After you save the scenario, you cannot import additional Zenrin Japan Map API 3.0 (Itsumo NAVI API 3.0) roads into it. Instead, you need to create a new scenario and import a new road network.
You can now add actors and sensors to the scenario, generate synthetic lane and object detections for testing your driving algorithms, or import the scenario into Simulink®.
See Also
Apps
Blocks
Objects
Functions
Topics
- Coordinate Systems in Automated Driving Toolbox
- Create Driving Scenario Interactively and Generate Synthetic Sensor Data
- Import HERE HD Live Map Roads into Driving Scenario
- Import OpenStreetMap Data into Driving Scenario
External Websites
1 To gain access to the Zenrin Japan Map API 3.0 (Itsumo NAVI API 3.0) service and get the required credentials (a client ID and secret key), you must enter into a separate agreement with ZENRIN DataCom CO., LTD.