Import OpenStreetMap Data into Driving Scenario
OpenStreetMap® is a free, open-source web map service that enables you to access crowdsourced map data. Using the Driving Scenario Designer app, you can import map data from OpenStreetMap and use it to generate roads for your driving scenarios.
This example focuses on importing map data in the app. Alternatively, to import OpenStreetMap roads into a drivingScenario object, use the roadNetwork function.
Select OpenStreetMap File
To import a road network, you must first select an OpenStreetMap file containing the road geometry for that network. To export these files from openstreetmap.org, specify a map location, manually adjust the region around this location, and export the road geometry for that region to an OpenStreetMap with extension .osm. Only roads whose whole lengths are within this specified region are exported. In this example, you select an OpenStreetMap file that was previously exported from this website.
Open the Driving Scenario Designer app.
drivingScenarioDesigner
On the app toolstrip, select Import and then OpenStreetMap.
In the OpenStreetMap Import dialog box, browse for the applehill.osm file in the current example folder. The file was downloaded from https://www.openstreetmap.org, which provides access to crowd-sourced map data all over the world. The data is licensed under the Open Data Commons Open Database License (ODbL), https://opendatacommons.org/licenses/odbl/.
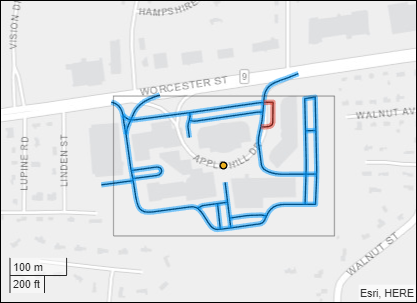
The Select Roads section of the dialog box displays the road network for the MathWorks® Apple Hill campus. The gray box represents the map region selected from openstreetmap.org. The center point of the gray box is the geographic reference point. Click this point to show or hide the coordinate data. When the roads are imported into that app, this point becomes the origin of the driving scenario.

Select Roads to Import
In the Select Roads section of the dialog box, select the roads that you want to import into a driving scenario. The selectable roads are in black.
Note
The number of roads you select has a direct effect on app performance. Select the fewest roads that you need to create your driving scenario.
Because this road network is small, click Select All to select all roads. The selected roads appear in blue.

This table describes the actions you can take for selecting roads to import.

Import Roads
With all roads in the network still selected, click Import. The app pauses the import and highlights one of the roads in red. The app is unable to render the geometry of this road properly, so the road cannot be imported.
Click Continue to continue importing all other selected roads. The app imports the roads and generates a road network.

To maintain the same alignment with the geographic map display, the X-axis of the Scenario Canvas is on the bottom and the Y-axis is on the left. In driving scenarios that are not imported from maps, the X-axis is on the left and the Y-axis is on the bottom. This alignment is consistent with the Automated Driving Toolbox™ world coordinate system. The origin of the scenario corresponds to the geographic reference point.
By default, road interactions are disabled. Disabled road interactions prevent you from accidentally modifying the network and reduce visual clutter by hiding the road centers. If you want to modify the roads, in the bottom-left corner of the Scenario Canvas, click the Configure the Scenario Canvas button ![]() . Then, select Enable road interactions.
. Then, select Enable road interactions.
Compare Imported Roads Against Map Data
The generated road network in the app differs from the OpenStreetMap road network. For example, examine the difference in this portion of the road network.
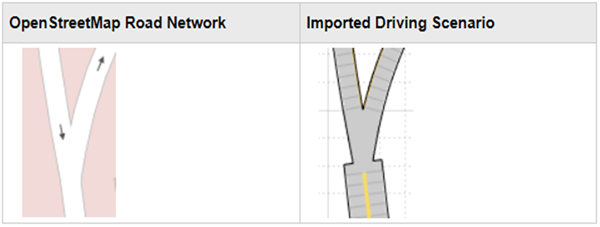
The transition between roads in the imported scenario is more abrupt because the app does not support the gradual tapering of lanes as the number of lanes change. In addition, because the app does not import lane-level information from OpenStreetMap, the number of lanes in the generated road network is based only on the direction of travel specified in the road network, where:
All one-way roads are imported as single-lane roads.
All two-way roads are imported as two-lane roads.
These lanes all have the same width, which can lead to abrupt transitions such as in the example shown in the table.
For more details on the limitations of importing OpenStreetMap data, see the Limitations section of the Driving Scenario Designer app reference page.
Save Scenario
Save the scenario file. After you save the scenario, you cannot import additional OpenStreetMap roads into it. Instead, you must create a new scenario and import a new road network.
You can now add actors and sensors to the scenario, generate synthetic lane and object detections for testing your driving algorithms, or import the scenario into Simulink®.
See Also
Apps
Blocks
Objects
Functions
Topics
- Coordinate Systems in Automated Driving Toolbox
- Create Driving Scenario Interactively and Generate Synthetic Sensor Data
- Import HERE HD Live Map Roads into Driving Scenario
- Import Zenrin Japan Map API 3.0 (Itsumo NAVI API 3.0) into Driving Scenario