PX4 Hardware-in-the-Loop (HITL) Simulation with Manual Control for Fixed-Wing Plant in Simulink
This example shows how to use the UAV Toolbox Support Package for PX4® Autopilots and take manual control inputs from RC Transmitter and control the fixed-wing flight.
Before starting with Simulink®, ensure that you go through PX4 Hardware-in-the-Loop (HITL) Simulation with Fixed-Wing Plant in Simulink example and perform Step 1.
Launch MATLAB
Open MATLAB®.
Open the example MATLAB project by executing this command at the MATLAB command prompt:
openExample('px4/PX4HITLSimulationFixedWingPlantSimulinkExample')Once you open the project, click the Project Shortcuts tab on the MATLAB toolstrip and click Launch Manual Control Mode to launch the ManualControl controller.
Alternatively, execute this command at the MATLAB command prompt.
open_system('ManualControl')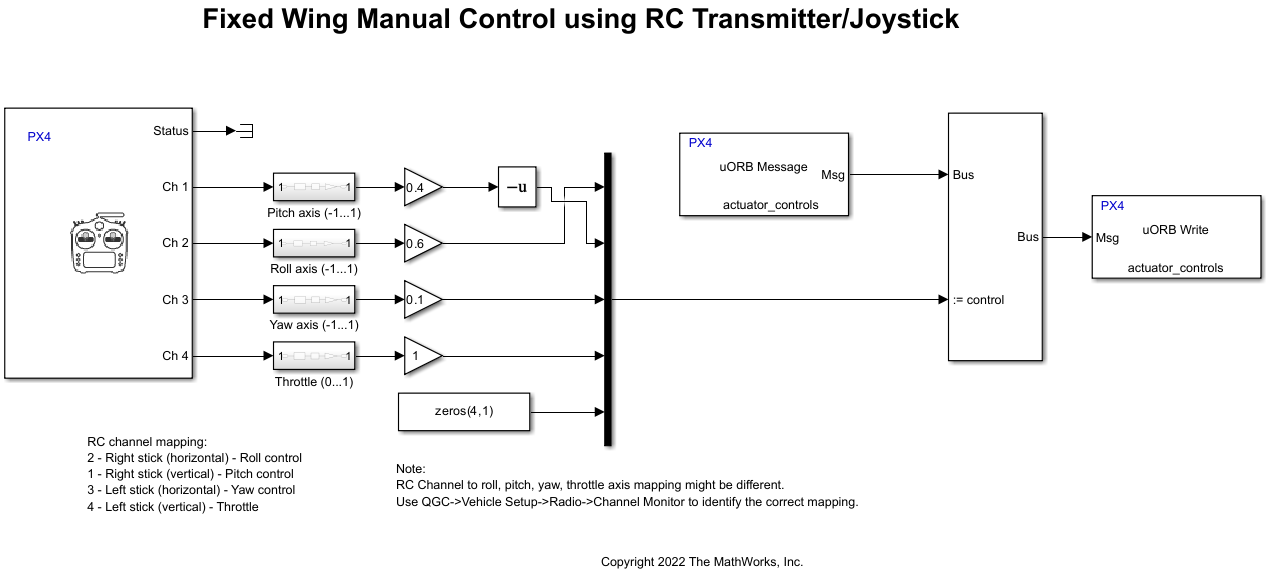
In the Project Shortcuts tab, click Launch UAV Dynamics to launch the Simulink plant model named UAV_Dynamics_Autopilot_Communication.
Alternatively, execute this command at the MATLAB command prompt.
open_system('UAV_Dynamics_Autopilot_Communication')In the Simulink plant model, set the serial ports in MAVLink Bridge Source and MAVLink Bridge Sink blocks.
Click Build, Deploy & Start from Deploy section of Hardware tab in the Simulink Toolstrip of the controller model ManualControl.
Run the Simulink Plant Model, Configure QGroundControl and Fly UAV
Run the Simulink plant model (UAV_Dynamics_Autopilot_Communication).
Open QGC and connect to PX4.
In the QGC, navigate to Vehicle Setup > Airframe.
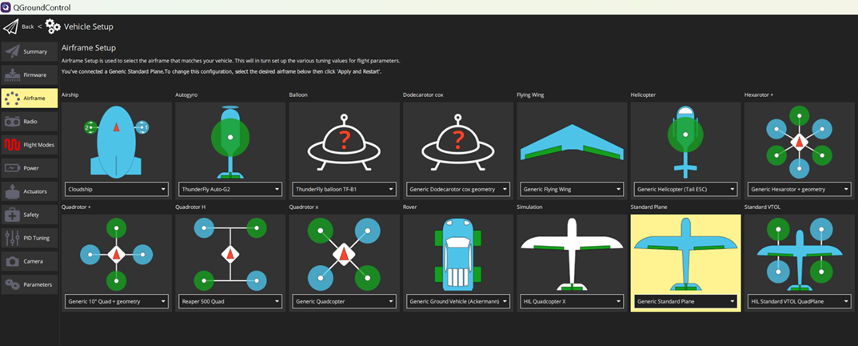
Select the Generic Standard Plane.
Click Apply and Restart at the top right corner of the window.
Reboot the Vehicle for the changes to take effect. This stops the Simulink plant model.
Run the Simulink plant model again.
In the QGC, navigate to Vehicle Setup > Safety and perform these steps.
In the Hardware in the Loop Simulation section, select
HITL enabledoption.
Close the QGC and Reboot the vehicle manually.
This will stop the Simulink plant model
Run the Simulink plant model again and relaunch the QGC.
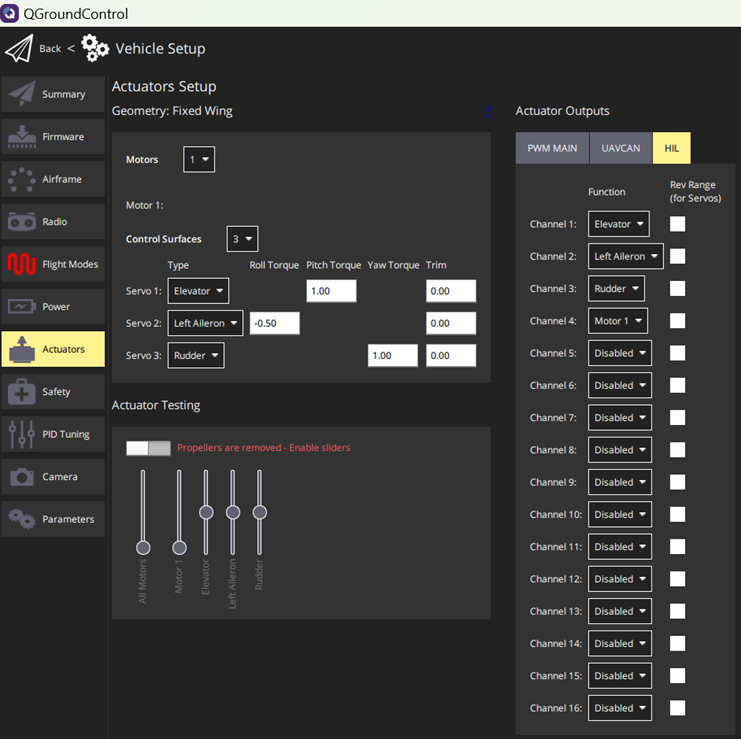
In the QGC, navigate to Vehicle Setup > Actuators and choose the servos and motors for the channels as shown in this image.
Note
The sequence should match the sequence used in the Simulink plant model. You can see the sequence under
UAV_Dynamics_Autopilot_Communication/UAV Dynamics with MAVLink Serialization UAV_Dynamics_DataSerialization/UAV Dynamics (UAV_Dynamics)/Dynamics model/Force and Moment Calculation/Actuator Modelsubsystem.In the QGC, navigate to Vehicle Setup > Parameters.
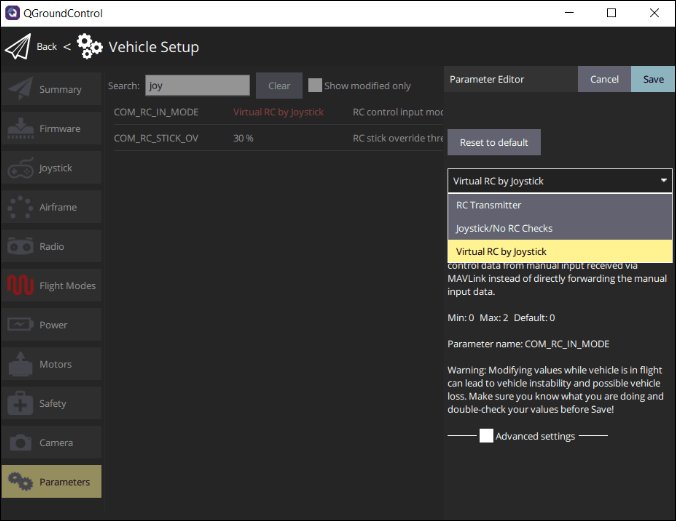
Set the input device in
COM_RC_IN_MODEparameter.Select
RC Transmitter onlyoption. For information on connection and calibration, see Radio (Remote Control) Setup.
Set the parameters
COM_DISARM_LANDandCOM_DISARM_PRFLTto-1.
Click Radio and move each sticks that control aileron, elevator, rudder, and throttle. Observe the channel value changes in the Channel Monitor.
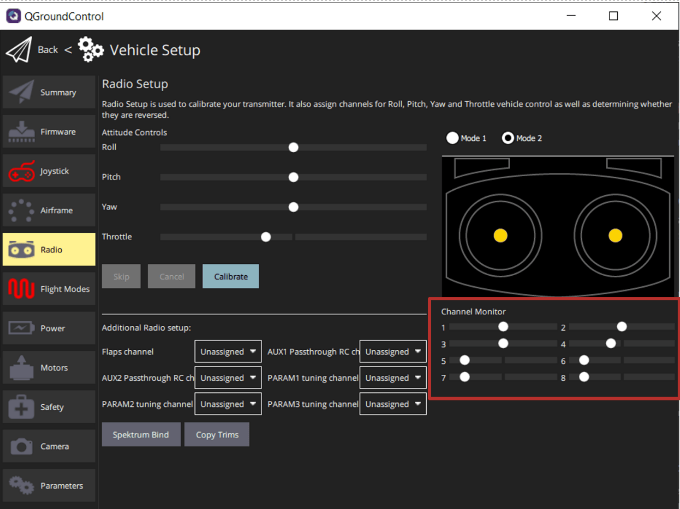
If the mapping is incorrect in the example model or between the channel number and controlled axes, correct it.
Arm the vehicle from QGC and move the left stick towards right-bottom to arm the vehicle. Provide only the throttle for the drone to takeoff.
Limitations
The moments along roll, pitch, and yaw axis exerted by the ground is not modelled. High control inputs can make the simulated plant turn to improbable angles.