Remote-Sensorsteuerung mit sicherem MQTT-Publishing und -Subscribe
Dieses Beispiel zeigt, wie die MQTT-Publish- und Subscribe-Architektur in ThingSpeak verwendet wird. Das MQTT-Protokoll ist ein Gerätenachrichtensystem mit geringem Overhead. Abonnieren Sie mithilfe von MQTT Feld 1 eines Steuerkanals. Wenn Sie den Steuerkanal aktualisieren, wird der gepostete Wert an Ihr Gerät gesendet. Das Servo dreht sich um den angegebenen Winkel. Das Gerät misst die Netzwerkstärke und aktualisiert den Speicherkanal. Kommentare im Code geben an, wie dieses Beispiel für eine nicht sichere Verbindung angepasst werden kann.
Unterstützte Hardware
ESP8266, NodeMCU, WeMOS
Arduino MKR1000
Arduino Uno, Mega, Due oder Leonardo mit drahtloser Netzwerkverbindung
Particle Photon (mit leichten Code- und Schemaanpassungen)
Das Beispiel ist so konzipiert, dass es mit nur wenigen zusätzlichen Komponenten, nämlich einem einzigen Servomotor, funktioniert. Sie verwenden die integrierte WLAN-Antenne, um die WLAN-Stärke zu messen.

Diese Bilder zeigen Beispielkanalausgaben vom Speicherkanal. Feld 1 speichert den Winkel des Servomotors, der vom Steuerkanal eingestellt wird, und Feld 2 zeigt den gemessenen Wert der WLAN-Stärke.

Die Datenanalyse zeigt, dass die Ausrichtung der WeMOS-Hardware einen Richtungseffekt auf die gemessene Signalstärke hat.

Voraussetzungen
1) Erstellen Sie einen ThingSpeak-Kanal für die Abonnementsteuerung, wie unter Daten in einem neuen Kanal sammeln gezeigt. Der Abonnementkanal enthält den Winkel für den Servomotor. Wenn der Servomotorwinkel aktualisiert wird, empfängt das abonnierte Gerät den Winkel als MQTT-Nachricht. Das Gerät stellt den Servowinkel ein und misst die Stärke des neuen drahtlosen Netzwerks in diesem Winkel.
2) Erstellen Sie einen weiteren ThingSpeak-Kanal für die veröffentlichten Daten. Der Veröffentlichungskanal zeichnet den eingestellten Winkel und die Signalstärkedaten auf.
3) Aktivieren Sie in der Ansicht Channel Settings die Felder 1 und 2 für den Veröffentlichungskanal. Um zwischen den Feldern zu unterscheiden, geben Sie jedem Feld einen beschreibenden Namen.

4) Beachten Sie die Read- und Write-API-Schlüssel auf der Registerkarte API Keys in der Ansicht Channel Settings (im Bild eingekreist).
5) Erstellen Sie ein MQTT-Gerät, indem Sie oben auf der Seite auf Geräte > MQTT und dann auf Neues Gerät hinzufügen klicken. Autorisieren Sie beim Einrichten des Geräts beide Kanäle zum Veröffentlichen und Abonnieren. Einzelheiten finden Sie unter Erstellen Sie ein ThingSpeak MQTT-Gerät.
6) Klicken Sie beim Hinzufügen des neuen Geräts auf Anmeldeinformationen herunterladen > Arduino (mqtt_secrets.h). Bewahren Sie diese heruntergeladene Geheimnisdatei für den Zugriff im Codeabschnitt unten auf.
Erforderliche Hardware
WeMOS D1 Mini oder eines der folgenden Geräte mit Änderungen an den verwendeten Bibliotheken: NodeMCU, ESP8266-01, ESP8266-04, ESP8266-12, ESP8266-12E, Arduino® MKR1000 oder andere Arduino mit Ethernet- oder drahtloser Netzwerkverbindung
Servomotor (z. B. Futaba S3003)
Überbrückungskabel (mindestens 3)
USB-Kabel
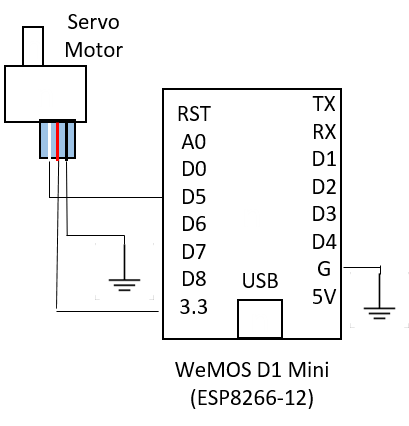
Schema und Anschlüsse
1) Verbinden Sie D5 am WeMOS D1 Mini mit der Signalleitung des Servos.
2) Verbinden Sie das Erdungskabel des Servos mit der Erde auf der WeMOS-Platine.
3) Schließen Sie die Servostromversorgung an 3,3 V an. Die direkte Verwendung von 5 V kann in einigen Fällen die USB-Stromversorgungsgrenze überlasten.
Programmieren Sie Ihren Arduino
Verwenden Sie die Arduino IDE, um Ihr Gerät zu programmieren. Sie können die neueste Arduino IDE hier herunterladen.
1) Fügen Sie das ESP8266-Board-Paket hinzu:
A. Geben Sie unter Datei > Einstellungen https://arduino.esp8266.com/stable/package_esp8266com_index.json in Zusätzliche Board Manager-URLs ein.
B. Wählen Sie Tools > Boards > Board-Manager. Geben Sie ESP8266 in die Suchleiste ein und installieren Sie das Paket.
2) Ändern Sie die zulässige Paketgröße.
A. Navigieren Sie zum Ordner mit der Header-Datei der Pub-Unterbibliothek, im Allgemeinen Documents\Arduino\libraries\PubSubClient\src.
B. Bearbeiten Sie PubSubClient.h to c und ändern Sie die maximale Paketgröße auf 4096. Nach Abschluss sollte die Zeile wie folgt lauten:
#define MQTT_MAX_PACKET_SIZE 4096
3) Erstellen Sie die Anwendung:
A. Öffnen Sie ein neues Fenster in der Arduino IDE und speichern Sie die Datei.
B. Fügen Sie den im Abschnitt „Code“ bereitgestellten Code hinzu.
C. Denken Sie daran, die Informationen zum drahtlosen Netzwerk und die Kanal-IDs im Code zu bearbeiten.
4) Fügen Sie der Skizze Bibliotheken und Geheimnisdateien hinzu:
A. Fügen Sie die folgenden Bibliotheken, sofern sie noch nicht vorhanden sind, zum Bibliotheksmanager hinzu, indem Sie Skizze > Bibliothek einschließen > Bibliotheken verwalten auswählen. Suchen Sie für jede Bibliothek nach ihrem Namen und wählen Sie Installieren.
PubSubClientESP8266Wifiservo
B. Fügen Sie die Datei mqtt_secrets.h hinzu.
Testen Sie Ihr Gerät
Nachdem Sie Ihr Programm erfolgreich hochgeladen haben, können Sie die Ausgabe mit dem seriellen Monitor überwachen. Laden Sie einen Wert im Bereich von 0 bis 175 in Ihren ThingSpeak-Steuerkanal hoch. Sie können das GET-Anforderungsformat aus der Registerkarte API Keys kopieren oder diesen Text mit Ihrem eigenen Write-API-Schlüssel ändern. Geben Sie jede URL direkt in die Adressleiste Ihres Browsers ein und ändern Sie IHREN WRITE-API-SCHLÜSSEL in den Write-API-Schlüssel für Ihren Kanal.
https://api.thingspeak.com/update?api_key=YOUR_WRITE_API_KEY&field1=ANGLE_VALUE
Das Gerät veröffentlicht den Winkel und die WLAN-Signalstärke im Speicherkanal, wenn Sie im Abonnementkanal posten. Stellen Sie sicher, dass Ihr Winkelwert im Bereich von 0 bis 175 liegt.
Code
1) Benötigte Bibliotheken einbinden und Datenfelder definieren:
#include <PubSubClient.h>
#include <WiFiClientSecure.h>                         // Needed only if using secure connection.
#include <ESP8266WiFi.h>
#include <Servo.h>
#include "mqtt_secrets.h"
#define ANGLE_FIELD 0
#define DATA_FIELD 1                                  // Data field to post the signal strength to.
2) Definieren und initialisieren Sie die Variablen. Denken Sie daran, die Informationen zum drahtlosen Netzwerk, die Kanal-ID und die Anmeldeinformationen zu bearbeiten. Ihre Kanal-ID finden Sie oben auf der Hauptseite Ihres Kanals.
char ssid[] = "YOUR_SSID";                   // Change to your network SSID (name).
char pass[] = "YOUR_WIFI_PASSWORD";          // Change to your network password.
const char* server = "mqtt3.thingspeak.com";
char mqttUserName[] = SECRET_MQTT_USERNAME;  // Change to your MQTT device username.
char mqttPass[] = SECRET_MQTT_PASSWORD;      // Change to your MQTT device password.
char clientID[] = SECRET_MQTT_CLIENT_ID;     // Change to your MQTT device clientID.
long readChannelID = 85;
long writeChannelID = 86;

// Here's how to get ThingSpeak server fingerprint: https://www.a2hosting.com/kb/security/ssl/a2-hostings-ssl-certificate-fingerprints
const char* thingspeak_server_fingerprint = "27 18 92 dd a4 26 c3 07 09 b9 7a e6 c5 21 b9 5b 48 f7 16 e1";

// WiFiClient client;                                 // Initialize the Wi-Fi client library. Uncomment for nonsecure connection.
WiFiClientSecure client;                              // Uncomment for secure connection.
PubSubClient mqttClient( client );                    // Initialize the PuBSubClient library.
Servo myservo;  // Create servo object to control a servo .

int fieldsToPublish[8]={1,1,0,0,0,0,0,0};             // Change to allow multiple fields.
float dataToPublish[8];                               // Holds your field data.
int changeFlag=0;                                     // Let the main loop know there is new data to set.
int servo_pos=0;                                      // Servo position
3) Definieren Sie die Funktionsprototypen in diesem Code.
//
// Prototypes
//

// Handle messages from MQTT subscription.
void mqttSubscriptionCallback(char* topic, byte* payload, unsigned int length);

// Generate a unique client ID and connect to MQTT broker.
void mqttConnect();

// Subscribe to a field or feed from a ThingSpeak channel.
int mqttSubscribe( long subChannelID,int field, int unSub);

// Publish messages to a channel feed.

// Connect to a given Wi-Fi SSID.
int connectWifi();

// Measure the Wi-Fi signal strength.
void updateRSSIValue();
4) Initialisieren Sie die Pins für Ein- und Ausgabe, starten Sie den seriellen Monitor und initialisieren Sie den MQTT-Client in der Routine setup.
void setup() {
Serial.begin( 115200 );
Serial.println( "Start" );
int status = WL_IDLE_STATUS; // Set temporary Wi-Fi status.

    connectWifi();                                        // Connect to Wi-Fi network.
    // mqttClient.setServer( server, 1883 );              // Set the MQTT broker details, nonsecure port. Uncomment for nonsecure connection.
    mqttClient.setServer( server, 8883 );                 // Set the MQTT broker details, secure port. Uncomment for secure connection.
    mqttClient.setCallback( mqttSubscriptionCallback );   // Set the MQTT message handler function.
    myservo.attach(14);                                   // Attach the servo on GIO2 to the servo object.
    myservo.write(90);                                    // Start in the middle.
}
5) Überprüfen Sie bei jeder Ausführung der Hauptschleife, ob Daten aus dem MQTT-Abonnement zur Verarbeitung verfügbar sind. Stellen Sie anschließend die Servoposition entsprechend den Daten ein. Stellen Sie sicher, dass die Wireless- und MQTT-Clients aktiv sind und eine Verbindung zum Client-Server aufrechterhalten.
void loop() {

    if (WiFi.status() != WL_CONNECTED) {
        connectWifi();
    }

    if (!mqttClient.connected())
    {

       mqttConnect(); // Connect if MQTT client is not connected.

         if(mqttSubscribe( readChannelID,1,0 )==1 ){
                Serial.println( " Subscribed " );
            }
    }

    mqttClient.loop(); // Call the loop to maintain connection to the server.

    if ((servo_pos>175)||(servo_pos<0)){
    servo_pos=0;
    }

    if (changeFlag){

        changeFlag=0;
        myservo.write(servo_pos);
        dataToPublish[ANGLE_FIELD]=servo_pos;
        delay(1100);                       // Wait for ThingSpeak to publish.
        Serial.println( "Servo value " + String( servo_pos ) );
        mqttPublish( writeChannelID, dataToPublish, fieldsToPublish );
    }

    delay(1);
}
6) Verwenden Sie die Funktion mqttSubscriptionCallback, um eingehende MQTT-Nachrichten zu verarbeiten. Das Programm läuft reibungsloser, wenn die Hauptschleife anstelle des Rückrufs die Verarbeitungsschritte ausführt. Verwenden Sie in dieser Funktion Flags, um Änderungen in der Hauptschleife zu bewirken.
/**
 * Process messages received from subscribed channel via MQTT broker.
 *   topic - Subscription topic for message.
 *   payload - Field to subscribe to. Value 0 means subscribe to all fields.
 *   mesLength - Message length.
 */

void mqttSubscriptionCallback( char* topic, byte* payload, unsigned int mesLength ) {

    char p[mesLength + 1];
    memcpy( p, payload, mesLength );
    p[mesLength] = NULL;
    Serial.print( "Answer: " );
    Serial.println( String(p) );
    servo_pos=atoi( p );
    changeFlag=1;
}
7) Verwenden Sie die Funktion MQTTConnect, um eine Verbindung zum MQTT einzurichten und aufrechtzuerhalten.
void mqttConnect()
{
    // Loop until connected.
    while ( !mqttClient.connected() )
    {
      Serial.println(String( mqttUserName)+ " , " + mqttPass + " , " + clientID);

        // Connect to the MQTT broker.
        Serial.print( "Attempting MQTT connection..." );
        if ( mqttClient.connect( clientID, mqttUserName, mqttPass ) )
        {
            Serial.println( "Connected with Client ID:  " + String( clientID ) + " User "+ String( mqttUserName ) + " Pwd "+String( mqttPass ) );

        } else
        {
            Serial.print( "failed, rc = " );
            // See https://pubsubclient.knolleary.net/api.html#state for the failure code explanation.
            Serial.print( mqttClient.state() );
            Serial.println( " Will try again in 5 seconds" );
            delay( 5000 );
        }
    }
}
8) Verwenden Sie mqttSubscribe, um Updates vom LED-Steuerfeld zu erhalten. In diesem Beispiel abonnieren Sie ein Feld, Sie können diese Funktion jedoch auch verwenden, um den gesamten Kanal-Feed zu abonnieren. Rufen Sie die Funktion mit field = 0 auf, um den gesamten Feed zu abonnieren.
/**
 * Subscribe to fields of a channel.
 *   subChannelID - Channel to subscribe to.
 *   field - Field to subscribe to. Value 0 means subscribe to all fields.
 *   readKey - Read API key for the subscribe channel.
 *   unSub - Set to 1 for unsubscribe.
 */

int mqttSubscribe( long subChannelID, int field, int unsubSub ){
    String myTopic;

    // There is no field zero, so if field 0 is sent to subscribe to, then subscribe to the whole channel feed.
    if (field==0){
        myTopic="channels/"+String( subChannelID )+"/subscribe";
    }
    else{
        myTopic="channels/"+String( subChannelID )+"/subscribe/fields/field"+String( field );
    }

    Serial.println( "Subscribing to " +myTopic );
    Serial.println( "State= " + String( mqttClient.state() ) );

    if ( unsubSub==1 ){
        return mqttClient.unsubscribe(myTopic.c_str());
    }
    return mqttClient.subscribe( myTopic.c_str() ,0 );
}
9) Die Funktion mqttUnsubscribe wird im Code nicht verwendet, Sie können sie jedoch zum Beenden eines Abonnements verwenden.
/**
 * Unsubscribe channel
 *   subChannelID - Channel to unsubscribe from.
 *   field - Field to unsubscribe subscribe from. The value 0 means subscribe to all fields.
 *   readKey - Read API key for the subscribe channel.
 */

int mqttUnSubscribe(long subChannelID,int field,char* readKey){
    String myTopic;

    if (field==0){
         myTopic="channels/"+String( subChannelID )+"/subscribe";
    }
    else{
        myTopic="channels/"+String( subChannelID )+"/subscribe/fields/field"+String( field );
    }
    return mqttClient.unsubscribe( myTopic.c_str() );
}
10) Verwenden Sie die Funktion mqttPublish, um Ihren Winkel und Ihre Wi-Fi-RSSI-Daten an einen ThingSpeak-Kanal zu senden.
/**
 * Publish to a channel
 *   pubChannelID - Channel to publish to.
 *   pubWriteAPIKey - Write API key for the channel to publish to.
 *   dataArray - Binary array indicating which fields to publish to, starting with field 1.
 *   fieldArray - Array of values to publish, starting with field 1.
 */

void mqttPublish(long pubChannelID, float dataArray[], int fieldArray[]) {
    int index=0;
    String dataString="";

    updateRSSIValue();  // Make sure the stored value is updated.

    //
    while (index<8){

        // Look at the field array to build the posting string to send to ThingSpeak.
        if (fieldArray[ index ]>0){

            dataString+="&field" + String( index+1 ) + "="+String( dataArray [ index ] );
        }
        index++;
    }

    Serial.println( dataString );

    // Create a topic string and publish data to ThingSpeak channel feed.
     String topicString ="channels/" + String( pubChannelID ) + "/publish";
    mqttClient.publish( topicString.c_str(), dataString.c_str() );
    Serial.println( "Published to channel " + String( pubChannelID ) );
}
11) Verbinden Sie Ihr Gerät mithilfe der Funktion connectWiFi mit einem drahtlosen Netzwerk.
int connectWifi()
{
    while ( WiFi.status() != WL_CONNECTED ) {
        WiFi.begin( ssid, pass );
        delay( 8500 );
        Serial.println( "Connecting to Wi-Fi" );
    }
    Serial.println( "Connected" );
    client.setFingerprint(thingspeak_server_fingerprint);  // Comment this line if using nonsecure connection.
}
12) Verwenden Sie die Funktion updateRSSIValue, um die Signalstärke für das Netzwerk zu lesen, mit dem Sie derzeit verbunden sind.
void updateRSSIValue(){

   long rssi = WiFi.RSSI();
   Serial.print( "RSSI:" );
   Serial.println(rssi);
   dataToPublish[ DATA_FIELD ]=float( rssi );

}