MQTT-Grundlagen
MQTT ist eine Publish/Subscribe-Architektur, die in erster Linie entwickelt wurde, um Geräte mit eingeschränkter Bandbreite und Leistung über drahtlose Netzwerke zu verbinden. Es ist ein einfaches und leichtes Protokoll, das über TCP/IP-Sockets oder WebSockets läuft. MQTT über WebSockets kann mit SSL gesichert werden. Die Publish/Subscribe-Architektur ermöglicht das Senden von Nachrichten an die Clientgeräte, ohne dass das Gerät den Server kontinuierlich abfragen muss.
Der MQTT-Broker ist der zentrale Kommunikationspunkt und für die Übermittlung aller Nachrichten zwischen den Absendern und den rechtmäßigen Empfängern zuständig. Ein Client ist jedes Gerät, das eine Verbindung zum Broker herstellt und Themen veröffentlichen oder abonnieren kann, um auf die Informationen zuzugreifen. Ein Thema enthält die Routing-Informationen für den Broker. Jeder Client, der Nachrichten senden möchte, veröffentlicht diese zu einem bestimmten Thema, und jeder Client, der Nachrichten empfangen möchte, abonniert ein bestimmtes Thema. Der Broker stellt alle Nachrichten mit dem passenden Thema den entsprechenden Clients zu.
ThingSpeak™ hat einen MQTT-Broker unter der URL mqtt3.thingspeak.com und dem Port 1883. Der ThingSpeak-Broker unterstützt sowohl MQTT-Publish als auch MQTT-Subscribe, wie in den folgenden Diagrammen gezeigt.
MQTT-Veröffentlichung
Diese Abbildung beschreibt die Themenstruktur. Der Broker bestätigt eine korrekte CONNECT-Anfrage mit CONNACK.

MQTT Abonnieren
Diese Abbildung beschreibt die Themenstruktur. Der Broker bestätigt eine korrekte SUBSCRIBE-Anfrage mit SUBACK.

Erstellen Sie ein ThingSpeak MQTT-Gerät
Der MQTT-Zugriff auf Ihre Kanäle, einschließlich der Anmeldeinformationen, wird von einem ThingSpeak MQTT-Gerät verwaltet. Ihr Gerät ist mit den Anmeldeinformationen konfiguriert, die Ihr MQTT-Client für die Kommunikation mit ThingSpeak und für die Autorisierung bestimmter Kanäle benötigt. Führen Sie die folgenden Schritte aus, um ein MQTT-Gerät zu erstellen.
Klicken Sie im ThingSpeak-Menü auf Devices > MQTT.

Klicken Sie auf der Seite „MQTT-Geräte“ auf Add a new device.

Füllen Sie das Dialogfeld „Neues Gerät hinzufügen“ aus:
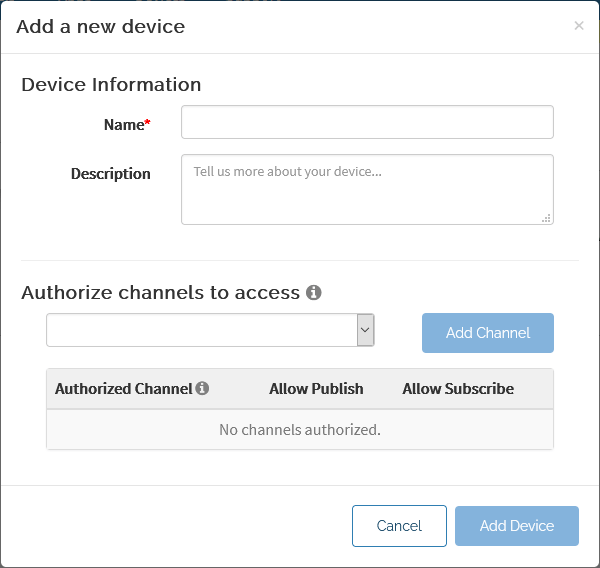
Geben Sie einen Gerätenamen an.
Geben Sie optional eine Beschreibung ein.
Wählen Sie im Abschnitt „Kanäle autorisieren“ einen Kanal aus dem Listenmenü aus und klicken Sie dann auf Add Channel. Wiederholen Sie diesen Vorgang, bis Sie alle Kanäle, die Sie mit dem Gerät verbinden möchten, in der Liste der autorisierten Kanäle haben. Stellen Sie jeweils ein, dass die Veröffentlichung bzw. das Abonnieren nach Bedarf zulässig ist.
Klicken Sie auf Add Device.
An diesem Punkt generiert ThingSpeak eine Liste mit Anmeldeinformationen für Ihr Gerät, die Client-ID, Benutzernamen und Passwort enthält. Sie können diese Elemente auf dieser Seite anzeigen und kopieren oder auf Download Credentials klicken, um die Anmeldeinformationen in einer lokalen Datei zu speichern. Wichtig: Notieren oder speichern Sie Ihre Anmeldeinformationen jetzt, da Sie keine weitere Gelegenheit erhalten, das Kennwort anzuzeigen oder zu speichern.
Klicken Sie auf Done, um die Geräteerstellung abzuschließen.
Ihr neues Gerät wird jetzt auf der Seite „MQTT-Geräte“ angezeigt. Sie können Ihre Geräteeinstellungen ändern und Kanäle hinzufügen, indem Sie auf Edit klicken. Sie können die Client-ID, den Benutzernamen und das Passwort in Ihrem MQTT-Client verwenden, um auf Ihr ThingSpeak MQTT-Gerät zuzugreifen und dessen Kanäle zu veröffentlichen und zu abonnieren.
Hinweis
Sie können bis zu 100 MQTT-Geräte pro Benutzer haben, mit maximal 10 autorisierten Kanälen pro Gerät. Wenn Sie mehr Geräte oder Kanäle benötigen, kontaktieren Sie den Support.
Informationen zur Verwendung eines Desktop-MQTT-Clients finden Sie unter Veröffentlichen und Abonnieren eines Kanals mit dem Desktop-MQTT-Client.
Zurücksetzen des Gerätekennworts. Wenn Sie Ihr Gerätekennwort jederzeit zurücksetzen müssen, können Sie es auf der Gerätebearbeitungsseite zurücksetzen:
Wählen Sie Devices > MQTT.
Klicken Sie in der angezeigten Liste Ihrer MQTT-Geräte für das Gerät, das Sie zurücksetzen möchten, auf Edit, um dessen Konfigurationsdetails anzuzeigen.
Klicken Sie im Abschnitt MQTT Credentials auf das Symbol „Neu generieren“, um das Kennwort zurückzusetzen. Verbindungen mit dem alten Passwort werden deaktiviert.

Serverantwort für Verbindungen
Wenn die Verbindung erfolgreich ist, antwortet der ThingSpeak MQTT-Broker mit einer Verbindungsbestätigung, CONNACK. Der MQTT-Broker antwortet auf eine erfolgreiche Abonnementanforderung mit einer SUBACK-Nachricht und leitet alle neuen Daten, die im abonnierten Kanal oder Feld gepostet werden, an den Client weiter. Weitere Informationen zu diesen Nachrichten finden Sie in der Spezifikation MQTT v3.1.1. Anschließend können Sie Nachrichten zu Themen im Format Publish to a Channel Feed oder Publish to a Channel Field Feed veröffentlichen.
MQTT-Client-Konfiguration
ThingSpeak hat einen MQTT-Broker unter der URL mqtt3.thingspeak.com. Konfigurieren Sie Ihren MQTT-Client für die Kommunikation mit dem ThingSpeak MQTT-Broker basierend auf einer der folgenden Optionen:
Hafen | Verbindungstyp | Verschlüsselung |
|---|---|---|
1883 | TCP | Keiner |
8883 | TCP | TLS/SSL |
80 | WebSocket | Keiner |
443 | WebSocket | TLS/SSL |
Beachten Sie beim Konfigurieren Ihrer Clientverbindung Folgendes:
Wenn Ihre Hardware den sicheren SSL-Socket-Verbindungsmodus unterstützt, verwenden Sie diesen Modus, wann immer möglich, um mit dem ThingSpeak MQTT-Broker zu kommunizieren.
ThingSpeak implementiert die MQTT-Publish- und Subscribe-Funktionalität mit
QoS=0. Dieses „Fire-and-Forget“-Protokoll bedeutet, dass Ihr Client keine Bestätigung erhält, wenn Sie in einem ThingSpeak-Kanal veröffentlichen.MQTT-Verbindungen laufen nach einer Stunde Inaktivität ab.
Bei Verwendung einer WebSocket-Verbindung ist der erforderliche Pfad
/mqtt.Bei Verwendung der Paho-Bibliothek mit Python® auf Raspberry Pi® ist der Standard-MQTT-Pfad
"/mqtt", Sie können dies jedoch auch mit der folgenden Codezeile festlegen:client.ws_set_options("/mqtt")Mit der HiveMQ MQTT CLI legen Sie den Pfad mit der Befehlsoption fest:
mqtt pub … -ws -ws:path /mqtt …
Siehe auch
Publish to a Channel Feed | Publish to a Channel Field Feed | Subscribe to a Channel Field Feed | Subscribe to a Channel Feed
Themen
- Fehlerbehebung bei der MQTT-Veröffentlichung
- MQTT-API
- Veröffentlichen und Abonnieren eines ThingSpeak-Kanals mit Secure MQTT
- Veröffentlichen und Abonnieren eines Kanals mit dem Desktop-MQTT-Client
- Veröffentlichen Sie mit einem Particle Device Client über MQTT in einem ThingSpeak-Kanal
- Veröffentlichen mit WebSockets in Python auf einem Raspberry Pi
- Verwenden Sie den Particle Photon Client, um Kanalaktualisierungen zu abonnieren
- Fehlerbehebung bei MQTT Subscribe
- Verwenden Sie den Particle Photon Client, um Kanalaktualisierungen zu abonnieren