Add Prepopulated Custom Tab to Simulink Toolstrip
This example provides the resources folder contents for a prepopulated custom tab. When you add custom tabs to the Simulink® Toolstrip, you might find modifying a prepopulated tab easier than starting with a blank tab.
A custom tab provides a single location for the actions you use most often. Use custom tabs to collect built-in actions that span multiple tabs on the default Toolstrip, such as the Open and Model Advisor buttons. While this example focuses on Simulink actions, you can also add actions from other products to your custom tab, such as the Build button from Simulink Coder™. If you do not have a product installed or do not have a license for a product, the built-in actions from that product appear as empty buttons on the custom tab.
Custom tabs also support custom actions. In this example, the MathWorks Website button uses a custom action defined by a script.

The prepopulated custom tab provides one or more examples of each type of control that custom tabs support.
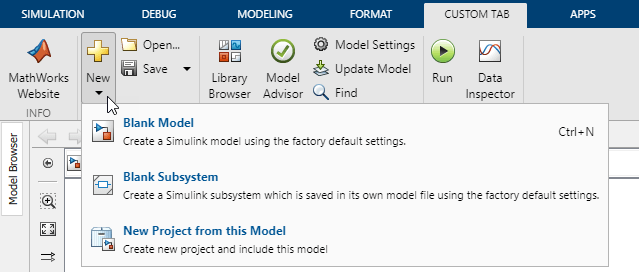
The New button is a drop-down button that expands to show additional items in a pop-up list.
The Open button is a push button that you click to perform an action.
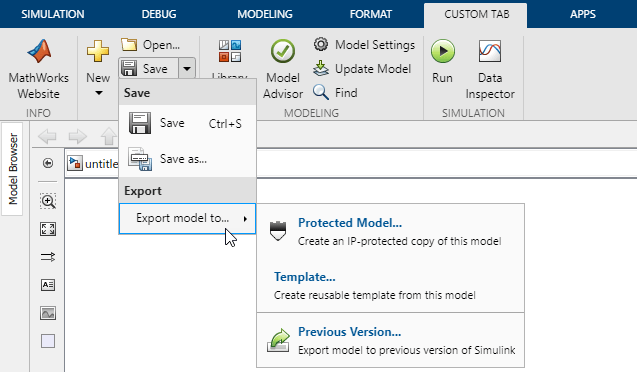
The Save button is a split button that consists of a push button and drop-down button.
An empty control adds space below the Save button.
You can distinguish a drop-down button from a split button by pausing on the button. The split button has two interactive parts separated by a line, while a drop-down button has only one part.
The New button expands to show a pop-up list with three list items that you click to perform an action.

The Save button expands to show a pop-up list with more features.
Save and Export are list headers that provide headings.
The line between Template and Previous Version is a list separator.
Export model to is a list item with a pop-up list that expands to show additional items in a nested pop-up list.

Examine Files That Define Custom Tab Appearance and Behavior
In this example, the resourcesExample folder contains the files that define the prepopulated custom tab. The custom tab does not appear in the Simulink Toolstrip because the files are in a folder named resourcesExample. For a custom tab to register as a Simulink Toolstrip customization, the folder must be named resources and its parent folder must be on the MATLAB® path. You will view the custom tab in the toolstrip in a later step.
Examine the files that are in the resourcesExample folder.
The sl_toolstrip_plugins.json file defines the Simulink Toolstrip component. Do not edit this file.
file0 = fullfile(pwd,"resourcesExample","sl_toolstrip_plugins.json");
type(file0)
{"entries":[{"content":{"Name":"custom"},"type":"config.ComponentData"}],"packageUris":[],"version":"1.0"}
The two images in the icons folder of the resourcesExample folder provide the 16-by-16 and 24-by-24 pixel versions of a custom icon.
![]()
![]()
Three JSON files in the json folder of the resourcesExample folder define the custom tab.
customTab.json— JSON file that defines the tab, layout, and controls.customTab_popups.json— Optional JSON file that defines the pop-up lists for drop-down buttons, split buttons, and list items with pop-up lists.customTab_actions.json— Optional JSON file that defines custom actions.
file1 = fullfile(pwd,"resourcesExample","json","customTab.json");
type(file1)
{
    "version": "1.0",
    "entries": [
        {
            "type": "Tab",
            "id": "customTab",
            "title": "CUSTOM TAB",
            "children": [
                {
                    "type": "Section",
                    "title": "Info",
                    "children": [
                        {
                            "type": "Column",
                            "children": [
                                {
                                    "type": "PushButton",
                                    "action": "openMathWorksWebsiteAction"
                                }
                            ]
                        }
                    ]
                },
                {
                    "type": "Section",
                    "title": "File",
                    "children": [
                        {
                            "type": "Column",
                            "children": [
                                {
                                    "type": "DropDownButton",
                                    "action": "newPopUpAction",
                                    "popupName": "newPopUpList"
                                }
                            ]
                        },
                        {
                            "type": "Column",
                            "children": [
                                {
                                    "type": "PushButton",
                                    "action": "openModelAction"
                                },
                                {
                                    "type": "SplitButton",
                                    "action": "saveModelAction",
                                    "popupName": "savePopUpList"
                                },
                                {
                                    "type": "EmptyControl"
                                }
                            ]
                        }
                    ]
                },
                {
                    "type": "Section",
                    "title": "Modeling",
                    "children": [
                        {
                            "type": "Column",
                            "children": [
                                {
                                    "type": "PushButton",
                                    "action": "showLibraryBrowserAction"
                                }
                            ]
                        },
                        {
                            "type": "Column",
                            "children": [
                                {
                                    "type": "PushButton",
                                    "action": "openModelAdvisorAction"
                                }
                            ]
                        },
                        {
                            "type": "Column",
                            "children": [
                                {
                                    "type": "PushButton",
                                    "action": "openModelConfigParamAction"
                                },
                                {
                                    "type": "PushButton",
                                    "action": "updateDiagramAction"
                                },
                                {
                                    "type": "PushButton",
                                    "action": "findInModelAction"
                                }
                            ]
                        }
                    ]
                },
                {
                    "type": "Section",
                    "title": "Simulation",
                    "children": [
                        {
                            "type": "Column",
                            "children": [
                                {
                                    "type": "PushButton",
                                    "action": "playSimulationAction"
                                }
                            ]
                        },
                        {
                            "type": "Column",
                            "children": [
                                {
                                    "type": "PushButton",
                                    "action": "openSimDataInspectorAction"
                                }
                            ]
                        }
                    ]
                }
            ]
        }
    ]
}
file2 = fullfile(pwd,"resourcesExample","json","customTab_popups.json");
type(file2)
{
    "version": "1.0",
    "entries": [
        {
            "type": "PopupList",
            "id": "newPopUpList",
            "children": [
                {
                    "type": "ListItem",
                    "action": "createNewBlankModelAction"
                },
                {
                    "type": "ListItem",
                    "action": "createNewBlankReferenceableSubsystemAction"
                },
                {
                    "type": "ListItem",
                    "action": "createNewProjectFromModelAction"
                }
            ]
        },
        {
            "type": "PopupList",
            "id": "savePopUpList",
            "children": [
                {
                    "type": "ListHeader",
                    "text": "Save"
                },
                {
                    "type": "ListItem",
                    "action": "saveModelAction"
                },
                {
                    "type": "ListItem",
                    "action": "saveModelAsAction"
                },
                {
                    "type": "ListHeader",
                    "text": "Export"
                },
                {
                    "type": "ListItemWithPopup",
                    "action": "exportPopUpAction",
                    "popupName": "exportPopUpList"
                }
            ]
        },
        {
            "type": "PopupList",
            "id": "exportPopUpList",
            "children": [
                {
                    "type": "ListItem",
                    "action": "createProtectedModelAction"
                },
                {
                    "type": "ListItem",
                    "action": "exportModelToTemplateAction"
                },
                {
                    "type": "ListSeparator"
                },
                {
                    "type": "ListItem",
                    "action": "exportModelToPreviousVersionAction"
                }
            ]
        }
    ]
}
file3 = fullfile(pwd, "resourcesExample","json","customTab_actions.json");
type(file3)
{
    "version": "1.0",
    "entries": [
        {
            "type": "Action",
            "id": "newPopUpAction",
            "text": "New",
            "icon": "new"
        },
        {
            "type": "Action",
            "id": "exportPopUpAction",
            "text": "Export model to..."
        },
        {
            "type": "Action",
            "id": "openMathWorksWebsiteAction",
            "text": "MathWorks\nWebsite",
            "description": "Open the MathWorks website",
            "icon": "openMathWorksWebsiteIcon",
            "command": "openMathWorksWebsite",
            "commandType": "Script"
        },
        {
            "type": "Icon",
            "id": "openMathWorksWebsiteIcon",
            "icon16": "openMathWorksWebsite_16.png",
            "icon24": "openMathWorksWebsite_24.png"
        }
    ]
}
One of the custom actions references the openMathWorksWebsite.m script in the example folder. The script that the action references must be on the MATLAB path. The script cannot be in the resources folder for the custom tab.
type openMathWorksWebsite.mweb('https://www.mathworks.com')
View and Edit Prepopulated Custom Tab
To view the custom tab in the Simulink Toolstrip, complete these steps.
Copy the
resourcesExamplefolder and theopenMathWorksWebsite.mscript to a folder on the MATLAB path.Rename the folder from
resourcesExampletoresources.In the MATLAB Command Window, enter
slReloadToolstripConfig.
To interact with the custom tab, open a Simulink model.
Once you can see the custom tab in the toolstrip, to edit the custom tab, complete these steps.
Edit the JSON files in the
jsonfolder.To see your changes, reload the Simulink Toolstrip configuration by entering
slReloadToolstripConfig.
For more information, see Create Custom Simulink Toolstrip Tabs.