Create, Import, and Modify Assets
Assets are the materials, textures, props, and other 3D objects that are available in a RoadRunner project and that can be added to a scene. To browse, create, and modify assets in a current project, use the Library Browser. The Library Browser is divided into two panes:
The left pane displays the directory structure within the
Assetsfolder, enabling you to quickly navigate the folder hierarchy.The right pane displays the contents of the currently selected folder. When you select an asset from this pane, you can view its attributes from the Attributes pane and preview it in the asset viewer.
Using these two panes, you can create and modify assets, manage asset files in your project, and add assets to scenes.
Only files recognized by RoadRunner as assets are displayed. Other system files and auxiliary files in the directory are not shown. For more details on the asset files contained in a project, see RoadRunner Project and Scene System.
Create and Import Assets
Depending on the asset type, you can either create new assets for a project either directly in the Library Browser or you can import files created outside RoadRunner into the Library Browser to create RoadRunner assets.
Create Asset Within RoadRunner
You can create some assets directly within the Library Browser, such as materials and road styles. Follow these steps:
Navigate to the folder in the Library Browser where you want to create the new asset.
Right-click in the Library Browser and select New, then select (Asset Type). Alternatively, select Assets, and then select the (Asset Type) menu option.
Specify a name and press Enter.
You can also:
Right-click the asset in the Library Browser and select Duplicate.
Specify a name for the new asset and press Enter.
You can use these steps only for assets created within RoadRunner, such as a material or road style asset. If you want to duplicate an
asset that depends on another file, such as a texture image or 3D model, duplicate
the dependent file only (not the rrmeta file) by using the file
explorer for your operating system.
Create Asset by Importing File Created Outside RoadRunner
Some assets depend on files created outside of RoadRunner, such as a texture image saved as a PNG file or a 3D building model saved as an STL file, or a 3D tree saved as an FBX® file. To create such assets for use in RoadRunner, drag the dependent file into the Library Browser. Follow these steps:
Navigate to the folder in the Library Browser where you want to add the new asset.
In the file explorer window for your operating system, navigate to the location of the dependent file (for example, the texture image or the 3D model).
Select the file (and any associated files or folders) in the file explorer.
Drag the file, and any associated files or folders, into the Library Browser.
This operation copies, rather than moves, the selected files into the directory of the current project.
Alternatively, you can perform these steps by using the file explorer window by
moving the files somewhere under the Assets directory of your
project. This option can be useful if you want to move rather than copy the files,
or if you want to use an external script to create assets in a project.
Modify Assets
The steps to modify an asset differ depending on the specific type of asset. For more details, refer to the documentation for the specific asset type.
In most cases, you can modify an asset by following these steps:
Select the asset in the Library Browser.
View and modify the asset attributes displayed in the Attributes pane.
Some assets, such as Sign Assets, are modified using the 2D Editor pane.
Modifications made to an asset are saved only when you next save the project.
Reload Modified Assets
If you change an asset by using an external application, such as modifying a texture file using an image editor, you can force RoadRunner to reload the asset. Right-click in the Library Browser and select Update Assets. Alternatively, select Assets and then the Update Assets menu option.
Manage Assets
You can use the Library Browser to manage the assets in your project.
Rename Asset
Right-click the asset in the Library Browser and select Rename (or press F2).
Specify a new name and press Enter.
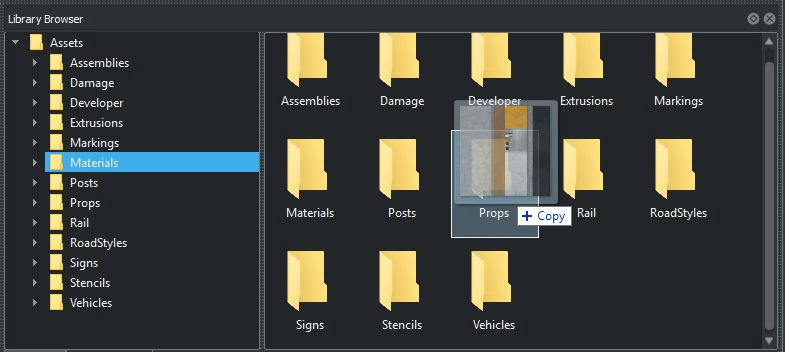
Move Assets or Folders
Select assets or folders in the Library Browser.
Click and drag the assets or folders to a different folder in either the left or right pane.
Moving an asset automatically updates asset references in the current scene, but other saved scenes might still reference the old asset location. See Find Moved Assets.
Create New Asset Folder
Right-click in the Library Browser and select New, then Folder. Alternatively, select Assets, then New, then Folder.
Specify a name and press Enter.
Delete Asset or Asset Folder
Select assets or folders in the Library Browser.
Right-click and select Delete. Alternatively, select the Edit , then Delete menu option, or press Delete.
Find Moved Assets
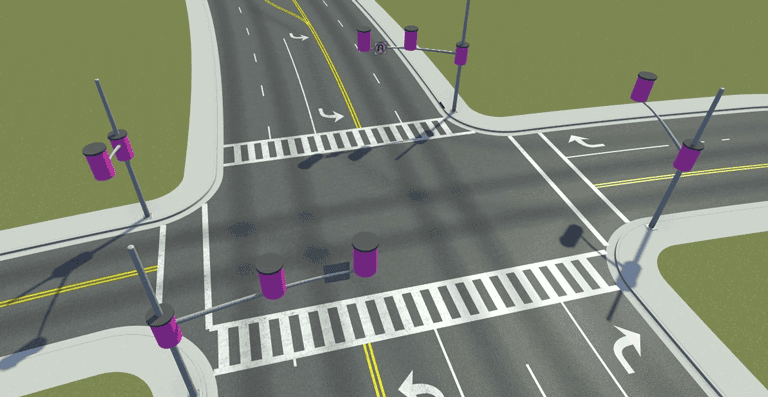
If an asset or asset folder has been moved or renamed, then existing scene files might still refer to the old location. If a scene cannot find an asset, RoadRunner replaces references to that asset with a visually distinct fallback asset (for example, props display as pink barrels, and textures display as striped red and blue images).
If you encounter this situation, RoadRunner can search for the missing references and attempt to relink them. Follow these steps:
Open the scene file containing the missing asset references.
Right-click in the Library Browser and select Update Assets. Alternatively, select the Assets , then Update Assets menu option.
This search finds moved assets only if the corresponding rrmeta
file was also moved or renamed and was left intact.
Select Assets
To select all the assets of a given type in a scene, follow these steps:
In the Library Browser, navigate to the folder that contains the asset.
Right-click the asset file and select Select in Scene.
RoadRunner selects all assets of that type in the scene and switches to the primary tool used to select that asset. If you are already using a tool that can select the asset, then RoadRunner does not switch tools.
Note
Selecting road style assets in a scene is not supported.
Visualize Assets
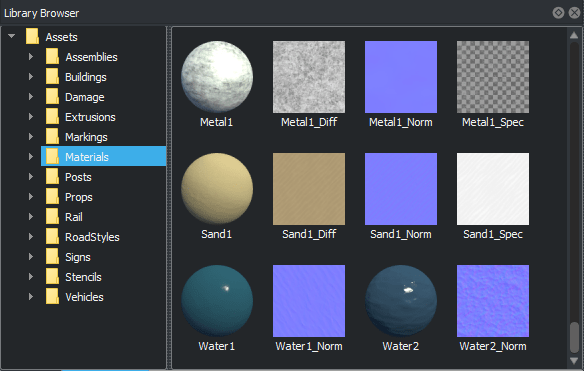
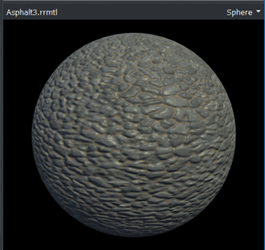
Using the asset viewer, you can visualize the currently selected asset in the Library Browser. By default, the asset viewer appears below the Attributes pane when a single asset is selected in the Library Browser. This image shows a sample material asset.
The asset viewer displays different asset types, such as 3D model assets and 2D image assets, in different ways. If the selected asset type supports a 3D display, you can move the camera by using the same controls listed in Camera Control in RoadRunner. Unlike the other render windows, you do not need to hold Alt to adjust the camera in the asset viewer.
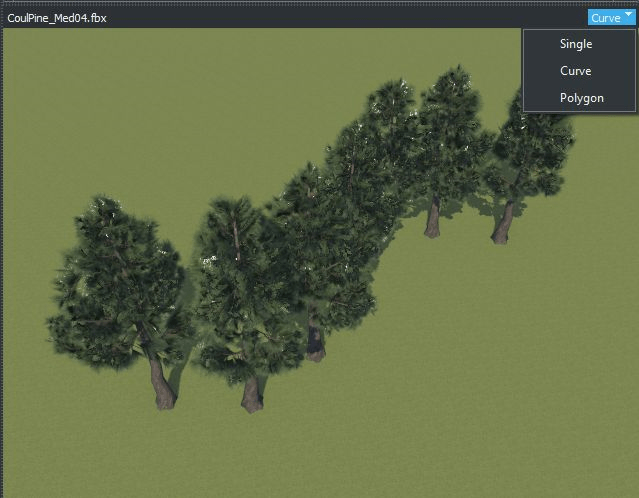
Change Asset Display Type
Some types of assets support additional viewing options. For example, Material Assets can be displayed on different types of geometry, and Prop Model Assets can be displayed as a point, curve, or collection.
To change the asset display type, in the top-right corner of the asset viewer, click the current display type and select the new display type you want.
Upgrade RoadRunner Asset Library
You can upgrade the assets of a project created with a previous version of RoadRunner to the current version. You do not need to have a RoadRunner Asset Library license to upgrade the assets. Upgrading the assets:
Removes the replaced assets from the old location.
Keeps customer assets (assets that are not in the Asset Library) intact.
Note
The file locations of all built-in assets are reset to their default locations. Make a copy of your project before upgrading if you have changed the file locations of any built-in assets.
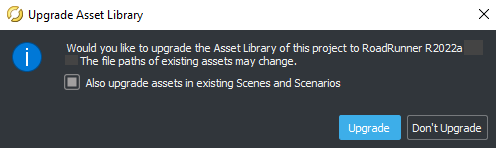
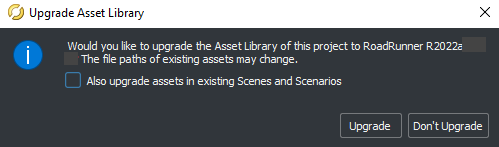
To upgrade the RoadRunner Asset Library, follow these steps:
Click Upgrade Asset Library from the Assets menu.

Select Also upgrade assets in existing Scenes and Scenarios if you want to upgrade the assets in the existing scene or scenario file. Then, click Upgrade in the Upgrade Asset Library dialog box.
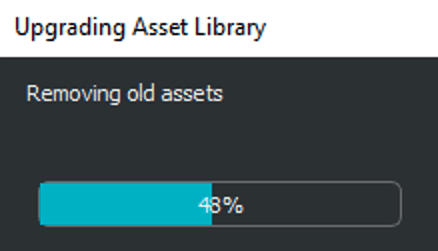
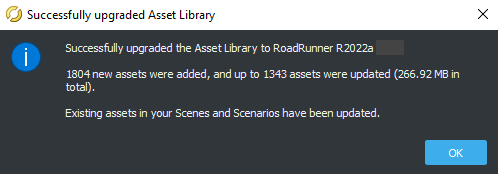
Once you click Upgrade, you can see the progress of the up-gradation process.
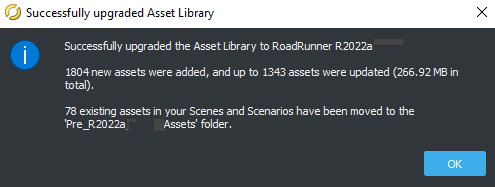
Once the upgrade process completes, you see a message in the dialog box, which denotes the successful completion of the upgrade. It also shows the number of assets added, the number of assets updated, and the amount of memory used by the assets. The upgrade process does not fail if no new assets are detected.
If you want to keep the assets in your scenes and scenarios intact, uncheck the Also upgrade assets in existing Scenes and Scenarios in the Upgrade Asset Library dialog box. The assets found in your scenes and scenarios that would otherwise be replaced are automatically moved to a new folder.
Once the upgrade process completes, you see a message in the dialog box, which denotes the successful completion of the upgrade. It also shows the number of assets added, the number of assets updated, and the amount of memory used by the assets. It also shows the number of existing assets that are moved to a new folder Pre_R2022a_Assets'