Identifizieren nichtlinearer Black-Box-Modelle mithilfe der App „System Identification“
Einführung
Ziele
Schätzen und Validieren nichtlinearer Modelle aus SISO-Daten, um herauszufinden, welches Modell die Systemdynamiken am besten darstellt.
Nach Abschluss dieses Tutorials können Sie die folgenden Aufgaben mithilfe der App System Identification ausführen:
Importieren von Datenobjekten aus dem MATLAB®-Workspace in die App.
Schätzen und Validieren nichtlinearer Modelle anhand der Daten.
Plotten und Analysieren des Verhaltens von Nichtlinearitäten.
Datenbeschreibung
In diesem Tutorial wird die Datendatei twotankdata.mat verwendet, die Single-Input/Single-Output-(SISO-)Zeitdomänendaten für ein System mit zwei Tanks enthält (siehe die folgende Abbildung).
System mit zwei Tanks

In diesem System mit zwei Tanks wird Wasser durch ein Rohr in Tank 1 geleitet, das in Tank 2 abfließt und das System durch eine kleine Öffnung am Boden von Tank 2 verlässt. Der gemessene Eingang u(t) für das System entspricht der Spannung, die an der Pumpe anliegt, die Wasser in Tank 1 leitet (in Volt). Der gemessene Ausgang y(t) entspricht dem Wasserstand im unteren Tank (in Metern).
Basierend auf dem Gesetz von Bernoulli, nach dem die Strömungsgeschwindigkeit von Wasser, das durch eine kleine Öffnung am Boden eines Tanks abfließt, nichtlinear vom Wasserstand im Tank abhängig ist, wird erwartet, dass die Beziehung zwischen den Eingangs- und Ausgangsdaten nichtlinear ist.
twotankdata.mat umfasst 3000 Stichproben mit einer Abtastzeit von 0,2 s.
Was sind nichtlineare Black-Box-Modelle?
Typen nichtlinearer Black-Box-Modelle
Sie können nichtlineare, zeitdiskrete Black-Box-Modelle für Zeitdomänendaten eines Ausgangs oder mehrerer Ausgänge schätzen. Sie haben die Wahl zwischen zwei Typen nichtlinearer Black-Box-Modellstrukturen:
Nichtlineare ARX-Modelle
Hammerstein-Wiener-Modelle
Hinweis
Sie können Hammerstein-Wiener-Black-Box-Modelle ausschließlich anhand von Eingangs-/Ausgangsdaten schätzen. Diese Modelle unterstützen keine Zeitreihen, bei denen es keinen Eingang gibt.
Weitere Informationen zum Schätzen nichtlinearer Black-Box-Modelle finden Sie unter Identifikation nicht linearer Modelle.
Was ist ein nichtlineares ARX-Modell?
Ein nichtlineares ARX-Modell besteht aus Modellregressoren und einer Ausgangsfunktion. Die Ausgangsfunktion umfasst mindestens ein Zuordnungsobjekt, eines für jeden Modellausgang. Jedes Zuordnungsobjekt kann eine lineare und eine nichtlineare Funktion umfassen, die auf die Modellregressoren wirken, sodass das Modell einen Ausgang und einen festen Offset für diesen Ausgang erhält. Dieses Blockdiagramm stellt die Struktur eines nichtlinearen ARX-Modells mit einem Ausgang in einem Simulationsszenario dar.

Die Software berechnet den nichtlinearen ARX-Modellausgang y in zwei Phasen:
Sie berechnet Regressorwerte aus den aktuellen und bisherigen Eingangswerten und aus den bisherigen Ausgangsdaten.
Im einfachsten Fall sind Regressoren verzögerte Eingänge und Ausgänge, z. B. u(t–1) und y(t–3). Diese Art von Regressoren werden lineare Regressoren genannt. Sie geben lineare Regressoren mithilfe des Objekts
linearRegressoran. Sie können lineare Regressoren auch angeben, indem Sie Ordnungen linearer ARX-Modelle als Eingangsargument angeben. Weitere Informationen finden Sie unter Nonlinear ARX Model Orders and Delay. Allerdings begrenzt dieser zweite Ansatz Ihre Regressormenge auf lineare Regressoren mit aufeinanderfolgenden Verzögerungen. Verwenden Sie zum Erstellen von Polynomregressoren das ObjektpolynomialRegressor. Verwenden Sie zum Erstellen periodischer Regressoren, die die Sinus- und Kosinusfunktionen von verzögerten Eingangs- und Ausgangsvariablen enthalten, dasperiodicRegressor-Objekt. Sie können auch benutzerdefinierte Regressoren angeben, bei denen es sich um nichtlineare Funktionen verzögerter Eingänge und Ausgänge handelt. Beispielsweise ist u(t–1)y(t–3) ein benutzerdefinierter Regressor, der Instanzen von Eingang und Ausgang miteinander multipliziert. Geben Sie benutzerdefinierte Regressoren mithilfe des ObjektscustomRegressoran.Sie können jeden der Regressoren als Eingang zum linearen Funktionsblock der Ausgangsfunktion und/oder zum nichtlinearen Funktionsblock zuweisen.
Die Regressoren werden dem Modellausgang mithilfe eines Ausgangsfunktionsblocks zugeordnet. Der Ausgangsfunktionsblock kann mehrere Zuordnungsobjekte umfassen, die jeweils lineare, nichtlineare und Offset-Blöcke parallel enthalten. Gehen Sie beispielsweise von der folgenden Gleichung aus:
Hier ist x ein Vektor der Regressoren und r ist der Mittelwert von x. ist der Ausgang des linearen Funktionsblocks. stellt den Ausgang des nichtlinearen Funktionsblocks dar. Q ist eine Projektionsmatrix, durch die die Berechnungen gut konditioniert werden. d ist ein skalarer Offset, der den kombinierten Ausgängen der linearen und nichtlinearen Blöcke hinzugefügt wird. Die exakte Form von F(x) hängt von der Ausgangsfunktion ab, die Sie ausgewählt haben. Sie können Ihre Wahl aus den verfügbaren Zuordnungsobjekten treffen, z. B. Netze mit Baumpartitionierung (tree-partition), Wavelet-Netze und neuronale Multilayer-Netze. Sie können auch den linearen oder den nichtlinearen Funktionsblock aus der Ausgangsfunktion ausschließen.
Beim Schätzen eines nichtlinearen ARX-Modells berechnet die Software die Modellparameterwerte, z. B. L, r, d, Q und andere Parameter durch Angabe von g.
Die resultierenden nichtlinearen ARX-Modelle sind idnlarx-Objekte, die alle Modelldaten speichern, einschließlich Modellregressoren und Parameter der Ausgangsfunktion. Weitere Informationen zu diesen Objekten finden Sie unter Nonlinear Model Structures.
Was ist ein Hammerstein-Wiener-Modell?
Dieses Blockdiagramm stellt die Struktur eines Hammerstein-Wiener-Modells dar:

Dabei gilt:
f ist eine nichtlineare Funktion, die Eingangsdaten u(t) in w(t) = f(u(t)) transformiert.
w(t), eine interne Variable, ist der Ausgang des Blocks „Input Nonlinearity“ (Eingangs-Nichtlinearität) und hat dieselbe Dimension wie u(t).
B/F ist eine lineare Transferfunktion, die w(t) in x(t) = (B/F)w(t) transformiert.
x(t), eine interne Variable, ist der Ausgang des Blocks „Linear“ und hat dieselbe Dimension wie y(t).
B und F ähneln Polynomen in einem linearen Ausgangsfehler-Modell. Weitere Informationen zu Ausgangsfehler-Modellen finden Sie unter What Are Polynomial Models?
Für ny-Ausgänge und nu-Eingänge ist der lineare Block eine Transferfunktionsmatrix, die die folgenden Einträge enthält:
Dabei gilt: j =
1,2,...,nyund i =1,2,...,nu.h ist eine nichtlineare Funktion, die den Ausgang des linearen Blocks x(t) dem Systemausgang y(t) als y(t) = h(x(t)) zuordnet.
Da f auf den Eingangskanal des linearen Blocks wirkt, wird diese Funktion Eingangs-Nichtlinearität genannt. Analog dazu wird, da h auf den Ausgangskanal des linearen Blocks wirkt, diese Funktion Ausgangs-Nichtlinearität genannt. Wenn Ihr System mehrere Eingänge und Ausgänge umfasst, müssen Sie die Funktionen f und h für jedes Eingangs- und Ausgangssignal definieren. Es ist nicht erforderlich, beide Nichtlinearitäten (also Eingangs- und Ausgangs-Nichtlinearität) in der Modellstruktur zu berücksichtigen. Wenn ein Modell nur die Eingangs-Nichtlinearität, f, umfasst, wird es Hammerstein-Modell genannt. Analog dazu wird ein Modell, das nur die Ausgangs-Nichtlinearität, h, umfasst, Wiener-Modell genannt.
Die Software berechnet den Ausgang y des Hammerstein-Wiener-Modells in drei Phasen:
Berechnen von w(t) = f(u(t)) aus den Eingangsdaten.
w(t) ist ein Eingang der linearen Transferfunktion B/F.
Die Eingangs-Nichtlinearität ist eine statische (speicherlose) Funktion, bei der der Wert des Ausgangs zu einem bestimmten Zeitpunkt t ausschließlich vom Eingang zum Zeitpunkt t abhängt.
Sie können die Eingangs-Nichtlinearität als S-förmiges Netz, Wavelet-Netz, Sättigung, Totzone, stückweise lineare Funktion, eindimensionales Polynom oder benutzerdefiniertes Netz konfigurieren. Sie können die Eingangs-Nichtlinearität auch entfernen.
Berechnen des Ausgangs des linearen Blocks mithilfe von w(t) und Anfangsbedingungen: x(t) = (B/F)w(t).
Sie können den linearen Block durch Angabe der Ordnungen des Zählers B und des Nenners F konfigurieren.
Berechnen des Modellausgangs durch Transformieren des Ausgangs des linearen Blocks x(t) mithilfe der nichtlinearen Funktion h in y(t) = h(x(t)).
Ähnlich wie die Eingangs-Nichtlinearität ist auch die Ausgangs-Nichtlinearität eine statische Funktion. Sie können die Ausgangs-Nichtlinearität auf dieselbe Weise konfigurieren wie die Eingangs-Nichtlinearität. Sie können die Ausgangs-Nichtlinearität auch entfernen, sodass Folgendes gilt: y(t) = x(t).
Die resultierenden Modelle sind idnlhw-Objekte, die alle Modelldaten speichern, einschließlich Modellparameter und Schätzfunktionen für die Nichtlinearität. Weitere Informationen zu diesen Objekten finden Sie unter Nonlinear Model Structures.
Vorbereiten von Daten
Laden von Daten in den MATLAB-Workspace
Laden Sie Beispieldaten in twotankdata.mat, indem Sie den folgenden Befehl in das MATLAB-Befehlsfenster eingeben:
load twotankdata
Dieser Befehl lädt die folgenden zwei Variablen in den MATLAB-Workspace:
uentspricht den gemessenen Eingangsdaten, also der Spannung, die an der Pumpe anliegt, die das Wasser Tank 1 zuführt (in Volt).yentspricht den Ausgangsdaten, also dem Wasserstand in Tank 2 (in Metern).
Erstellen von iddata-Objekten
Die Datenobjekte der System Identification Toolbox™ verkapseln Datenwerte und Dateneigenschaften zu einer einzigen Einheit. Sie können diese Datenobjekte mithilfe der Befehle der System Identification Toolbox komfortabel als einzelne Einheiten bearbeiten.
Sie müssen die Beispieldaten bereits in den MATLAB-Workspace geladen haben, wie in Laden von Daten in den MATLAB-Workspace beschrieben.
Verwenden Sie die folgenden Befehle, um zwei iddata-Datenobjekte, ze und zv, zu erstellen, wobei ze Daten für die Modellschätzung enthält, während zv Daten für die Modellvalidierung enthält. Ts ist die Abtastzeit.
Ts = 0.2; % Sample time is 0.2 sec
z = iddata(y,u,Ts);
% First 1000 samples used for estimation
ze = z(1:1000);
% Remaining samples used for validation
zv = z(1001:3000);
Zum Anzeigen der Eigenschaften des iddata-Objekts verwenden Sie den Befehl get. Beispiel:
get(ze)
Die Software MATLAB gibt die folgenden Dateneigenschaften und -werte zurück:
               Domain: 'Time'
                Name: ''
          OutputData: [1000x1 double]
                   y: 'Same as OutputData'
          OutputName: {'y1'}
          OutputUnit: {''}
           InputData: [1000x1 double]
                   u: 'Same as InputData'
           InputName: {'u1'}
           InputUnit: {''}
              Period: Inf
         InterSample: 'zoh'
                  Ts: 0.2000
              Tstart: 0.2000
    SamplingInstants: [1000x1 double]
            TimeUnit: 'seconds'
      ExperimentName: 'Exp1'
               Notes: {}
            UserData: []
Verwenden Sie zum Ändern von Dateneigenschaften die Punktschreibweise. Wenn Sie beispielsweise Kanalnamen und Einheiten zuweisen möchten, mit denen die Diagrammachsen beschriftet sind, geben Sie die folgende Syntax in das MATLAB-Befehlsfenster ein:
% Set time units to minutes
ze.TimeUnit = 'sec';
% Set names of input channels
ze.InputName = 'Voltage';
% Set units for input variables
ze.InputUnit = 'V';
% Set name of output channel
ze.OutputName = 'Height';
% Set unit of output channel
ze.OutputUnit = 'm';

% Set validation data properties
zv.TimeUnit = 'sec';
zv.InputName = 'Voltage';
zv.InputUnit = 'V';
zv.OutputName = 'Height';
zv.OutputUnit = 'm';
Um zu prüfen, ob sich die Eigenschaft InputName von ze geändert hat, geben Sie den folgenden Befehl ein:
ze.inputname
Tipp
Bei Eigenschaftennamen, z. B. InputName, muss die Groß-/Kleinschreibung nicht beachtet werden. Sie können Eigenschaftennamen, die mit Input oder Output beginnen, auch abkürzen, indem Sie im Namen u anstatt Input und y anstatt Output verwenden. Beispielsweise ist OutputUnit gleichbedeutend mit yunit.
Starten der App „System Identification“
Geben Sie zum Öffnen der App System Identification den folgenden Befehl in das MATLAB-Befehlsfenster ein:
systemIdentification
In der Titelleiste wird der Standard-Sitzungsname, Untitled, angezeigt.

Importieren von Datenobjekten in die App „System Identification“
Sie können die Datenobjekte aus dem MATLAB-Workspace in die App importieren.
Sie müssen die Datenobjekte bereits erstellt haben, wie in Erstellen von iddata-Objekten beschrieben, und die App geöffnet haben, wie in Starten der App „System Identification“ beschrieben.
So importieren Sie Datenobjekte:
Wählen Sie in der App System Identification die Optionen Import data > Data object aus.

Dadurch wird das Dialogfenster „Import Data“ (Daten importieren) geöffnet.

Geben Sie
zein das Feld Object ein, um die Schätzdaten zu importieren. Drücken Sie die Eingabetaste.Dadurch werden die Objektinformationen in die Felder für den Datenimport übernommen.
Klicken Sie auf More, um zusätzliche Informationen zu diesen Daten anzuzeigen, z. B. Kanalnamen und Einheiten.
Klicken Sie auf Import, um das Symbol mit dem Namen
zezur App System Identification hinzuzufügen.Geben Sie im Dialogfenster „Import Data“ den Wert
zvin das Feld Object ein, um die Validierungsdaten zu importieren. Drücken Sie die Eingabetaste.Klicken Sie auf Import, um das Symbol mit dem Namen
zvzur App System Identification hinzuzufügen.Klicken Sie im Dialogfenster „Import Data“ auf Close.
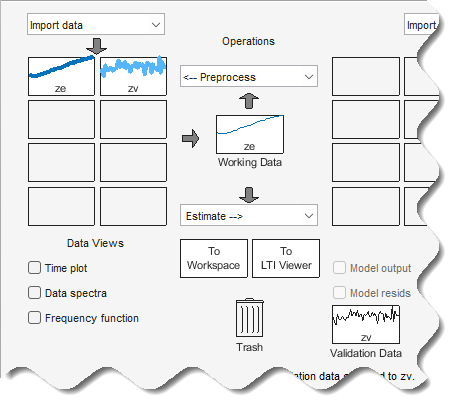
Ziehen Sie in der App System Identification das Symbol zv für die Validierungsdaten auf das Rechteck Validation Data. Das Symbol ze für die Schätzdaten ist im Rechteck Working Data bereits angegeben.
Klicken Sie alternativ mit der rechten Maustaste auf das Symbol
zv, um das Dialogfenster „Data/model Info“ zu öffnen. Aktivieren Sie das Kontrollkästchen Use as Validation Data (Als Validierungsdaten verwenden). Klicken Sie auf Apply und anschließend auf Close, umzvzum Rechteck Validation Data hinzuzufügen.Die App System Identification sieht nun in etwa wie folgt aus:
Schätzung nichtlinearer ARX-Modelle
Schätzung eines nichtlinearen ARX-Modells mit Standardeinstellungen
In diesem Teil des Tutorials schätzen Sie ein nichtlineares ARX-Modell mithilfe einer Standard-Modellstruktur und mithilfe von Schätzungsoptionen.
Sie müssen die Daten bereits vorbereitet haben, wie in Vorbereiten von Daten beschrieben. Weitere Informationen zu nichtlinearen ARX-Modellen finden Sie unter Was ist ein nichtlineares ARX-Modell?.
Hinweis
Die Abbildungen in diesem Tutorial stellen eine typische Sitzung in der App System Identification dar. Ihre Ergebnisse stimmen möglicherweise nicht exakt mit den Ergebnissen in den Abbildungen überein.
Wählen Sie in der App System Identification die Optionen Estimate > Nonlinear ARX Models aus.

Dadurch wird das Dialogfenster Estimate Nonlinear ARX Models (Nichtlineare ARX-Modelle schätzen) geöffnet.

Das Dialogfenster enthält zwei Registerkarten: Model Structure und Estimation Options.
Die Registerkarte Model Structure umfasst eine Option zur Initialisierung mithilfe eines bestehenden Modells. Sie enthält Parameter, die die Struktur des Modells konfigurieren, z. B. die Wahl des Regressors und den Typ der Ausgangsfunktion. Geben Sie den Namen des zu schätzenden Modells in Model name an. Der Standard-Modellname lautet
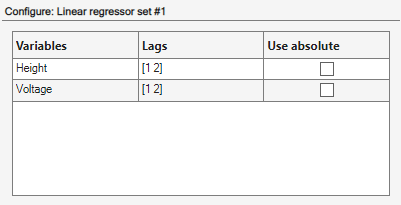
nlarx1.Erstellen Sie mithilfe der Registerkarte Regressors die zu verwendenden Regressormengen. Standardmäßig erstellt die App eine lineare Regressormenge mit Verzögerungen
[1 2]in jeder Variablen und speichert den Regressor alsLinear regressors #1im Bereich Regressor Sets. Dieser Bereich enthält eine Tabelle, die es Ihnen ermöglicht, die zu verwendenden Verzögerungen für die einzelnen Variablen zu ändern.
Der Konfigurationsbereich Configure: Linear regressors #1 enthält eine Tabelle mit den von der Regressormenge verwendeten Verzögerungswerten. Sie können diese Verzögerungen ändern.
In der Tabelle für die Regressorzuweisung, Assign Regressors to Output Function, sind die Regressornamen und Regressorzuweisungen zu den Komponenten der Ausgangsfunktion aufgelistet.

Die Regressorzuweisungen in der Tabelle erstellen ein Modell für den Ausgang
Height(Höhe):Height(t) = f(Height(t-1), Height(t-2),Voltage(t-1),Voltage(t-2))
Hier ist f(.) eine statische nichtlineare Funktion, die die Regressoren dem Ausgang zuordnet. Zum Auswählen von f(.) und den zugeordneten Parametern verwenden Sie die Registerkarte Output Function (Ausgangsfunktion).
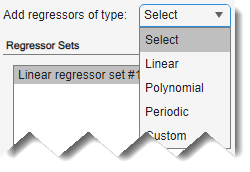
Sie können weitere Regressormengen, z. B. Polynome und benutzerdefinierte Formeln, hinzufügen, indem Sie in Add regressors of type (Hinzufügen von Regressoren des Typs) einen Regressortyp auswählen.
Dieses Beispiel verwendet nur
Linear regressors #1.Wählen Sie die Registerkarte Output Function aus.
Aus der Registerkarte wird ersichtlich, dass die App Wavelet Network als Standardtyp der Ausgangsfunktion f(.) auswählt. Diese Funktion verwendet die Summe einer linearen Funktion, einer nichtlinearen Funktion (die der Summe skalierter Wavelets entspricht) und eines Offset-Ausdrucks, um den Ausgang zu berechnen. Auf der Registerkarte werden auch verschiedene Konfigurationsparameter angezeigt. Die Anzahl der von der Funktion verwendeten Wavelets ist so konfiguriert, dass sie während der Schätzung automatisch ausgewählt wird. Sie können diese Auswahl ändern. Behalten Sie für die erste Schätzung die Standardauswahl bei.

Klicken Sie auf Estimate.
Bei diesem Vorgang wird das Modell
nlarx1zur Modellübersicht in der App System Identification hinzugefügt (siehe die folgende Abbildung).
Doppelklicken Sie oder klicken Sie mit der rechten Maustaste auf das Modellsymbol
nlarx1. In der Modellübersicht werden Informationen zum geschätzten Modell angezeigt. Im oberen Bereich sind die Modellstruktur und die Schätzergebnisse beschrieben (verwendete Daten, Prozentsatz der Übereinstimmung und andere Qualitätsmetriken). Im unteren Bereich (Diary and Notes) wird das MATLAB-Skript angezeigt, das Sie in die Befehlszeile eingeben können, um die Schätzergebnisse zu reproduzieren.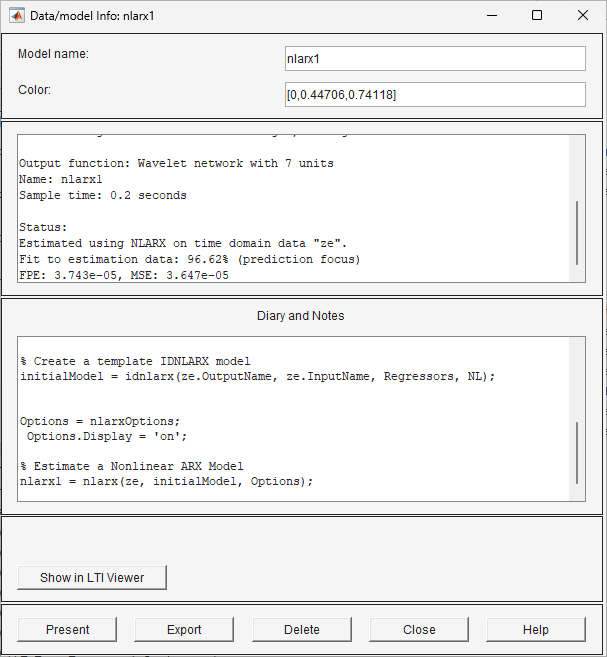
Hinweis
Fit (%) wird mithilfe des Schätzdatensatzes mit Vorhersagefokus und nicht mithilfe des Validierungsdatensatzes berechnet. Allerdings wird im Modellausgangsdiagramm im nächsten Schritt die Übereinstimmung mit dem Validierungsdatensatz verglichen. Wenn Sie anzeigen möchten, wie gut das Modell die Antwort eines unabhängigen Validierungsdatensatzes simulieren kann, verwenden Sie das Diagramm Model Output, wie im folgenden Schritt beschrieben.
Wählen Sie das Modellsymbol
nlarx1und im Bereich Model Views der System Identification-App die Option Model output aus. Dadurch wird das Modell simuliert, indem die Eingangsvalidierungsdaten als Eingang für das Modell verwendet werden und der simulierte Ausgang über den Ausgangsvalidierungsdaten geplottet wird.
Der Bereich Best Fits des Modellausgangsdiagramms zeigt die Übereinstimmung zwischen dem Modellausgang und dem Validierungsdatenausgang mithilfe einer Normalized-Root-Mean-Squared-Error-(NRMSE-)Metrik (Metrik der Wurzel des mittleren quadratischen Fehlers, normalisiert) der Anpassungsgüte. Im Zeitbereich zwischen 400 und 500 liegt eine schlechte Übereinstimmung vor.
Plotten von Nichtlinearitäts-Querschnitten für nichtlineare ARX-Modelle
Mithilfe der folgenden Vorgehensweise können Sie die Form der Nichtlinearität als Funktion von Regressoren im Diagramm eines nichtlinearen ARX-Modells anzeigen.
Aktivieren Sie in der App System Identification das Kontrollkästchen Nonlinear ARX , um die Nichtlinearitäts-Querschnitte anzuzeigen.
Standardmäßig wird im Diagramm die Beziehung zwischen den Ausgangsregressoren
Height(t-1)undHeight(t-2)angezeigt. In diesem Diagramm wird eine normale Ebene angezeigt (siehe die folgende Abbildung). Daher entspricht die Beziehung zwischen den Regressoren und dem Ausgang in etwa einer linearen Ebene.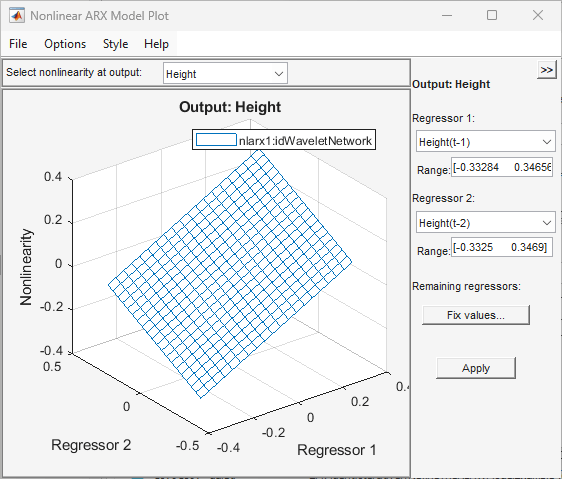
Setzen Sie im Dialogfenster „Nonlinear ARX Model Plot“ die Option Regressor 1 auf
Voltage(t-1). Setzen Sie Regressor 2 aufVoltage(t-2). Klicken Sie auf Apply.Die Beziehung zwischen diesen Regressoren und dem Ausgang ist nichtlinear, wie im folgenden Diagramm dargestellt.

Zum Drehen der Nichtlinearitätsfläche wählen Sie Style > Rotate 3D aus und richten Sie das Diagramm mit der Maus neu aus.
Zum Anzeigen eines eindimensionalen Querschnitts für Regressor 1 setzen Sie Regressor 2 auf
noneund klicken Sie anschließend auf Apply. Die folgende Abbildung zeigt die resultierende Nichtlinearitätsgröße für Regressor 1, also das zeitversetzte Spannungssignal,Voltage(t-1).
Ändern der Struktur nichtlinearer ARX-Modelle
In diesem Teil des Tutorials schätzen Sie ein nichtlineares ARX-Modell mithilfe einer spezifischen Eingangsverzögerung und mithilfe von Nichtlinearitäts-Einstellungen. In der Regel wählen Sie Modellordnungen durch Ausprobieren aus, bis ein Modell vorliegt, das exakt mit den Daten übereinstimmt.
Sie müssen das nichtlineare ARX-Modell bereits mit Standardeinstellungen geschätzt haben, wie in Schätzung eines nichtlinearen ARX-Modells mit Standardeinstellungen beschrieben.
Wählen Sie im Dialogfenster Estimate Nonlinear ARX Models (Nichtlineare ARX-Modelle schätzen) die Registerkarte Model Structure und anschließend die Registerkarte Regressors aus.
Ändern Sie im Bereich Configure: Linear regressors #1 die Verzögerungen der Variablen
Voltagein[3 4]. Dies ist deshalb erforderlich, weil die Daten nahelegen, dass zwischen dem Eingang und dem Ausgang mindestens 3 Abtastverzögerungen vorhanden sind.Mit dieser Aktion wird die Liste der Regressoren aktualisiert, sodass
Voltage(t-3)undVoltage(t-4)angezeigt werden – Ausdrücke mit einer Mindestverzögerung von drei Abtastungen.
Klicken Sie auf Estimate.
Dadurch wird das Modell
nlarx2der App System Identification hinzugefügt und das Fenster Model Output wird mit diesem Modell aktualisiert. Wenn Sie in der Modellübersicht auf das Symbolnlarx2klicken, werden in der Modellübersicht des Hauptfensters der App die Schätzergebnisse angezeigt.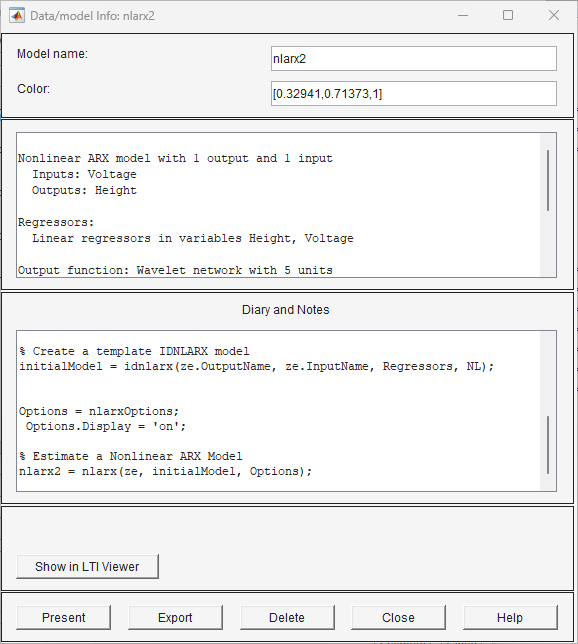
Die App aktualisiert auch das Modellausgangsdiagramm, um die Übereinstimmung des Modells
nlarx2mit dem Validierungsdatensatzzvanzuzeigen. Das Diagramm zeigt, dass durch Auswahl der korrekten Eingangsgrößenverzögerungen die Übereinstimmung verbessert werden kann.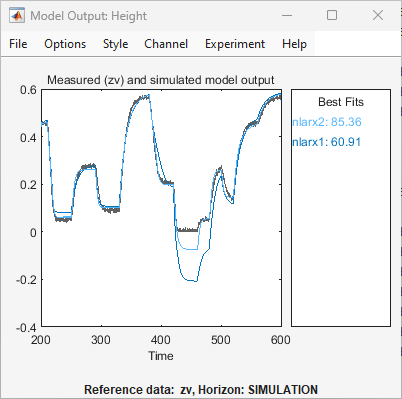
Wählen Sie im Dialogfenster Estimate Nonlinear ARX Models (Nichtlineare ARX-Modelle schätzen) die Registerkarte Model Structure und anschließend die Registerkarte Output Function aus.
Wählen Sie für Number of Units (Anzahl der Einheiten) Enter (Eingabe) aus und geben Sie den Wert
6ein. Durch Festlegen einer bestimmten Zahl kann die Flexibilität der nichtlinearen Funktion gesteuert werden, indem die Anzahl der von Wavelet Network verwendeten Wavelets direkt angegeben wird.
Klicken Sie auf Estimate.
Dadurch wird das Modell
nlarx3der App System Identification hinzugefügt. Außerdem wird das Fenster Model Output aktualisiert, wie in der folgenden Abbildung dargestellt.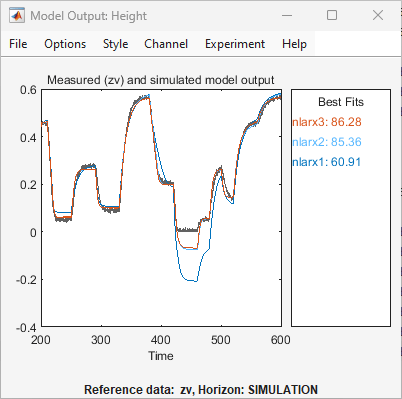
Verwenden von Polynomregressoren
Sie können ein lineares ARX-Modell schätzen, das höhere Potenzen verzögerter Variablen als Regressoren verwendet. In diesem Beispiel fügen Sie der verzögerten Variablen Polynome zweiter Ordnung hinzu, unter anderem auch Kreuzterme.
Wählen Sie im Dialogfenster Estimate Nonlinear ARX Models (Nichtlineare ARX-Modelle schätzen) die Registerkarte Model Structure und anschließend die Registerkarte Regressors aus.
Erweitern Sie die Option Add regressors of type und wählen Sie Polynomial aus.
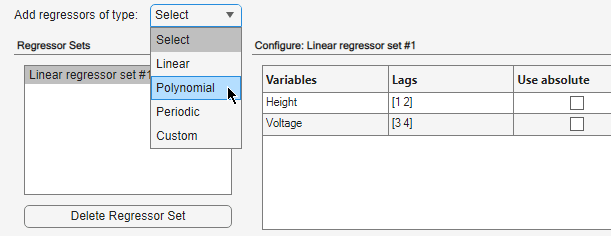
Dadurch wird eine Polynomregressormenge mit dem Namen
Polynomial regressors #1der Liste der Regressormengen hinzugefügt. Standardmäßig ist diese Menge so konfiguriert, dass sie Regressoren zweiter Ordnung generiert.Ändern Sie die Spannungsverzögerungen (
Voltage) in[3 4].Wählen Sie Mix lags (Variablen-Mix einschließen) aus, um alle Kreuzterme zu berücksichtigen. Mit dieser Aktion werden dem Modell zehn Regressoren zweiter Ordnung hinzugefügt (zusätzlich zu den vier, die von Linear regressor #1 beigesteuert wurden).

Klicken Sie auf Estimate. Dadurch wird das Modell
nlarx4der App hinzugefügt. Die App aktualisiert das Diagramm Model Output wie in der folgenden Abbildung dargestellt.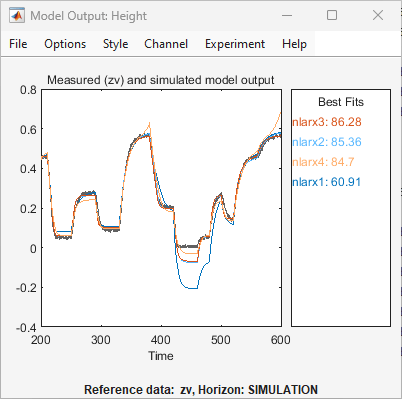
Das Diagramm zeigt, dass das Hinzufügen von Polynomregressoren die Generalisierungsfähigkeit des Modells nicht verbessert hat. Dies bedeutet, dass das Modell für unabhängige Validierungsdaten keine bessere Übereinstimmung zwischen dem Modellausgang und dem gemessenen Ausgang bereitstellt. Dieses Ergebnis ist in der Regel das Szenario mit Überanpassungen, also wenn das Modell mehr Regressoren enthält als absolut notwendig.
Auswählen einer Teilmenge an Regressoren im nichtlinearen Block
Sie können ein nichtlineares ARX-Modell schätzen, das nur eine Teilmenge von Regressoren umfasst, die als Eingänge für den nichtlinearen Block dienen. Standardmäßig werden alle Regressoren im nichtlinearen Block verwendet. In diesem Teil des Tutorials weisen Sie dem nichtlinearen Block nur eine Teilmenge der Regressoren zu.
Sie müssen die Modellstruktur bereits, wie in Ändern der Struktur nichtlinearer ARX-Modelle beschrieben, angegeben haben.
Wählen Sie im Dialogfenster Estimate Nonlinear ARX Models (Nichtlineare ARX-Modelle schätzen) die Registerkarte Model Structure und anschließend die Registerkarte Regressors aus.
Sofern der Bereich Assign Regressors to Output Function (Zuweisen von Regressoren zur Ausgangsfunktion) reduziert ist, erweitern Sie ihn.
Heben Sie in der Spalte Height:NonlinearFcn der Tabelle die Auswahl aller Regressoren zweiter Ordnung auf. Heben Sie in der Spalte Height:LinearFcn zudem die Auswahl aller Regressoren mit Kreuztermen (also Regressoren, die aus Produkten zweier Terme bestehen) auf.

Klicken Sie auf Estimate.
Dadurch wird das Modell
nlarx5der App System Identification hinzugefügt. Außerdem wird das Fenster Model Output aktualisiert.
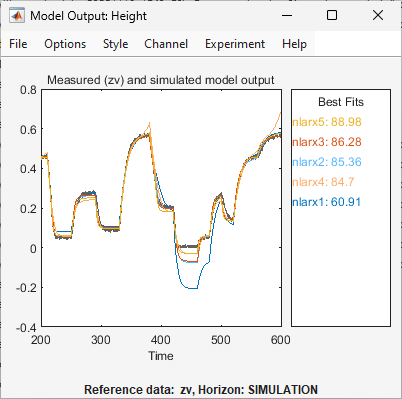
Dieses Modell zeigt eine verbesserte Generalisierungsfähigkeit.
Angeben des zuvor geschätzten Modells mit einer anderen Nichtlinearität der Ausgangsfunktion
Sie können eine Reihe nichtlinearer ARX-Modelle schätzen, indem Sie die Modellstruktur systematisch variieren und jedes neue Modell auf der Konfiguration eines zuvor geschätzten Modells aufbauen. In diesem Teil des Tutorials schätzen Sie ein nichtlineares ARX-Model, das einem bestehenden Modell (nlarx3) ähnelt, doch eine andere Nichtlinearität in der Ausgangsfunktion aufweist.
Wählen Sie im Dialogfenster Estimate Nonlinear ARX Models die Registerkarte Model Structure aus.
Klicken Sie auf Select neben Initialize using existing model (optional). Wählen Sie im Dialogfenster Initialize Model
nlarx3aus Nonlinear model aus und klicken Sie auf OK. Dadurch werden die Eigenschaften, die auf den Registerkarten Regressors und Output Function angezeigt werden, auf die Werte vonnlarx3gesetzt.
Wählen Sie die Registerkarte Output Function aus.
Ändern Sie in der Tabelle die Auswahl von Nonlinear Function in
Sigmoid Network. Dadurch wird die Ausgangsfunktion auf ein S-förmiges Netz gesetzt.Geben Sie in das Feld Enter the number of units den Wert
6ein.
Klicken Sie auf Estimate.
Dadurch wird das Modell
nlarx6der App System Identification hinzugefügt. Auch das Diagramm Model Output wird aktualisiert, wie in der folgenden Abbildung dargestellt.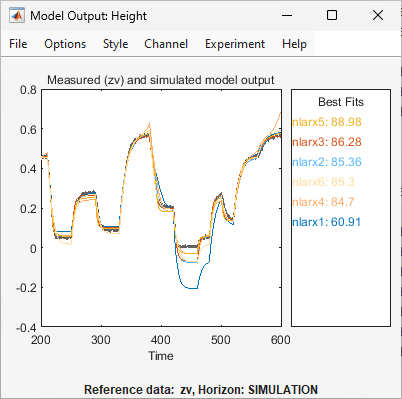
Auswählen des besten Modells
Das beste Modell ist das einfachste Modell, das die Dynamiken exakt beschreibt. Die Ergebnisse weisen darauf hin, dass das Modell nlarx3 ein Kandidat für das beste idnlarx-Modell für diese Daten ist, basierend auf der Auswahl an Modellstrukturen, die in diesem Beispiel untersucht wurden.
Exportieren des besten Modells in den Basis-Workspace
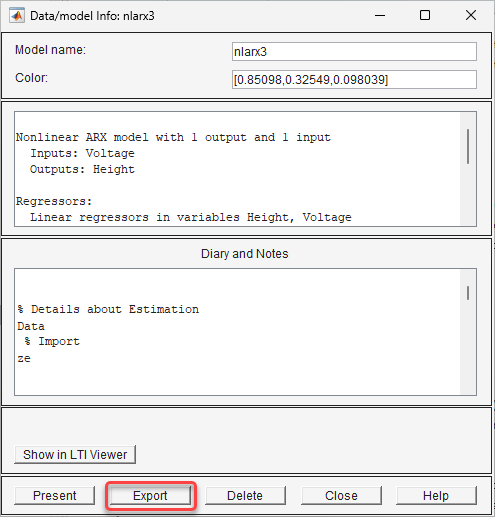
Ziehen Sie das Symbol nlarx3 in das Feld To Workspace im Hauptfenster der App System Identification. Alternativ doppelklicken Sie auf das Symbol nlarx3, um die Informationsübersicht zu öffnen. Von dort aus klicken Sie auf Export, um das Modell in den Basis-Workspace zu exportieren.
Schätzen von Hammerstein-Wiener-Modellen
Schätzen von Hammerstein-Wiener-Modellen mit Standardeinstellungen
In diesem Teil des Tutorials schätzen Sie nichtlineare Hammerstein-Wiener-Modelle mithilfe einer Standard-Modellstruktur und mithilfe von Schätzungsoptionen.
Sie müssen die Daten bereits vorbereitet haben, wie in Vorbereiten von Daten beschrieben. Weitere Informationen zu nichtlinearen ARX-Modellen finden Sie unter Was ist ein Hammerstein-Wiener-Modell?.
Hinweis
Die Abbildungen in diesem Tutorial stellen eine typische Sitzung in der App System Identification dar. Ihre Ergebnisse stimmen möglicherweise nicht exakt mit den Ergebnissen in den Abbildungen überein.
Wählen Sie in der App System Identification die Optionen Estimate > Hammerstein-Wiener Models aus, um das Dialogfenster Estimate Hammerstein-Wiener Models zu öffnen. Das Dialogfenster enthält zwei Registerkarten: Model Structure und Estimation Options.
Überprüfen Sie die Standard-Modellstruktur. Die Registerkarte Model Structure umfasst drei Registerkarten – eine für jede Komponente des Modells. Bei diesen Komponenten handelt es sich um die Eingangs-Nichtlinearität, den linearen Dynamikblock und die Ausgangs-Nichtlinearität.
Wählen Sie die Registerkarte Input Nonlinearity aus. Die Standard-Nichtlinearität ist eine stückweise lineare Funktion (Piecewise Linear) mit 10 Haltepunkten.

Wählen Sie die Registerkarte Linear Block aus. Die lineare Transferfunktion hat eine Zählerordnung von 2, was ein Polynom zweiter Ordnung in z-1 impliziert, eine Nennerordnung von 3 und eine Eingangsverzögerung von einer Abtastung.

Wählen Sie die Registerkarte Output Nonlinearity aus. Genau wie auf der Registerkarte Input Nonlinearity ist auch die Standardlinearität eine stückweise lineare Funktion (Piecewise Linear) mit 10 Haltepunkten.

Klicken Sie auf Estimate.
Dadurch werden die Parameter des Hammerstein-Wiener-Modells geschätzt, um die Differenz zwischen dem Modellausgang und dem gemessenen Ausgang (
ze.OutputData) zu minimieren. Die geschätzten Parameter sind:Die Haltepunktpositionen (x- und y-Koordinaten) der stückweise linearen Funktionen der Eingänge und Ausgänge.
Die Zähler- und Nennerpolynomkoeffizienten, die die lineare Blocktransferfunktion bilden.
Die Software fügt das geschätzte Modell
nlhw1zur Modellübersicht in der App System Identification hinzu.
Aktivieren Sie in der App System Identification das Kontrollkästchen Model output.
Dadurch wird das Modell simuliert, indem die Eingangsvalidierungsdaten als Eingang für das Modell verwendet werden und der simulierte Ausgang über den Ausgangsvalidierungsdaten geplottet wird. Beachten Sie, dass die Validierungsdaten auf
zvgesetzt sind.
Der Bereich Best Fits des Modellausgangsfensters zeigt die Übereinstimmung zwischen dem Modellausgang und dem Validierungsdatenausgang.

Das Modell
nlhw1wird nicht gut validiert. Die Übereinstimmung mitzv.OutputDataist schlecht.
Plotten von Nichtlinearitäten und der linearen Transferfunktion
Sie können die Eingangs-/Ausgangs-Nichtlinearitäten und die lineare Transferfunktion des Modells in einem Hammerstein-Wiener-Diagramm plotten.
Aktivieren Sie in der App System Identification das Kontrollkästchen Hamm-Wiener, um das Diagramm des Hammerstein-Wiener-Modells anzuzeigen.
Im Diagramm ist die Eingangs-Nichtlinearität dargestellt (siehe die folgende Abbildung).

Klicken Sie auf das Rechteck yNL im oberen Bereich des Fensters „Hammerstein-Wiener Model Plot“.
Das Diagramm wird aktualisiert und zeigt die Ausgangs-Nichtlinearität an.

Klicken Sie auf das Rechteck Linear Block im oberen Bereich des Fensters Fensters „Hammerstein-Wiener Model Plot“.
Das Diagramm wird aktualisiert und zeigt die Sprungantwort der linearen Transferfunktion an.

Wählen Sie aus der Liste Choose plot type den Eintrag
Bodeaus. Dadurch wird ein Bode-Diagramm der linearen Transferfunktion angezeigt.
Ändern der Eingangsverzögerung von Hammerstein-Wiener-Modellen
In diesem Teil des Tutorials schätzen Sie ein Hammerstein-Wiener-Modell mithilfe einer spezifischen Modellordnung und mithilfe von Nichtlinearitäts-Einstellungen. In der Regel wählen Sie Modellordnungen und Verzögerungen indem Sie solange ausprobieren, bis ein Modell vorliegt, das eine zufriedenstellende Übereinstimmung mit den Daten bietet.
Sie müssen das Hammerstein-Wiener-Modell bereits mit Standardeinstellungen geschätzt haben, wie in Schätzen von Hammerstein-Wiener-Modellen mit Standardeinstellungen beschrieben.
Wählen Sie im Dialogfenster Estimate Hammerstein-Wiener die Registerkarte Model Structure und anschließend die Registerkarte Linear Block aus.
Doppelklicken Sie für den Spannungseingangskanal (
Voltage) auf die entsprechende Zelle für die Eingangsverzögerung (Input Delay (nk)) und geben Sie den Wert3ein.Klicken Sie auf Estimate.
Bei diesem Vorgang wird das Modell
nlhw2der App System Identification hinzugefügt und das Diagramm Model Output wird aktualisiert, wie in der folgenden Abbildung veranschaulicht.
Im Bereich Best Fits des Fensters „Model Output“ wird die Qualität der Übereinstimmung von
nlhw2angezeigt, die eine Verbesserung gegenüber dem Modellnlhw1darstellt.
Ändern der Nichtlinearitäts-Schätzfunktion im Hammerstein-Wiener-Modell
In diesem Teil des Beispiels ändern Sie die Hammerstein-Wiener-Modellstruktur, indem Sie deren Nichtlinearitäts-Schätzfunktion ändern.
Tipp
Wenn Sie wissen, dass Ihr System Sättigungs- oder Totzonen-Nichtlinearitäten umfasst, können Sie diese spezialisierten Nichtlinearitäts-Schätzfunktionen in Ihrem Modell angeben. Piecewise Linear, Wavelet Network und Sigmoid Network sind Nichtlinearitäts-Schätzfunktionen für die allgemeine Nichtlinearitäts-Approximation.
Wählen Sie im Dialogfenster Estimate Hammerstein-Wiener Models die Registerkarte Model Structure und anschließend die Registerkarte Input Nonlinearity aus.
Klicken Sie auf die Zelle Nonlinearity für die Variable
Voltageund wählen SieSigmoid Networkaus der Liste aus.
Setzen Sie den Wert im Feld Enter the number of units auf
20.
Klicken Sie auf Estimate.
Dadurch wird das Modell
nlhw3der App System Identification hinzugefügt. Außerdem wird das Fenster Model Output aktualisiert, wie in der folgenden Abbildung dargestellt.
Wählen Sie im Dialogfenster Estimate Hammerstein-Wiener Models die Registerkarte Input Nonlinearity aus.
Legen Sie für den Eingang
Voltage(Spannung) in der Spalte Nonlinearity (Nichtlinearität) den WertWavelet Network(Wavelet-Netz) fest. Der Standardwert für Number of Units ist Select Automatically.
Wählen Sie die Registerkarte Output Nonlinearity aus.
Setzen Sie für den Ausgang
Heightdie Einstellung Nonlinearity aufOne-dimensional Polynomial(Eindimensionales Polynom). Setzen Sie Degree of polynomial (Grad des Polynoms) auf2.
Klicken Sie auf Estimate.
Dadurch wird das Modell
nlhw4der App System Identification hinzugefügt. Außerdem wird das Fenster Model Output aktualisiert, wie in der folgenden Abbildung dargestellt.
Auswählen des besten Modells
Das beste Modell ist das einfachste Modell, das die Dynamiken exakt beschreibt.
In diesem Beispiel sind die Modelle nlhw3 und nlhw4 gute Kandidaten.