Generate RoadRunner Scenario from Recorded Sensor Data
This example shows how to generate a RoadRunner scenario containing actor trajectories by using data extracted from actor track data and Global Positioning System (GPS) data.
RoadRunner Scenario is an interactive editor that enables you to design scenarios for simulating and testing automated driving systems. Generating scenarios from recorded vehicle data enables you to mimic real-world driving scenarios and improve the test coverage of automated driving systems.
In this example you:
Reconstruct ego-vehicle trajectory from GPS data
Extract non-ego actor trajectories from the recorded track data
Export actor trajectories on a map in RoadRunner
Simulate RoadRunner Scenario
Load Sensor Data
This example requires the Scenario Builder for Automated Driving Toolbox™ support package. Check if the support package is installed and, if it is not installed, install it using the Get and Manage Add-Ons.
checkIfScenarioBuilderIsInstalled
Download a ZIP file containing a subset of sensor data from the PandaSet data set, and then unzip the file. This file contains GPS data, an actor track list, and camera information. In this example, you use the camera data for visual validation of the generated scenario.
dataFolder = tempdir;
dataFilename = "PandasetSeq90_94.zip";
url = "https://ssd.mathworks.com/supportfiles/driving/data/" + dataFilename;
filePath = fullfile(dataFolder,dataFilename);
if ~isfile(filePath)
    websave(filePath,url);
end
unzip(filePath,dataFolder)
dataset = fullfile(dataFolder,"PandasetSeq90_94");
data = load(fullfile(dataset,"sensorData.mat"));
The GPS data is a table with these columns:
timeStamp— Timestamps, in seconds, at which the GPS data was collected.latitude— Latitude coordinate values of the ego vehicle. Units are in degrees.longitude— Longitude coordinate values of the ego vehicle. Units are in degrees.altitude— Altitude coordinate values of the ego vehicle. Units are in meters.
Extract GPS data from the recorded GPS readings and load them in the workspace.
gpsTimestamps = data.GPS.timeStamp;
latitude = data.GPS.latitude;
longitude = data.GPS.longitude;
% Set altitude to 0 as the scene does not contain height information.
altitude = zeros(size(data.GPS.altitude));
Create a GPSData object by using the recordedSensorData function to store the loaded GPS data.
gpsData = recordedSensorData("gps",gpsTimestamps,latitude,longitude,altitude)gpsData =
GPSData with properties:
Name: ''
NumSamples: 400
Duration: 39.8997
SampleRate: 10.0251
SampleTime: 0.1000
Timestamps: [400×1 double]
Latitude: [400×1 double]
Longitude: [400×1 double]
Altitude: [400×1 double]
Attributes: []
The actor track data is a table with these columns:
timeStamp— Timestamps, in seconds, at which the track was updated.Positions— 3D positions of the actors in meters.Dimension— Dimensions of the actors in meters.Orientation— Orientations of the actors in degrees.
You can generate actor track list by processing raw camera or lidar sensor data. For more information on how to generate actor track list from camera data, see the Extract Vehicle Track List from Recorded Camera Data for Scenario Generation example. For more information on how to generate track list from lidar data, see the Extract Vehicle Track List from Recorded Lidar Data for Scenario Generation example.
Extract the actor track data and load them into the workspace to create an ActorTrackData object by using the recordedSensorData function.
actorTimes = data.ActorTracks.timeStamp;
trackIDs = data.ActorTracks.TrackIDs;
actorPos = data.ActorTracks.Positions;
actorDims = data.ActorTracks.Dimension;
actorOrient = data.ActorTracks.Orientation;
trackData = recordedSensorData("actorTrack",actorTimes,trackIDs,actorPos,Dimension=actorDims,Orientation=actorOrient)
trackData =
ActorTrackData with properties:
Name: ''
NumSamples: 400
Duration: 39.8997
SampleRate: 10.0251
SampleTime: 0.1000
Timestamps: [400×1 double]
TrackID: {400×1 cell}
Category: []
Position: {400×1 cell}
Dimension: {400×1 cell}
Orientation: {400×1 cell}
Velocity: []
Speed: []
Age: []
Attributes: []
UniqueTrackIDs: [20×1 string]
UniqueCategories: []
Extract the camera data recorded from a forward-facing monocular camera mounted on the ego vehicle.
The camera data is a table with two columns:
timeStamp— Time, in seconds, at which the image data was captured.fileName— Filenames of the images in the data set.
Extract the image file names from the camera data.
imageFileNames = strcat(fullfile(dataset,"Camera"),filesep,data.Camera.fileName);Extract camera intrinsic parameters and create a monoCamera object.
focalLength = [data.Intrinsics.fx,data.Intrinsics.fy];
principlePoint = [data.Intrinsics.cx,data.Intrinsics.cy];
imageSize = size(imread(imageFileNames{1}),1:2);
intrinsics = cameraIntrinsics(focalLength,principlePoint,imageSize);

camTimestamps = data.Camera.timeStamp;
cameraParams = monoCamera(intrinsics,data.CameraHeight);
Create a CameraData object by using the recordedSensorData function. Ensure that camTimestamps and imageFileNames have one-to-one correspondence.
cameraData = recordedSensorData("camera",camTimestamps,imageFileNames,Name="FrontCamera",SensorParameters=cameraParams)
cameraData =
  CameraData with properties:

                Name: "FrontCamera"

          NumSamples: 400
            Duration: 39.8997
          SampleRate: 10.0251
          SampleTime: 0.1000
          Timestamps: [400×1 double]

              Frames: [400×1 string]
    SensorParameters: [1×1 monoCamera]

          Attributes: []
Preprocess Sensor Data
To effectively generate scenarios from recorded sensor data, you must synchronize them with reference to common timestamps. Synchronize GPS data and camera data with reference to actor track data by using the synchronize object function. For more information, see the Synchronize GPS, Camera, and Actor Track Data for Scenario Generation example.
synchronize(gpsData,trackData)
synchronize(cameraData,trackData)
Normalize the actor track data to ensure that its timestamps start from zero, and use its reference time to normalize the GPS data and camera data, by using the normalizeTimestamps object function.
refTime = normalizeTimestamps(trackData);
normalizeTimestamps(gpsData,refTime);
normalizeTimestamps(cameraData,refTime);
Create Ego Trajectory
Extract ego vehicle trajectory from GPS coordinates by using the trajectory object function.
egoTrajectory = trajectory(gpsData)
egoTrajectory =
  Trajectory with properties:

               Name: ''

         NumSamples: 400
           Duration: 39.8997
         SampleRate: 10.0251
         SampleTime: 0.1000
         Timestamps: [400×1 double]

           Position: [400×3 double]
        Orientation: [400×3 double]
           Velocity: [400×3 double]
             Course: [400×1 double]
        GroundSpeed: [400×1 double]
       Acceleration: [400×3 double]
    AngularVelocity: [400×3 double]

        LocalOrigin: [37.3738 -122.0563 0]
         TimeOrigin: 0

         Attributes: []
Raw GPS data often contains noise. Smooth the trajectory by using the smooth object function.
smooth(egoTrajectory);
Visualize the GPS data overlaid on a satellite map and the extracted ego vehicle trajectory.
f = figure(Position=[500 500 1000 500]);
gpsPanel = uipanel(Parent=f,Position=[0 0 0.5 1],Title="GPS");
plot(gpsData,Parent=gpsPanel,Basemap="satellite")
trajPanel = uipanel(Parent=f,Position=[0.5 0 0.5 1],Title="Ego Trajectory");
plot(egoTrajectory,ShowHeading=true,Parent=trajPanel)

If GPS data suffers from inaccuracies in position and orientation, then you must improve your ego vehicle localization to generate an accurate ego trajectory. For more information, see the Ego Vehicle Localization Using GPS and IMU Fusion for Scenario Generation example.
Extract Non-Ego Actor Trajectories
Visualize the actor track data and camera images by using the play object function of the CameraData object and the plot object function of the ActorTrackData object, respectively. Overlay track data on images and update the bird's eye plot.
% Setup the plotters.
[bep,axCam] = helperSetupCamAndBEPPlotters(trackData);
play(cameraData,Parent=axCam,PlotFcn=@(ax,img,i,cam)helperPlotActors(ax,img,i,cam,bep,trackData))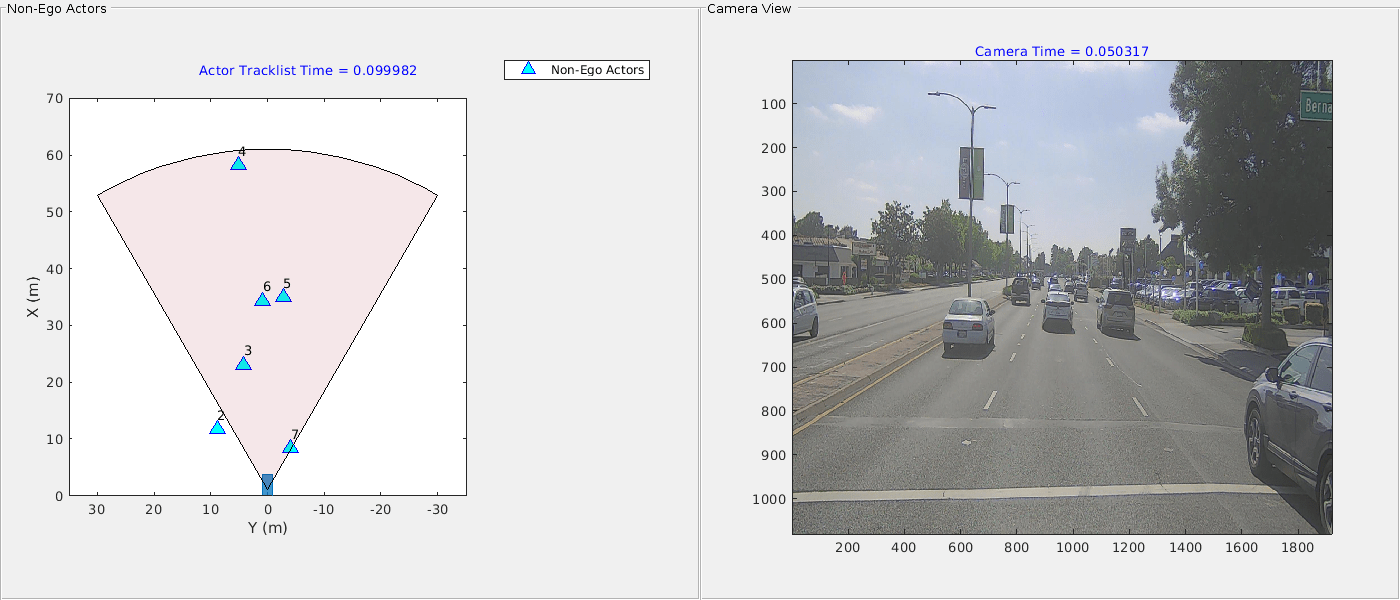
Extract actor properties such as entry time, exit time, and dimension from the track list data by using the actorprops function. The function transoms the non-ego actor information from vehicle coordinates to the world coordinates by using the ego trajectory. Data from the sensors is often noisy which results in inaccurate waypoints. Remove noise from the non-ego actor waypoints by using the helperSmoothWaypoints helper function.
nonEgoActorInfo = actorprops(trackData,egoTrajectory,SmoothWaypoints=@helperSmoothWaypoints,SaveAs="none");Display the first five entries of nonEgoActorInfo.
nonEgoActorInfo(1:5,:)
ans=5×14 table
    Age    TrackID    ClassID    EntryTime    ExitTime           Dimension                    Mesh                 Time           Waypoints          Speed            Roll             Pitch             Yaw         IsStationary
    ___    _______    _______    _________    ________    _______________________    ______________________    _____________    _____________    _____________    _____________    _____________    _____________    ____________

    34      "10"         1        7.8995        11.2      4.924    2.011    1.843    1×1 extendedObjectMesh    {34×1 double}    {34×3 double}    {34×1 double}    {34×1 double}    {34×1 double}    {34×1 double}       true
    34      "11"         1        8.1995        11.5      5.021    1.912    1.513    1×1 extendedObjectMesh    {34×1 double}    {34×3 double}    {34×1 double}    {34×1 double}    {34×1 double}    {34×1 double}       true
    34      "12"         1        8.5994        11.9      5.021    1.988    1.602    1×1 extendedObjectMesh    {34×1 double}    {34×3 double}    {34×1 double}    {34×1 double}    {34×1 double}    {34×1 double}       true
    34      "13"         1        9.9998        13.3      4.786     1.99    1.512    1×1 extendedObjectMesh    {34×1 double}    {34×3 double}    {34×1 double}    {34×1 double}    {34×1 double}    {34×1 double}       true
    34      "14"         1          10.3        13.6      4.677    1.894    1.493    1×1 extendedObjectMesh    {34×1 double}    {34×3 double}    {34×1 double}    {34×1 double}    {34×1 double}    {34×1 double}       true
Create RoadRunner Scenario
To open RoadRunner using MATLAB®, specify the path to your RoadRunner project. This code shows the path for a sample project folder location in Windows®.
rrProjectPath = "C:\RR\MyProject";Specify the path to your local RoadRunner installation folder. This code shows the path for the default installation location in Windows.
rrAppPath = "C:\Program Files\RoadRunner " + matlabRelease.Release + "\bin\win64";
Open RoadRunner using the specified path to your project.
rrApp = roadrunner(rrProjectPath,InstallationFolder=rrAppPath);
This example requires a RoadRunner Scene to visualize the vehicle trajectories on road. You can build the scene using HD map and save the RoadRunner scene file. For more information on creating scenes, refer Import Scene Data (RoadRunner).
This example provides a RoadRunner scene, which is created using the Generate RoadRunner Scene Using Labeled Camera Images and Raw Lidar Data example from the PandaSet dataset. Specify the file name of the RoadRunner scene, and export the ego trajectory to RoadRunner by using the exportToRoadRunner object function. The geographic coordinates of the scene origin are set to the local origin of the trajectory.
filename = fullfile(pwd,"pandasetScene.rrscene");
exportToRoadRunner(egoTrajectory,rrApp,RoadRunnerScene=filename,Name="Ego")
Connection status: 1
Connected to RoadRunner Scenario server on localhost:60729, with client id {5bd9ff81-40f9-4def-b3cf-109597a66875}
Create and export the trajectories of the non-ego actors to RoadRunner. Note that, as the ego actor is imported first, it is the first actor in the list of actors in Actor attribute under Camera in the Simulation pane. The helperGetAssetInfo helper function assigns different assets based on track ids. For more information on creating custom assets from camera images, see the Simulate RoadRunner Scenario with Custom 3D Assets Generated from Single-View Camera Images example.
for i = 1:size(nonEgoActorInfo,1)
    orient = deg2rad([nonEgoActorInfo.Yaw{i,1},nonEgoActorInfo.Pitch{i,1},nonEgoActorInfo.Roll{i,1}]);
    traj = recordedSensorData("trajectory",nonEgoActorInfo.Time{i,1},nonEgoActorInfo.Waypoints{i,1},Orientation=orient);
    smooth(traj,Method="rloess",SmoothingFactor=0.2)
    id = nonEgoActorInfo.TrackID(i,:);
    [color,assetPath] = helperGetAssetInfo(id);
    exportToRoadRunner(traj,rrApp,Name=id,AssetPath=assetPath,Color=color,SetupSimulation=false);
end
Create a scenario simulation object for the current RoadRunner Scenario using the createSimulation function. The simulation object enables you to programmatically interact with the RoadRunner scenario simulation using MATLAB.
rrSim = createSimulation(rrApp);
Define the simulation parameters of RoadRunner Scenario. Specify the maximum simulation time as 17 as the RoadRunner Scene is created for a 17 seconds sequence. To plot the simulation results, enable data logging.
endTime = 17;
set(rrSim,MaxSimulationTime=endTime)
set(rrSim,Logging="on")
Run the simulation. Monitor the status of the simulation, and wait for the simulation to complete. Because RoadRunner Scenario cannot remove actors after their exit times, scenario simulation may can fail due to collision. To avoid stopping the scenario on collision, remove fail conditions using these steps:
1. In the Logic editor, click the condition node at the end of the scenario.
2. In the Attributes pane, click Remove Fail Condition.
set(rrSim,SimulationCommand="Start")
 while strcmp(get(rrSim,"SimulationStatus"),"Running")
     simstatus = get(rrSim,"SimulationStatus");
     pause(1)
 end
To view the scenario from the ego vehicle view or chase view, in the Simulation pane, in the Camera section, set Camera View to either Follow or Front. Note that, the Actor attribute by default is set to vehicle, which is the ego vehicle for the scenario in this example.
This figure shows a scenario created in RoadRunner Scenario using a RoadRunner scene and the actor track data.

References
[1] Hesai and Scale. PandaSet. Accessed September 18, 2025. https://pandaset.org/. The PandaSet data set is provided under the CC-BY-4.0 license.
See Also
Functions
Topics
- Overview of Scenario Generation from Recorded Sensor Data
- Smooth GPS Waypoints for Ego Localization
- Ego Vehicle Localization Using GPS and IMU Fusion for Scenario Generation
- Extract Lane Information from Recorded Camera Data for Scene Generation
- Generate High Definition Scene from Lane Detections and OpenStreetMap
- Generate Scenario from Actor Track Data and GPS Data
- Extract Vehicle Track List from Recorded Lidar Data for Scenario Generation