Develop, Analyze, and Debug Plugins in Audio Test Bench
In this tutorial, explore key functionality of the Audio Test Bench. The Audio Test Bench app enables you to debug, visualize, and configure audio plugins.
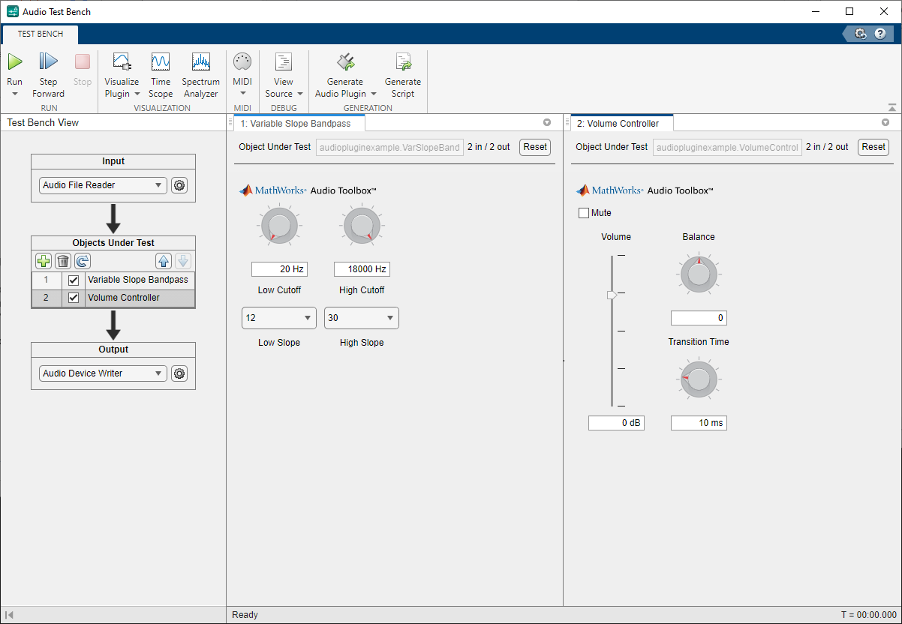
Choose Objects Under Test
To open the Audio Test Bench, at the MATLAB® command prompt, enter this command.
audioTestBench

In the Add an Object Under Test field, enter
audiopluginexample.VarSlopeBandpassFilter and press
Enter. Alternatively, you can click the ![]() button to browse for a file containing a plugin
class definition or an external plugin binary. The Audio Test Bench
automatically displays the tunable parameters of the
button to browse for a file containing a plugin
class definition or an external plugin binary. The Audio Test Bench
automatically displays the tunable parameters of the
audiopluginexample.VarSlopeBandpassFilter audio plugin.

The mapping between the tunable parameters of your object and the
UI controls on the Audio Test Bench is determined by audioPluginInterface and audioPluginParameter in the class
definition of your object.
Under Objects Under Test in the Test Bench
View, click ![]() and add the
and add the
audiopluginexample.VolumeController plugin. The two plugins
are now connected in a cascade where the
audiopluginexample.VarSlopeBandpassFilter plugin processes
the input signal, and its output is then processed by the
audiopluginexample.VolumeController plugin.
Right-click the Volume Controller tab and select the
Left/Right configuration under Tile
All to view the tunable parameters of both plugins side by side.
You can change the order of the plugins in the cascade by selecting a plugin from
the Objects Under Test and clicking ![]() or
or ![]() to move it up or down. You can also remove a
plugin by selecting it and clicking
to move it up or down. You can also remove a
plugin by selecting it and clicking ![]() .
.
Run Audio Test Bench
To run the Audio Test Bench and stream audio through your plugins,
click ![]() . Use the UI controls to tune the plugin
parameters while streaming.
. Use the UI controls to tune the plugin
parameters while streaming.
To stop the audio stream loop, click ![]() . The MATLAB command line and objects used by the test bench are now
released.
. The MATLAB command line and objects used by the test bench are now
released.
To reset internal states of your audio plugin and return the UI controls to their
initial positions, select the plugin from the Objects Under
Test and click ![]() .
.
Click ![]() to run the Audio Test Bench
again.
to run the Audio Test Bench
again.
Debug Source Code of Audio Plugin
To pause the Audio Test Bench, click ![]() .
.
To open the source file of your audio plugin, click ![]() and select the plugin from the dropdown list. For this example,
select
and select the plugin from the dropdown list. For this example,
select Volume Controller.
You can inspect the source code of your audio plugin, set breakpoints on it, and
modify the code. Set a breakpoint in the set.TransitionTime
function and then click ![]() on the Audio Test Bench.
on the Audio Test Bench.

The Audio Test Bench runs your plugin until it reaches the breakpoint. To reach the breakpoint, move the Transition Time dial. To stop debugging, remove the breakpoint and click Continue in the MATLAB editor.
Open Scopes
To open a time scope to visualize the time-domain input and output, click ![]() . To open a spectrum analyzer to visualize the
frequency-domain input and output, click
. To open a spectrum analyzer to visualize the
frequency-domain input and output, click ![]() . The scopes display input to the Audio Test
Bench and the output of the last plugin in the cascade.
. The scopes display input to the Audio Test
Bench and the output of the last plugin in the cascade.


To release objects and stop the audio stream loop, click ![]() .
.
Configure Input to Audio Test Bench
The Input list contains these options corresponding to System objects:
Audio File Reader––dsp.AudioFileReaderAudio Device Reader––audioDeviceReaderAudio Oscillator––audioOscillatorWavetable Synthesizer––wavetableSynthesizerChirp Signal––dsp.ChirpColored Noise––dsp.ColoredNoise
The Audio Device Reader option is not
supported in MATLAB
Online.
Select
Audio File Reader.Click
 to open the settings panel for
Audio File Readerconfiguration.
You can enter any file name included on the MATLAB path. To specify a file that is not on the MATLAB path, specify the full file path.
In the Audio file box, enter:
RockDrums-44p1-stereo-11secs.mp3
Click ![]() again to close the settings panel. To run the
audio test bench with your new input, click
again to close the settings panel. To run the
audio test bench with your new input, click ![]() .
.
To release your output object and stop the audio stream loop, click ![]() .
.
Configure Output from Audio Test Bench
The Output list contains these options corresponding to System objects:
Audio Device Writer––audioDeviceWriterAudio File Writer––dsp.AudioFileWriterBoth––audioDeviceWriteranddsp.AudioFileWriterNone–– The audio signal is not routed to a file or device. Use this option if you are only interested in using the visualization and tuning capabilities of the test bench.
The Audio Device Writer and
Both options are not supported in MATLAB
Online.
Choose to output to device and file by selecting
Bothfrom the Output menu.To open settings panels for
Audio Device WriterandAudio File Writerconfiguration, click.


Call Custom Visualization of Audio Plugin
If your audio plugin has a custom visualization method, you can view the
visualization in the Audio Test Bench. To open the custom visualization
of audiopluginexample.VarSlopeBandpassFilter, click ![]() and select
and select Variable Slope
Bandpass. The custom visualization plots the frequency response of
the filter. Tune the plugin parameters and observe the plot update in real
time.

Custom visualizations are available only in MATLAB and not in generated plugins.
Synchronize Plugin Property with MIDI Control
If you have a MIDI device connected to your computer, you can synchronize plugin
properties with MIDI controls. To open a MIDI configuration UI, click ![]() and select
and select Variable Slope
Bandpass. Synchronize the LowCutoff and
HighCutoff properties with MIDI controls you choose. Click
OK.
See configureMIDI for more
information.
Play the Audio and Save the Output File
To run your audio plugin, click ![]() . Adjust your plugin properties in real time using your
synchronized MIDI controls and sliders. Your processed audio file is saved to the
current folder according to the
. Adjust your plugin properties in real time using your
synchronized MIDI controls and sliders. Your processed audio file is saved to the
current folder according to the Audio File Writer
settings you configured for the Output.
Audio playback is not supported in MATLAB Online.
Validate and Generate Audio Plugin
To open the validation and generation dialog box, click ![]() and select
and select Variable Slope
Bandpass.

You can validate your MATLAB audio plugin code and generate audio plugin binaries. In the
Coder configuration section, you can specify libraries for
deep learning and code replacement when generating plugins. See generateAudioPlugin, validateAudioPlugin, and audioPluginConfig for more information.
Plugin generation is not supported in MATLAB Online.
Generate MATLAB Script
To generate a MATLAB script that implements a test bench with the current app settings for
the cascade of plugins, click ![]() .
.

You can modify the code for complete control over the test bench environment.
See Also
Audio Test Bench | validateAudioPlugin | generateAudioPlugin | audioPlugin