Set Up Virtual Vehicle Architecture
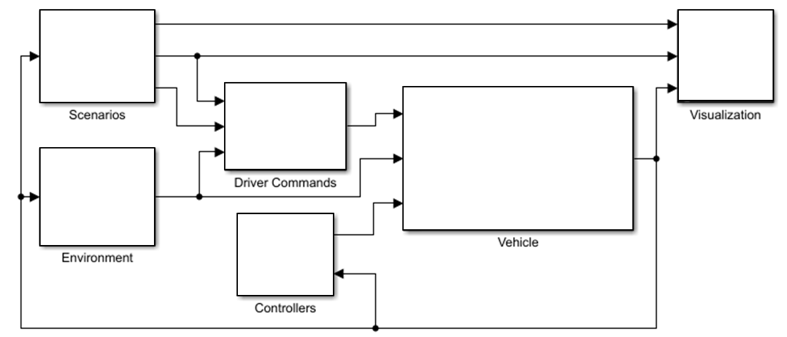
To configure, build, and test your virtual vehicle in the Virtual Vehicle Composer, the first step is to set up the fundamental vehicle architecture, such as the vehicle class, powertrain type, level of vehicle dynamics detail, and model template. Make these choices in the Setup pane of the app.
To start Virtual Vehicle Composer, perform one of these actions:
MATLAB® Toolstrip: On the Apps tab, under Automotive, click the Virtual Vehicle Composer app icon
 .
.MATLAB Command Window: Enter
virtualVehicleComposer.
Then, go to the Composer tab and click New
![]() . This action takes you to the
Setup pane. You can return to view this pane any time by
clicking the Setup tab.
. This action takes you to the
Setup pane. You can return to view this pane any time by
clicking the Setup tab.
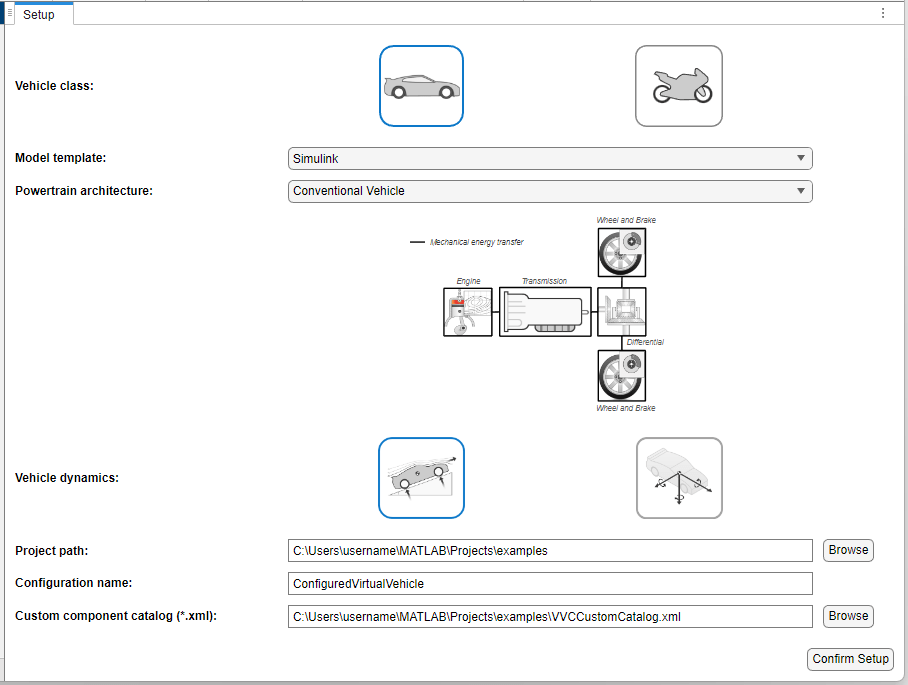
These architectural choices determine which simulations can be run on your virtual vehicle, and cannot be changed once you click Confirm Setup:
Vehicle class
Powertrain architecture
Vehicle dynamics
Model template
For Vehicle class, you can click Passenger vehicle or Motorcycle. Click Passenger vehicle to set up a four-wheeled vehicle designed for light-duty use, such as a passenger car, cross-over vehicle, or pickup truck. Click Motorcycle to set up a two-wheeled motorcycle.
For Powertrain architecture, choose from the powertrain types. For Passenger vehicle, you can choose between a conventional powertrain with an internal combustion engine, five types of battery-electric powertrain, and seven types of hybrid-electric powertrain. For Motorcycle, you can choose a conventional powertrain with an internal combustion engine, or a battery-electric powertrain.
The app can model vehicle motion at different levels of detail. The Vehicle dynamics choices depend on the Vehicle class you select:
For Passenger vehicle, you have two choices on the Setup pane. If you select
Longitudinal
                    dynamics
, the template models forward vehicle motion. However, you have the option to add vertical and pitch motions in the Data and Calibration pane. If you selectCombined longitudinal and lateral dynamics, the template models longitudinal, lateral, and vertical translations and their corresponding rotations.For Motorcycle, you have two choices. If you select
In-plane dynamics, the template will model longitudinal, vertical, and pitch motions. If you chooseOut-of-plane dynamics, the template will model longitudinal, lateral, and vertical translations, and their corresponding rotations.
Note that the degrees of freedom are relative to the vehicle for all vehicle classes.
Your options for Model template depend on the Vehicle
class you select. The templates are named for the type of physical components
they accommodate. A Simulink template populates with Simulink® components. A Simscape template populates with
Simscape™ components. For Passenger vehicle, you can click either
a Simulink or Simscape template. For
Motorcycle, the only choice is
Simscape.
On the Setup pane, you also select the storage locations for your vehicle project and for a catalog of custom components:
Project path
Configuration name
Custom component catalog
Project path is the storage location to place all of your project work within the model architecture you set. You cannot change it once you click Confirm Setup. Each time you configure a vehicle with a specific set of components and parameters, save the configuration under a unique Configuration name.
Custom component catalog is an XML file you can use to access custom components, such as electric motors, engines, tires, and suspensions that you need to access repeatedly. You can store reparameterized components from within the Virtual Vehicle Composer or Simulink models that are compatible with the model template. You cannot change the custom catalog file name once you click Confirm Setup.
Once you complete your selections, click Confirm Setup. The app loads the information required to create the template you specify.