Kanalaktualisierung und Lichtsteuerung auf Arduino
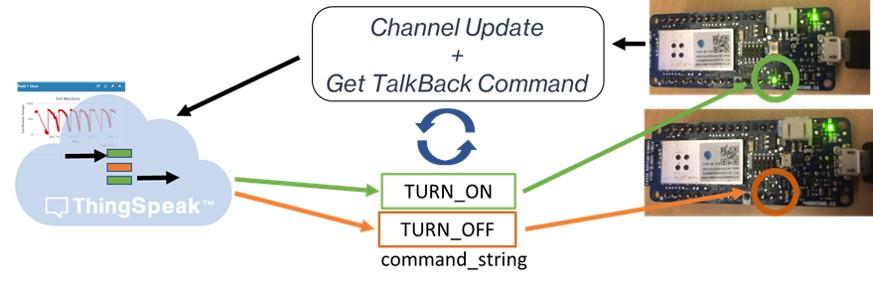
Dieses Beispiel zeigt, wie Sie Ihren Kanal aktualisieren und Befehle aus einer ThingSpeak ™ TalkBack-Warteschlange abrufen. Verwenden Sie die Befehle, um den Status der integrierten LED zu ändern.
Verwenden Sie TalkBack, wenn Ihre Anwendung eine Maschine umfasst, die Sie nur ausführen möchten, wenn sich ein Befehl in der Warteschlange befindet.

Sie können gleichzeitig Ihren Kanal aktualisieren und den neuesten in einer TalkBack-Warteschlange gespeicherten Befehl abrufen. Fügen Sie Ihrer POST-Anfrage den Parameter talkback_key hinzu und ThingSpeak gibt in der Antwort den neuesten TalkBack-Befehl zurück.

Unterstützte Hardware
Arduino Uno oder ähnliches Arduino-Board mit Wi-Fi Shield
MKR1000
Voraussetzungen
Sie müssen mindestens einen Kanal eingerichtet haben, um dieses Beispiel abzuschließen. Erstellen Sie einen Kanal, wie unter Daten in einem neuen Kanal sammeln gezeigt, und notieren Sie den Schreib-API-Schlüssel. Sie müssen auch ein TalkBack einrichten. Gehen Sie zu Apps > TalkBacks und wählen Sie Neues TalkBack.

Befehle zur TalkBack-Warteschlange hinzufügen
Sie können einer TalkBack-Warteschlange auf zwei Arten Befehle hinzufügen.
Verwenden Sie die ThingSpeak TalkBack-Weboberfläche, um Befehle zur TalkBack-Warteschlange hinzuzufügen. Sie können TalkBack so konfigurieren, dass es über bis zu 8000 Befehle verfügt.
Verwenden Sie die ThingSpeak-API. Sie können eine HTTP-POST-Anforderung verwenden, um der Warteschlange einen Befehl hinzuzufügen. Ersetzen Sie im folgenden POST
TALKBACK_ID,YOUR_TALKBACK_API_KEY,TALKBACK_COMMANDundPOSITION_NUMBERdurch die entsprechenden Werte aus Ihrem Kanal.
POST https://api.thingspeak.com/talkbacks/TALKBACK_ID/commands
 api_key=YOUR_TALKBACK_API_KEY
     command_string=TALKBACK_COMMAND
     position=POSITION_NUMBER
Programmieren Sie Ihr Gerät
1) Laden Sie die neueste Arduino® IDE herunter.
2) Fügen Sie WiFi101 zum Bibliotheksmanager hinzu, falls es dort noch nicht vorhanden ist.
a) Wählen Sie Skizze > Bibliothek einschließen > Bibliotheken verwalten.
b) Wählen Sie die Bibliothek WiFi101 aus und klicken Sie auf Installieren.
3) Fügen Sie SPI zum Bibliotheksmanager hinzu, falls es dort noch nicht vorhanden ist.
a) Wählen Sie Skizze > Bibliothek einschließen > Bibliotheken verwalten. Suchen Sie nach SPI.
b) Wählen Sie SPI aus, um es Ihrer Skizze hinzuzufügen.
4) Wählen Sie im Menü Tools den entsprechenden Port und die entsprechende Karte in der Arduino IDE aus.
5) Fügen Sie den Code in die Arduino IDE ein. Fügen Sie Ihre WLAN-Netzwerkinformationen, Ihren TalkBack-API-Schlüssel und Ihre TalkBack-Nummer hinzu.
6) Programmieren Sie das Gerät und beobachten Sie dann den seriellen Monitor und die LED, um Änderungen zu erkennen, wenn Befehle ausgeführt werden. Jeder ausgeführte Befehl wird aus der Liste entfernt. Sie müssen der Liste weitere Befehle hinzufügen, nachdem diese verbraucht wurden.
Code
1) Beginnen Sie mit der Einbindung der entsprechenden Bibliotheken und der Definition von Variablen. Geben Sie Ihre Netzwerk-SSID und Ihr Passwort ein. Bearbeiten Sie die Kanalnummer und die TalkBack-Parameter für ID und API-Schlüssel.
/*
WriteMultipleFieldsAndFetchCommandFromTalkBack

Description: Checks a TalkBack queue every 60 seconds and sets the state of the built-in LED according
             to the latest command fetched. Turn the LED on and off by using the commands TURN_ON and TURN_OFF.
             The TalkBack documentation can be found at https://www.mathworks.com/help/thingspeak/talkback-app.html.


Hardware: Arduino Wi-Fi Shield 101

Notes:
- Requires WiFi101 library. Use the WiFi101 library version 0.13.0 or older. WiFi101 library versions 0.14.0 and newer have a bug
  that prevents this ThingSpeak library from working properly.
- Make sure the WiFi Shield 101 has updated firmware. Find instructions at https://www.arduino.cc/en/Tutorial/FirmwareUpdater.

Copyright 2018, The MathWorks, Inc.
*/

#include "ThingSpeak.h"
#include <SPI.h>
#include <WiFi101.h>

char ssid[] = <enter your SSID>;   // your network SSID (name)
char pass[] = <enter your password>;   // your network password

WiFiClient  client;

unsigned long myChannelNumber = <enter your channel ID>;
unsigned long myTalkBackID = <enter your TalkBack ID>;
const char * myTalkBackKey = <enter your TalkBack API key>;

// Some values to send to ThingSpeak
int number1 = 0;
int number2 = random(0,100);
int number3 = random(0,100);
int number4 = random(0,100);
2) Initialisieren Sie in der Funktion setup die LED und starten Sie den seriellen Monitor.
void setup() {
  pinMode(LED_BUILTIN, OUTPUT);  // Set up LED
  Serial.begin(115200);  // Initialize serial
}
3) Beginnen Sie in der Hauptschleife mit dem Aufbau einer Verbindung zum lokalen WLAN-Netzwerk. Erstellen Sie die POST-Nachricht aus den zufällig generierten Zahlen. Senden Sie die POST-Anfrage, überprüfen Sie das Ergebnis und suchen Sie nach einem TalkBack-Befehl. Generieren Sie dann in 20 Sekunden neue Zufallszahlen für das nächste Kanalupdate.
void loop() {

  // Connect or reconnect to Wi-Fi
  if(WiFi.status() != WL_CONNECTED){
    Serial.print("Attempting to connect to SSID: ");
    Serial.println(String(ssid);
    while(WiFi.status() != WL_CONNECTED){
      WiFi.begin(ssid, pass);
      Serial.print(".");
      delay(5000);
    }
    Serial.println("\nConnected.");
  }

  // Create the message body for the POST out of the values
  String postMessage =  String("field1=") + String(number1) +
                        String("&field2=") + String(number2) +
                        String("&field3=") + String(number3) +
                        String("&field4=") + String(number4) +
                        String("&api_key=") + String(myWriteAPIKey) +
                        String("&talkback_key=") + String(myTalkBackKey);


   // Make a string for any commands in the queue
  String newCommand = String();

  // Make the POST to ThingSpeak
  int x = httpPOST(postMessage, newCommand);
  client.stop();

  // Check the result
  if(x == 200){
    Serial.println("checking queue...");
    // check for a command returned from TalkBack
    if(newCommand.length() != 0){

      Serial.print("  Latest command from queue: ");
      Serial.println(newCommand);

      if(newCommand == "TURN_ON"){
        digitalWrite(LED_BUILTIN, HIGH);
      }

      if(newCommand == "TURN_OFF"){
        digitalWrite(LED_BUILTIN, LOW);
      }
    }
    else{
      Serial.println("  Nothing new.");
    }

  }
  else{
    Serial.println("Problem checking queue. HTTP error code " + String(x));
  }

  // Confirm code works by changing values
  number1++;
  if(number1 > 99){
    number1 = 0;
  }
  number2 = random(0,100);
  number3 = random(0,100);
  number4 = random(0,100);

  delay(20000); // Wait 20 seconds to update the channel again
}
4) Verwenden Sie die Funktion httpPOST, um Daten an ThingSpeak zu senden und den nächsten TalkBack-Befehl zu lesen.
// General function to POST to ThingSpeak
int httpPOST(String postMessage, String &response){

  bool connectSuccess = false;
  connectSuccess = client.connect("api.thingspeak.com",80);

  if(!connectSuccess){
      return -301;
  }

  postMessage += "&headers=false";

  String Headers =  String("POST /update HTTP/1.1\r\n") +
                    String("Host: api.thingspeak.com\r\n") +
                    String("Content-Type: application/x-www-form-urlencoded\r\n") +
                    String("Connection: close\r\n") +
                    String("Content-Length: ") + String(postMessage.length()) +
                    String("\r\n\r\n");

  client.print(Headers);
  client.print(postMessage);

  long startWaitForResponseAt = millis();
  while(client.available() == 0 && millis() - startWaitForResponseAt < 5000){
      delay(100);
  }

  if(client.available() == 0){
    return -304; // Didn't get server response in time
  }

  if(!client.find(const_cast<char *>("HTTP/1.1"))){
      return -303; // Couldn't parse response (didn't find HTTP/1.1)
  }

  int status = client.parseInt();
  if(status != 200){
    return status;
  }

  if(!client.find(const_cast<char *>("\n\r\n"))){
    return -303;
  }

  String tempString = String(client.readString());
  response = tempString;

  return status;

}