Create Back-to-Back Tests Using Enhanced MCDC
Back-to-back tests, or equivalence tests, compare the results of normal simulations with the generated code results from software-in-the-loop (SIL), processor-in-the-loop (PIL), or hardware-in-the-loop (HIL) simulations. You can generate back-to-back tests in Simulink® Test™ that use Enhanced MCDC.
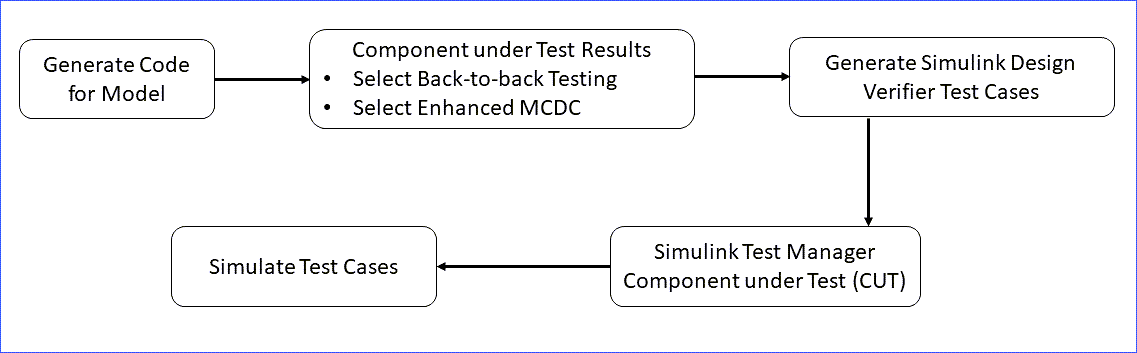
Set Up Test Inputs and Verification Strategy
If you want to test a component under test or subsystems in Simulink Test, you can use the Create Test for Component wizard by selecting New > Create Test for Model Component Simulink Test Test Manager, Use Design Verifier to generate test input scenarios. For detailed information, see Generate Tests and Test Harnesses for a Model or Components (Simulink Test).
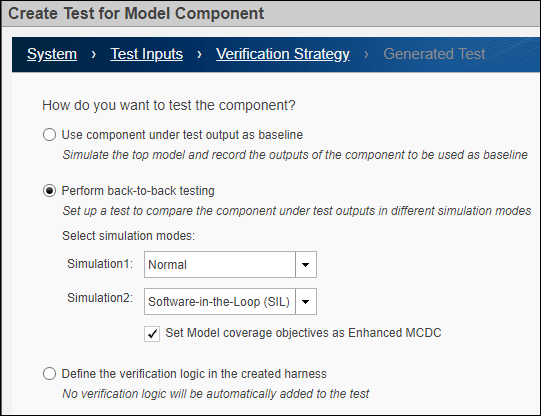
To compare the results of running the component in two different simulation modes, select Perform back-to-back testing on the Verification Strategy tab of the wizard. For SIL testing an atomic subsystem or a reusable library subsystem, the subsystem or library that contains the subsystem must already have generated code. See Enhanced MCDC Coverage in Simulink Design Verifier for more information.
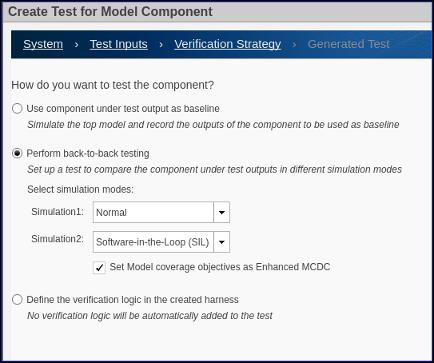
If, under Perform back-to-back testing you select
Software-in-the-Loop or Processor-in-the-Loop
for Simulation2, the Set Model
Coverage Objective as Enhanced MCDC option appears. Enhanced MCDC extends
decision coverage by generating test cases that avoid masking effects from downstream
blocks.
Run Back-to-Back Tests Using Enhanced MCDC
This example shows you how to create and run a back-to-back test using enhanced MCDC. Enhanced MCDC analyzes the detectability of each objective in the model and generates non-masking test cases for each objective. For more information, see Enhanced MCDC Coverage in Simulink Design Verifier.
Back-to-back tests in Simulink® Test™ compare the results of normal simulations with the generated code results from software-in-the-loop, processor-in-the-loop, or hardware-in-the-loop simulations.
Prepare the Model
1. Open the model:
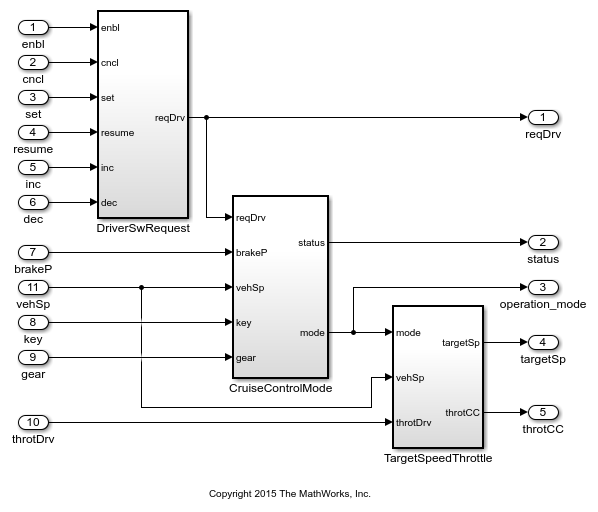
model = ('sldvSliceCruiseControl');
open_system(model);
2. Prepare the model for code generation and logging.
set_param(model, 'ProdHWDeviceType', 'Intel->x86-64 (Linux 64)');
set_param(model, 'ProdLongLongMode', 'on');
set_param(model, 'SaveOutput', 'on');
set_param(model, 'SignalLogging', 'on');
set_param(model, 'SaveFormat', 'Dataset');
Note: You can also optionally mark internal signals in the model as test-pointed logged signals (for example, sldvSliceCruiseControl/CruiseControlMode/opMode/Switch,) so that these signals are prioritized as detection sites during the enhanced MCDC analysis. For more information, see Configure Detection Sites using Test-pointed Logged Signals.
3. Generate the code.
In the Apps tab, click Embedded Coder, and then click Generate Code.
Embedded coder® generates the code generation report for model. Close the generated report window. Simulink Design Verifier uses information on logged signals from the generated code to configure the detection sites for enhanced MCDC. If you do not generate the code, Simulink Design Verifier uses the information on test-pointed logged signals from the model to configure the detection sites for enhanced MCDC.
Create Back-to-Back Tests Using Enhanced MCDC
Follow these steps to create back-to-back tests in the Simulink Test Test Manager:
1. To open the Simulink Test tab, in the Apps tab, in the Model Verification, Validation, and Test section, click Simulink Test.
2. To open the Test Manager, in the Tests tab, click Simulink Test Manager.
3. Click New > Test for Model Component. The Create Test for Model Component wizard opens.
4. To specify the Top Model to test, fill the fields by clicking the Use currently selected model component button next to the Top Model field.
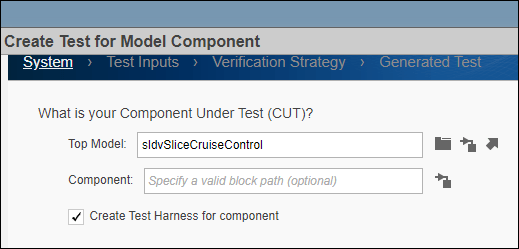
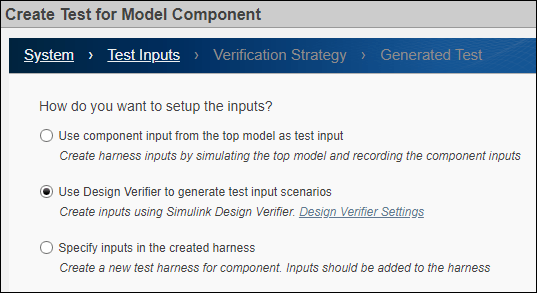
5. Click Next to specify how to use the Simulink Design Verifier to generate test inputs. Select Use Design Verifier to generate test input scenarios. This option runs the model and creates inputs using Simulink Design Verifier.
6. Click Next to select the testing method. Select Perform back-to-back testing. For Simulation1, select Normal. For Simulation2, select Software-in-the-Loop (SIL). Select Set Model coverage objectives as Enhanced MCDC.
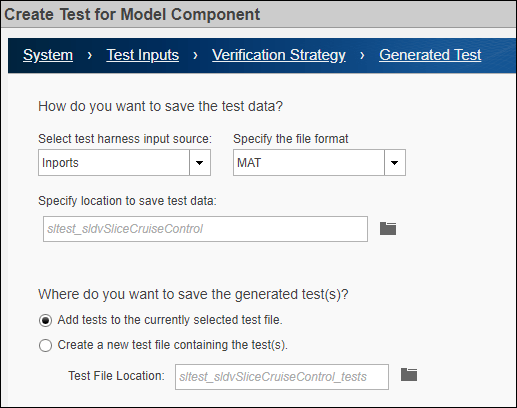
7. Click Next to specify the input source, format, and where to save the test data and generated tests. For Specify the file format, select MAT. For Specify location to save test data, use the default location name.
8. Click Done. Simulink Test creates the test cases and closes the wizard.
Run Back-to-Back Tests
To run the back-to-back test, click Run in Simulink Test Manager.
Clean Up
To complete the example, close the model.
bdclose(model);