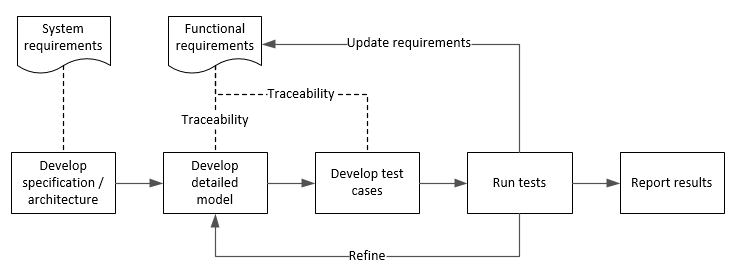
Test Model Against Requirements and Report Results
Establishing traceability between requirements and test cases helps you interpret the test
results and see the extent to which your model verifies your requirements. You can establish
traceability by linking a requirement to the elements that verify it, such as the test cases
in the Test Manager, verify statements in a Test Sequence
block, or model verification blocks. When you run tests, a pass/fail summary appears in your
requirements set.
This example demonstrates how to test the requirements of a cruise control system against a model. You start with a requirements set, a model, and a test case. You add traceability between the tests and the safety requirements, run the test, summarize the verification status, and report the results.
In this example, you test of two requirements in the requirement set:
That the cruise control system transitions from engaged to disengaged when a braking event occurs
That the cruise control system transitions from engaged to disengaged when the current vehicle speed is outside the range of 20 mph to 90 mph
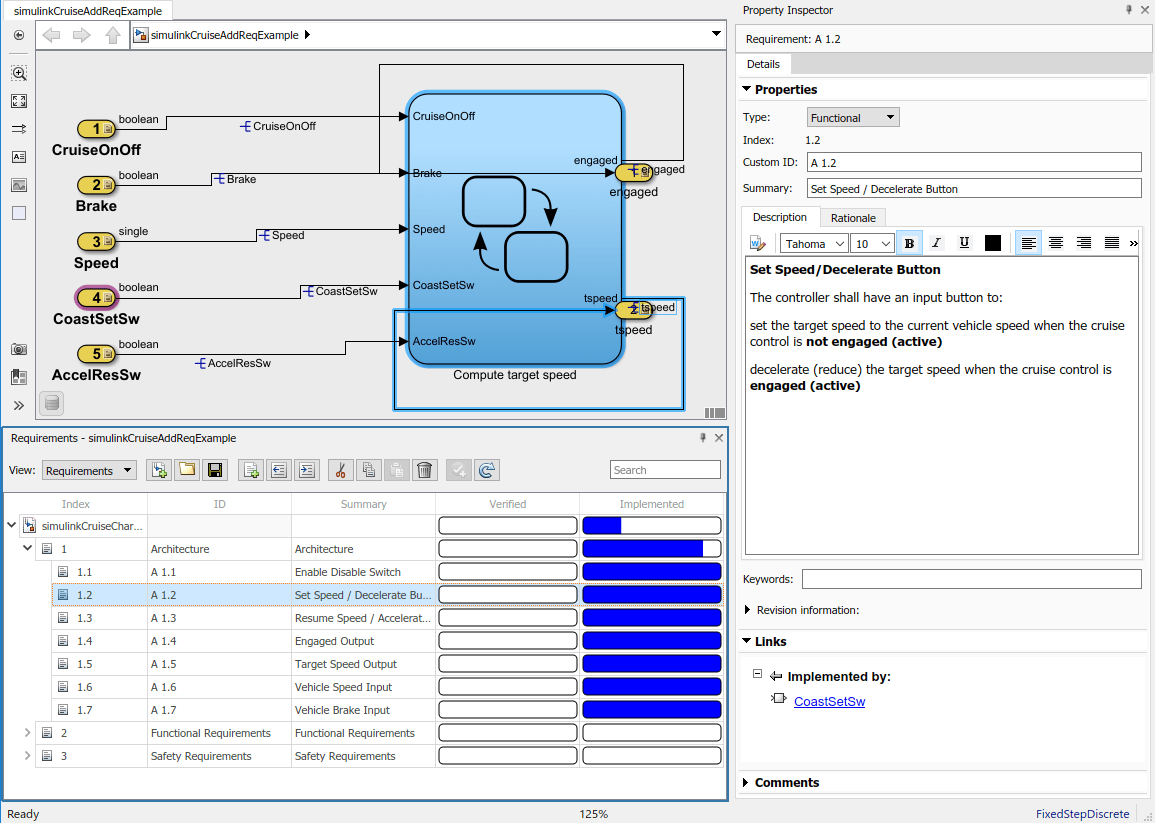
Display the Requirements
Open the example project.
openExample("shared_vnv/CruiseControlVerificationProjectExample");
pr = openProject("SimulinkVerificationCruise");
Open the
simulinkCruiseAddReqExamplemodel.open_system("simulinkCruiseAddReqExample");Display the requirements. Click the
 icon in the lower-right corner of the model
canvas, and select Requirements. The
Requirements pane opens.
icon in the lower-right corner of the model
canvas, and select Requirements. The
Requirements pane opens.Display the verification and implementation status. Right-click the requirement set and select Verification Status and Implementation Status.
Link Requirements to Tests
Link the requirements to the test case.
In MATLAB®, in the Project pane, in the
testsfolder, open the Simulink® Test™ fileslReqTests.mldatx. The test file opens in the Test Manager.In the model, click on requirement
S 3.1.In the Test Manager, select the
Safety Teststest case. In the right pane, in the Requirements section, click Add > Link to Selected Requirement. In the model, in the Property Inspector, the Verified by section indicates a link to theSafety Tests. In the Requirements pane, the yellow bars in the Verified column indicate that the linked tests have not been executed.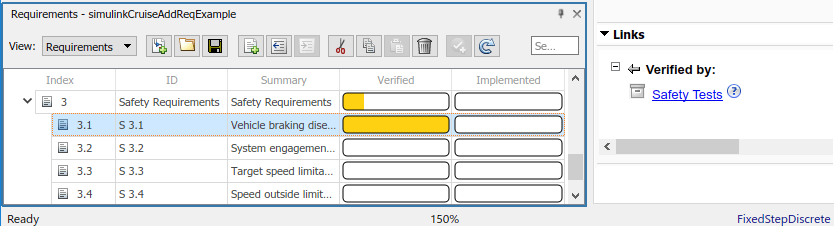
Repeat the previous step to add a link for requirement
S
                        3.4
.
Run the Test
The test case uses a test harness named SafetyTest_Harness1. To
open the test harness, click the ![]() icon in the lower-right corner of the model canvas
and select SafetyTest_Harness1. In the test harness, open the
Test Sequence block. The test sequence sets the input conditions and
checks the model behavior:
icon in the lower-right corner of the model canvas
and select SafetyTest_Harness1. In the test harness, open the
Test Sequence block. The test sequence sets the input conditions and
checks the model behavior:
The
BrakeTestsequence engages the cruise control, then applies the brake. It includes thisverifystatement:verify(engaged == false,... 'verify:brake',... 'system must disengage when brake applied')
The
LimitTestsequence engages the cruise control, then ramps up the vehicle speed until it exceeds the upper limit. It includes thisverifystatement:verify(engaged == false,... 'verify:limit',... 'system must disengage when limit exceeded')
To run the test case, return to the Test Manager and click Run.
When the test finishes, review the results. In the Test Manager, in the Results and Artifacts pane, expand the test case and select Verify Statements. Then, in the Data Inspector tab, in the Inspect tab, select the
verifystatements. The plots provide the detailed results of eachverifystatement and show that both assessments pass.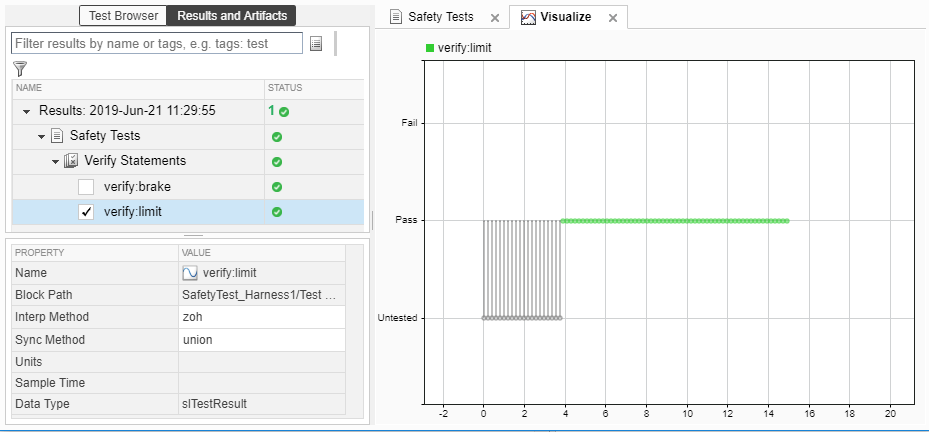
Return to the model and click the Refresh button in the Requirements pane to refresh the requirements. The green bar in the Verified column indicates that the test case successfully verified requirements
S 3.1andS 3.4.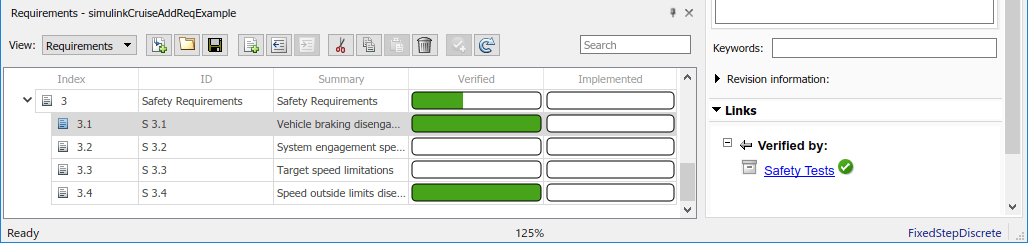
Report the Results
Create a report using a custom Microsoft® Word template.
In the Test Manager, in the Results and Artifacts pane, right-click the test case name. Select Create Report.
In the Create Test Result Report dialog box, set these options:
Title —
SafetyTestResults for —
All
                                Tests
File Format —
DOCX
Enter a file name and select a location for the report.
Set Template File to the file
ReportTemplate.dotxfile in thedocumentsproject folder.Click Create.
Review the report.
The Test Case Requirements section specifies the associated requirements.
The Verify Result section contains details of the two assessments in the test and links to the simulation output.
See Also
Topics
- Link to Requirements (Simulink Test)
- Validate Requirements Links in a Model (Requirements Toolbox)
- Customize Requirements Traceability Report for Model (Requirements Toolbox)