Configure Model Data Elements for ASAP2 File Generation
When you generate an ASAP2 file from a model, the ASAP2 file includes information about the data elements in your model such as characteristics and measurement variables. Each data element is described by information such as the memory address, storage structure, data types and conversion rules. In Simulink® you can now customize how the data elements are described in an ASAP2 file. You can choose only those characteristics and measurements that you are interested in exporting into ASAP2 file.
To configure data elements for ASAP2 file generation in the Code Mappings Editor – C display, use the tabs:
Inports
Outports
Parameters
Data Stores
Signals/States
View Calibration Attributes
Open a model with multiple data elements.
openExample('ConfigurationRapidPrototypingInterface');
cm = coder.mapping.api.get('ConfigurationRapidPrototypingInterface');
Open the Embedded Coder® app. On the C Code tab, select Code Interface + Individual Element Code Mappings.
On the C Code tab, select Settings + Calibration and Measurement properties.

Configure Inport for ASAP2 File Generation
On the Inports tab, select an inport and click the
 icon.
icon.Specify the measurement property fields for the inport.

Alternatively, at the command line, you can enter these commands:
setInport(cm,'In1','CalibrationAccess','Calibration');
setInport(cm,'In1','CompuMethod','CM_Inport');
setInport(cm,'In1','DisplayIdentifier','inport_display_name');
setInport(cm,'In1','Format','%4.2');
Build the model.
Generate the ASAP2 file by using this command:
coder.asap2.export('ConfigurationRapidPrototypingInterface');Verify the exported inport in the ASAP2 file and verify the fields that you specified are present.

You can configure an outport in the same way. By default, all the inports and
outports are exported to A2L file. To avoid exporting an inport or an outport to A2L
file, set the Export property to false using the
command:
setInport(cm,'In1','Export',false);
Configure Parameter for ASAP2 File Generation
On the Parameters tab, select a parameter and click the
icon.Specify the calibration property fields for the parameter.

Alternatively, at the command line, you can enter these commands:
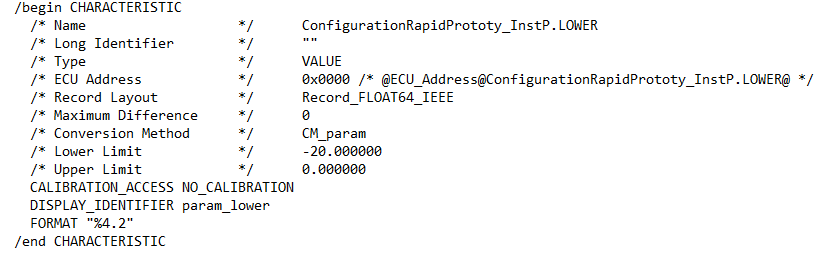
setModelParameter(cm,'LOWER','CalibrationAccess','NoCalibration');
setModelParameter(cm,'LOWER','CompuMethod','CM_param');
setModelParameter(cm,'LOWER','DisplayIdentifier','param_lower');
setModelParameter(cm,'LOWER','Format','%4.2');
Build the model.
Generate the ASAP2 file by using this command:
coder.asap2.export('ConfigurationRapidPrototypingInterface');Verify the exported parameter in the ASAP2 file and verify the fields that you specified are present.
Note
For an element associated with the custom storage class where Type is set to Other
, create a custom attributes class for the custom storage class
and associate the custom attributes class with a Boolean property,
SupportSILPIL set to true. For more information, see
Interfaces That Produce Additional Generated Code.
You can configure data stores, states in the same way. By default, signals,
states, and data stores are exported to A2L file. To avoid exporting a data element
to A2L file, set the Export property to false using the command:
setModelParameter(cm,'LOWER','Export',false);
Note
To export signals, states, data stores, and parameters to the A2L file, configure the data element to a non-auto storage class.
Video - Customize ASAP2 File using Calibration Profile
This video walks you through how to customize an ASAP2 file using Calibration profile.
See Also
setSignal | setInport | setOutport | setModelParameter | setDataStore | setState | coder.asap2.export | coder.mapping.api.CodeMapping | Code Mappings Editor – C