Manual USRP Radio Support Package Hardware Setup
To use the features of Communications Toolbox™ Support Package for USRP™ Radio, you must establish communication between the host computer and the radio hardware. Each operating system (OS) has instructions specific to that OS. Choose the instructions for the OS on the host computer. After the support package is installed, follow these steps to manually set up the hardware.
Host Machine Checklist
Administrator privileges
You must have administrator privileges for the guided radio hardware setup because the software runs OS commands for configuring the network card. If you see the User Account Control window, click Yes to continue with the setup process.
Gigabit Ethernet connection (only for Ethernet-based USRP radios)
This connection is often referred to as a network connection. You can use an integrated network interface card (NIC) with a Gigabit Ethernet cable or a USB 3.0 Gigabit Ethernet adapter dongle. This connection is necessary for transmitting data, such as an FPGA or firmware image, from the host computer to the radio hardware. It is also necessary for sending and receiving signals to and from the radio hardware.
For Ethernet-based radios (Ettus Research™ Networked radios - N200, N210, or USRP2™), the host computer must contain at least one dedicated Gigabit network interface card (NIC) for connecting to the USRP radio.
When connecting to an Ethernet-based radio, a second NIC is recommended for the host computer to remain simultaneously connected to the radio and a network (or the Internet). Alternatively, you can use one NIC for the radio connection and WiFi to connect to a network. If the host computer has no WiFi and only one NIC, see Using One Ethernet Port.
Directly connect your USRP radio to the NIC on the host computer with an Ethernet cable.
USRP radios have a factory default IP address of 192.168.10.2. This value is used for the radio IP address throughout the setup instructions. If your radio has a different IP address, modify accordingly.
For USB-based radios (Ettus Research Bus Series radios - B200, B200mini, B200mini-i, B205mini-i, or B210), the host computer must have at least one available USB port to connect to the radio.
Radio Hardware Checklist
Supported radio hardware
For a list of supported radio hardware, see Supported Hardware.
Ethernet cable
You need the Ethernet cable to connect the Ethernet-based radios (Ettus Research Networked radios - N200, N210, or USRP2) to the host computer.
For Windows
After running the Hardware Setup steps of the installer, if the radio is still not detected, you can attempt to configure the network interface manually via the Windows Network Connections App or the command prompt.
Configure Ethernet Connection Via Windows Network Connections App
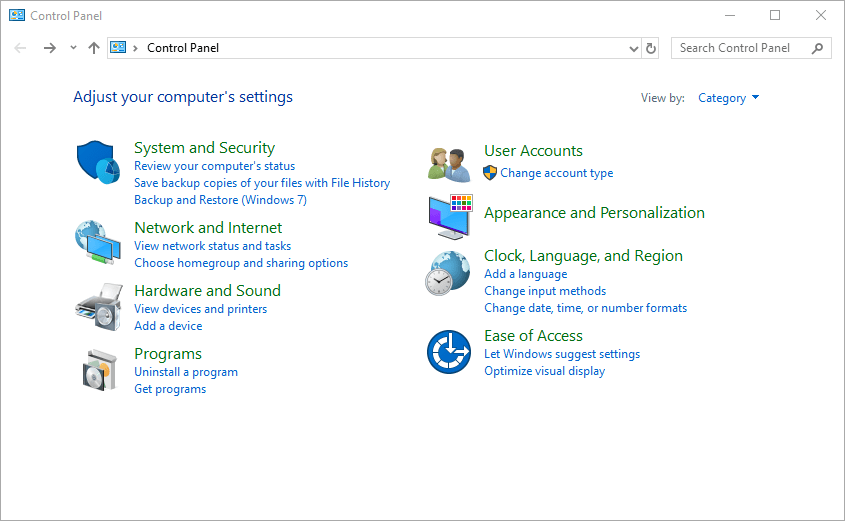
Open the Control Panel from the Windows® icon in the lower left corner of your monitor.
In the Control Panel window, make sure View by is set to
Category.Click Network and Internet.
Click Network and Sharing Center.
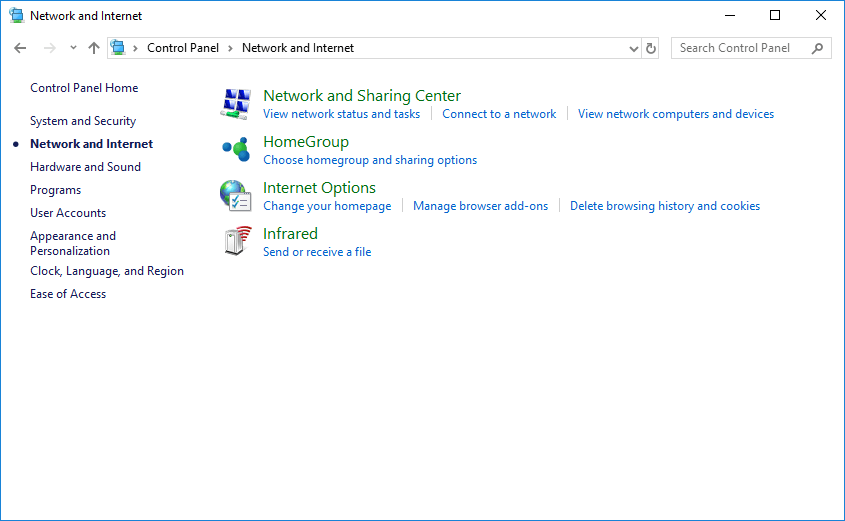
Click Change adapter settings in the left pane.
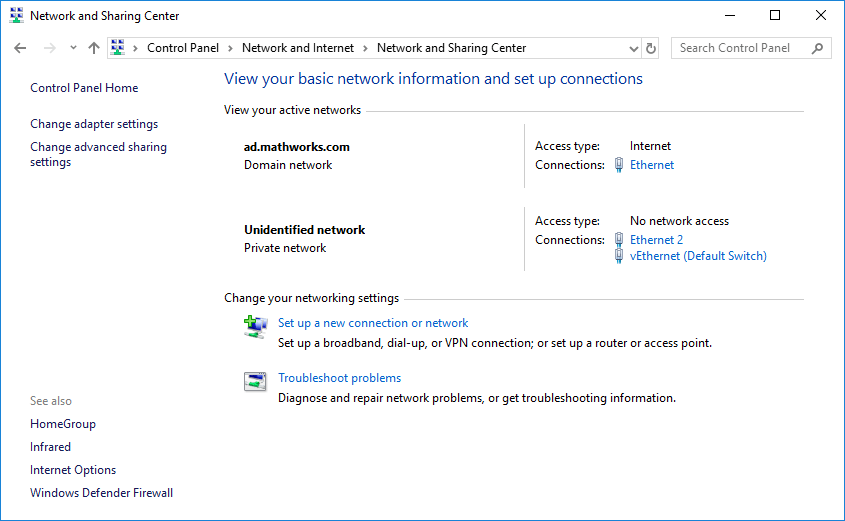
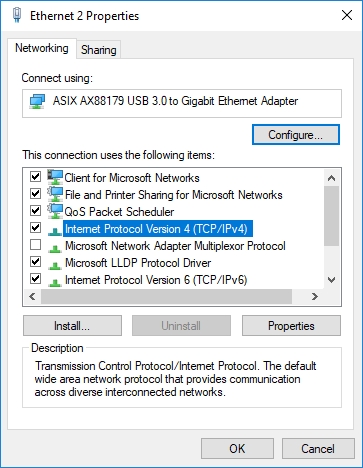
Double-click the adapter to configure its properties.
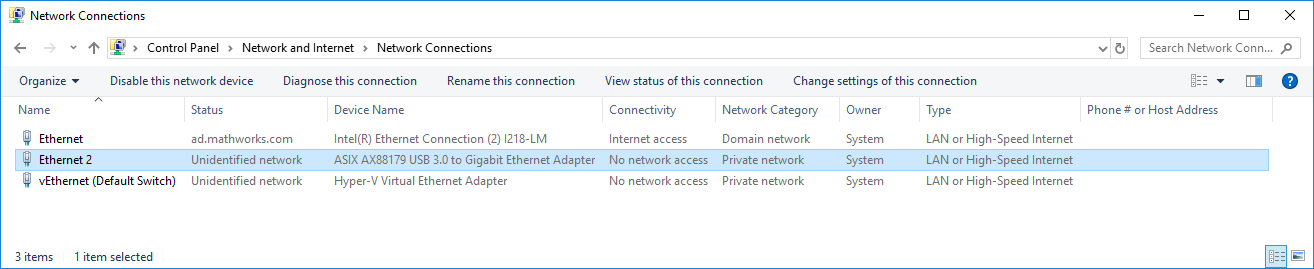
On this computer, the adapter with the name Ethernet indicates connectivity to the Internet, but the connectivity of Ethernet 2 indicates
No network access. Double-click the Ethernet 2 adapter to open its properties.On the Networking tab, clear Clients for Microsoft Networks and File and Printer Sharing for Microsoft Networks. These services can cause intermittent connection problems with USRP radios. To configure the IP address, double-click Internet Protocol Version 4 (TCP/IPv4).
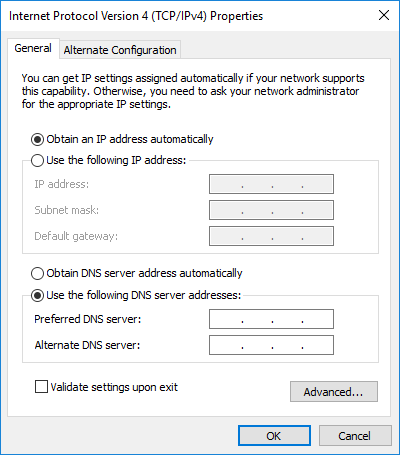
On the General tab, the default setting is typically set to Obtain an IP address automatically.
Select Use the following IP Address. Set the host IP address to 192.168.10.
X, whereXis any integer from 1 to 255 except 2. Leave the Subnet mask set to its default (255.255.255.0).If your radio is on another subnet, meaning the first three octets of the IP address field are not 192.168.30, then enter the IP address values of your radio for the first three octets. See Check Subnet Values on Host and Radio.
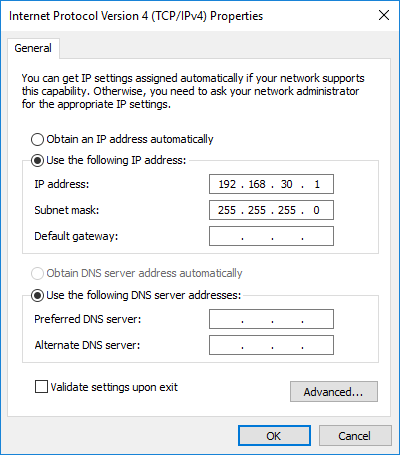
Click OK.
The host computer configuration is complete. Continue to Verify USRP Hardware Connection.
Configure Ethernet Connection Via Windows Command Prompt
Use these commands to determine the IP address of the radio. After determining the IP address for the radio, update the network interface IP address, and ping the radio to verify that the host-to-radio connection is working.
View the list of network interfaces, by entering this command at the Windows command prompt.
For the host computer used in this example, this is the output.C:\>getmac /V /FO CSV
"Connection Name","Network Adapter","Physical Address","Transport Name"
"Ethernet","Intel(R) Ethernet Connection (2) I218-LM","6C-0B-84-A9-7F-FE",
    "\Device\Tcpip_{24EC4E6B-0552-4055-995C-3A404E3FE21F}"
"vEthernet (Default Switch)","Hyper-V Virtual Ethernet Adapter","02-15-03-00-A9-6A",
    "\Device\Tcpip_{9BE08276-A58E-43EF-B928-0B215F3169A3}"
"Ethernet 2","ASIX AX88179 USB 3.0 to Gigabit Ethernet Adapter","8C-AE-4C-F4-F4-E8",
    "Media disconnected"
Determine which Ethernet adapter is used for the internet connection by pinging the IP address associated with each Connection Name returned. When you identify the connection name of the network adapter connected to the Internet, avoid selecting that network adapter for the radio. For more information, see Host Machine Checklist.
The host computer in this example uses the
"Ethernet"connection name for the Internet connection. Run thenetshcommand with this syntax to get the IP address of"Ethernet". Thenpingthat IP address to a website. Since the host computer uses this network adapter for its internet connection, reconfiguring this adapter to connect to the radio would jeopardize your ability to connect to the Internet. See Using One Ethernet Port.C:\>netsh interface ip show address "Ethernet"
Configuration for interface "Ethernet"
    DHCP enabled:     Yes
    IP Address:       172.21.18.178
    Subnet Prefix:    172.21.18.0/24 (mask 255.255.255.0)
    Default Gateway:  172.21.18.1
    Gateway Metric:   0
    InterfaceMetric:  25
C:\>ping -S “172.21.18.178” www.mathworks.com
Pinging ms-www.mathworks.com [144.212.244.17] from 172.21.18.178 with 32 bytes of data:
Reply from 144.212.244.17: bytes=32 time<1ms TTL=251
Reply from 144.212.244.17: bytes=32 time<1ms TTL=251
Reply from 144.212.244.17: bytes=32 time<1ms TTL=251
Reply from 144.212.244.17: bytes=32 time<1ms TTL=251
Next we run the
netshcommand specifying the"Ethernet 2"connection name. DHCP is typically enabled for an adapter that is not statically configured. Since the host computer does not use this network adapter for its internet connection, reconfiguring this adapter to connect to the radio, does not jeopardize your ability to connect to the Internet. That makes it a good adapter to use for the host-to-radio connection.C:\>netsh interface ip show address "Ethernet 2"
Configuration for interface "Ethernet 2"
  DHCP enabled: Yes
  InterfaceMetric: 5
Connect the radio to this USB-Ethernet adapter. Wait for a few seconds, and then check the setting again. The response for a successful host-to-radio connection resembles the output shown here.
C:\>netsh interface ip show address "Ethernet 2"
Configuration for interface "Ethernet 2"
  DHCP enabled: Yes
  IP Address: 169.254.55.226
  Subnet Prefix: 169.254.0.0/16 (mask 255.255.0.0)
  InterfaceMetric: 25
The IP address 169.254.55.226 is a private IP address automatically assigned by Windows to the Ethernet adapter. To discover the IP address of your radio, ping the broadcast address 169.254.255.255. This address corresponds to the subnet prefix 169.254.0.0. The response for a successful ping resembles the output shown here.
C:\>ping -S 169.254.55.226 169.254.255.255
Pinging 169.254.255.255 from 169.254.55.226 with 32 bytes of data:
Reply from 192.168.30.7: bytes=32 time=1ms TTL=32
Reply from 192.168.30.7: bytes=32 time=1ms TTL=32
Reply from 192.168.30.7: bytes=32 time=2ms TTL=32
Reply from 192.168.30.7: bytes=32 time=1ms TTL=32

Ping statistics for 169.254.255.255:
  Packets: Sent = 4, Received = 4, Lost = 0 (0% loss),
Approximate round trip times in milli-seconds:
  Minimum = 1ms, Maximum = 2ms, Average = 1ms
Based on the discovered radio IP address 192.168.30.7, assign an IP address to the Ethernet adapter from the same subnet, such as 192.168.30.1. Use a subnet mask of 255.255.255.0.
C:\>netsh interface ip set address "Ethernet 2" static 192.168.30.1 255.255.255.0
Verify that the updated IP address for the Ethernet adapter.
netsh interface ip show address "Ethernet 2"
Configuration for interface "Ethernet 2"
    DHCP enabled:    No
    IP Address:      192.168.30.1
    Subnet Prefix:   192.168.30.0/24 (mask 255.255.255.0)
    InterfaceMetric: 25
Verify that the host computer can ping the IP address assigned to the radio.
C:\>ping 192.168.30.7
Pinging 192.168.30.7 with 32 bytes of data:
Reply from 192.168.30.7: bytes=32 time=1ms TTL=32
Reply from 192.168.30.7: bytes=32 time=1ms TTL=32
Reply from 192.168.30.7: bytes=32 time=1ms TTL=32
Reply from 192.168.30.7: bytes=32 time=1ms TTL=32

Ping statistics for 192.168.30.7:
    Packets: Sent = 4, Received = 4, Lost = 0 (0% loss),
Approximate round trip times in milli-seconds:
    Minimum = 1ms, Maximum = 1ms, Average = 1ms
For Linux
After running the Hardware Setup steps of the installer, if the radio is still not detected, you can attempt to configure the network interface manually by running commands in a terminal window.
Configure Ethernet Connection Via Linux Command Prompt
To configure the network interface card (NIC) for your USRP radio via the Linux® command prompt, use these instructions.
Set the correct host computer network interface IP address. USRP radios have a factory default IP address of 192.168.10.2. Leave the subnet mask set to its default (
255.255.255.0).If the USRP radio IP address is the default value of 192.168.10.2, run this shell command to set these values.
%sudo ifconfig ethX 192.168.10.Y netmask 255.255.255.0
ethis the name of the host computer Ethernet port (usuallyXeth0,eth1, etc.), andYis any integer from 0 through 255 excluding 2. You might be required to enter a password to use thesudocommand.If your radio is on another subnet, meaning the first three octets of the IP address field are not 192.168.30, then enter the IP address values of your radio for the first three octets. See Check Subnet Values on Host and Radio.
This example shows this workflow in detail. Use these commands to determine the IP address of the radio. After determining the IP address for the radio, update the network interface IP address, and ping the radio to verify that the host-to-radio connection is working.
Run the
ipconfigcommand to view the list of network interfaces. On Linux, some of the network interfaces shown byifconfigmight correspond to virtual network interfaces for virtual machines.$ ifconfig
docker0   Link encap:Ethernet  HWaddr 02:42:0a:d0:14:e4
          inet addr:192.168.0.10  Bcast:0.0.0.0  Mask:255.255.255.0
          UP BROADCAST MULTICAST  MTU:1500  Metric:1
          RX packets:0 errors:0 dropped:0 overruns:0 frame:0
          TX packets:0 errors:0 dropped:0 overruns:0 carrier:0
          collisions:0 txqueuelen:0
          RX bytes:0 (0.0 B)  TX bytes:0 (0.0 B)

eth0      Link encap:Ethernet  HWaddr 6c:0b:84:65:8b:ab
          inet addr:172.21.152.206  Bcast:172.21.152.255  Mask:255.255.255.0
          inet6 addr: fe80::6e0b:84ff:fe65:8bab/64 Scope:Link
          UP BROADCAST RUNNING MULTICAST  MTU:1500  Metric:1
          RX packets:285108152 errors:0 dropped:0 overruns:0 frame:0
          TX packets:153065910 errors:0 dropped:0 overruns:0 carrier:0
          collisions:0 txqueuelen:1000
          RX bytes:240450151147 (223.9 GiB)  TX bytes:44073818567 (41.0 GiB)
          Interrupt:20 Memory:fb100000-fb120000

eth1      Link encap:Ethernet  HWaddr 8c:ae:4c:f4:f4:e5
          UP BROADCAST MULTICAST  MTU:1500  Metric:1
          RX packets:6091 errors:0 dropped:0 overruns:0 frame:0
          TX packets:9345 errors:0 dropped:0 overruns:0 carrier:0
          collisions:0 txqueuelen:1000
          RX bytes:459870 (449.0 KiB)  TX bytes:1285142 (1.2 MiB)

lo        Link encap:Local Loopback
          inet addr:127.0.0.1  Mask:255.0.0.0
          inet6 addr: ::1/128 Scope:Host
          UP LOOPBACK RUNNING  MTU:65536  Metric:1
          RX packets:6431593 errors:0 dropped:0 overruns:0 frame:0
          TX packets:6431593 errors:0 dropped:0 overruns:0 carrier:0
          collisions:0 txqueuelen:1
          RX bytes:8072498091 (7.5 GiB)  TX bytes:8072498091 (7.5 GiB)

vmnet1    Link encap:Ethernet  HWaddr 00:50:56:c0:00:01
          inet addr:172.16.37.1  Bcast:172.16.37.255  Mask:255.255.255.0
          inet6 addr: fe80::250:56ff:fec0:1/64 Scope:Link
          UP BROADCAST RUNNING MULTICAST  MTU:1500  Metric:1
          RX packets:0 errors:0 dropped:0 overruns:0 frame:0
          TX packets:24326 errors:0 dropped:0 overruns:0 carrier:0
          collisions:0 txqueuelen:1000
          RX bytes:0 (0.0 B)  TX bytes:0 (0.0 B)

vmnet8    Link encap:Ethernet  HWaddr 00:50:56:c0:00:08
          inet addr:192.168.138.1  Bcast:192.168.138.255  Mask:255.255.255.0
          inet6 addr: fe80::250:56ff:fec0:8/64 Scope:Link
          UP BROADCAST RUNNING MULTICAST  MTU:1500  Metric:1
          RX packets:0 errors:0 dropped:0 overruns:0 frame:0
          TX packets:24326 errors:0 dropped:0 overruns:0 carrier:0
          collisions:0 txqueuelen:1000
          RX bytes:0 (0.0 B)  TX bytes:0 (0.0 B)
In most Linux distributions, you can find the physical Ethernet interfaces by checking the presence of symbolic links. For example, run
ls
                        -l
to view the symbolic links assigned to/sys/class/net/*/device/driver.$ ls -l /sys/class/net/*/device/driver
lrwxrwxrwx 1 root root 0 Apr 23 16:41 /sys/class/net/eth0/device/driver
    -> ../../../bus/pci/drivers/e1000e/
lrwxrwxrwx 1 root root 0 Apr 24 14:31 /sys/class/net/eth1/device/driver
    -> ../../../../../../../bus/usb/drivers/ax88179_178a/
Run
modinfoto get more information about the device driverse1000eandax88179_178a.$ modinfo -d e1000e
Intel(R) PRO/1000 Network Driver
$ modinfo -d ax88179_178a
ASIX AX88179/178A based USB 3.0/2.0 Gigabit Ethernet Devices
To identify the connected interface and obtain the radio IP address, ping both
eth0andeth1using the broadcast address 255.255.255.255.$ ping -I eth1 -c 5 -b 255.255.255.255
WARNING: pinging broadcast address
ping: Warning: source address might be selected on device other than eth1.
PING 255.255.255.255 (255.255.255.255) from 172.21.152.206 eth1: 56(84) bytes of data.
64 bytes from 192.168.30.7: icmp_seq=1 ttl=32 time=1.15 ms
64 bytes from 192.168.30.7: icmp_seq=2 ttl=32 time=1.22 ms
64 bytes from 192.168.30.7: icmp_seq=3 ttl=32 time=1.16 ms
64 bytes from 192.168.30.7: icmp_seq=4 ttl=32 time=1.15 ms
64 bytes from 192.168.30.7: icmp_seq=5 ttl=32 time=1.20 ms

--- 255.255.255.255 ping statistics ---
5 packets transmitted, 5 received, 0% packet loss, time 4004ms
rtt min/avg/max/mdev = 1.154/1.181/1.227/0.028 ms
In Ubuntu and some other Linux systems, you might need to assign a static IP address and a subnet mask to a network interface before you can discover the IP address of the radio. Use the
sudocommand to assign a static IP address.View the network settings before and after running the
sudocommand.$ ifconfig eth1
eth1      Link encap:Ethernet  HWaddr 8c:ae:4c:f4:f4:e5
          UP BROADCAST MULTICAST  MTU:1500  Metric:1
          RX packets:6091 errors:0 dropped:0 overruns:0 frame:0
          TX packets:9345 errors:0 dropped:0 overruns:0 carrier:0
          collisions:0 txqueuelen:1000
          RX bytes:459870 (449.0 KiB)  TX bytes:1285142 (1.2 MiB)
$ sudo ifconfig eth1 192.168.10.1 netmask 255.255.0.0
$ ifconfig eth1
eth1      Link encap:Ethernet  HWaddr 8c:ae:4c:f4:f4:e5
          inet addr:192.168.20.1  Bcast:192.168.255.255  Mask:255.255.0.0
          inet6 addr: fe80::8eae:4cff:fef4:f4e5/64 Scope:Link
          UP BROADCAST RUNNING MULTICAST  MTU:1500  Metric:1
          RX packets:10129 errors:0 dropped:0 overruns:0 frame:0
          TX packets:13724 errors:0 dropped:0 overruns:0 carrier:0
          collisions:0 txqueuelen:1000
          RX bytes:763398 (745.5 KiB)  TX bytes:1733921 (1.6 MiB)
Ping
eth1at the broadcast address 192.168.255.255 to discover the IP address of the radio.$ ping -I eth1 -c 5 -b 192.168.255.255
WARNING: pinging broadcast address
PING 192.168.255.255 (192.168.255.255) from 192.168.10.1 eth1: 56(84) bytes of data.
64 bytes from 192.168.30.7: icmp_seq=1 ttl=32 time=1.18 ms
64 bytes from 192.168.30.7: icmp_seq=2 ttl=32 time=1.17 ms
64 bytes from 192.168.30.7: icmp_seq=3 ttl=32 time=1.17 ms
64 bytes from 192.168.30.7: icmp_seq=4 ttl=32 time=1.22 ms
64 bytes from 192.168.30.7: icmp_seq=5 ttl=32 time=1.15 ms

--- 192.168.255.255 ping statistics ---
5 packets transmitted, 5 received, 0% packet loss, time 4005ms
rtt min/avg/max/mdev = 1.155/1.181/1.224/0.031 ms
If the static IP address of the network interface is the same as the IP address of the radio, ping does not reveal the IP address of the radio. Assign a different static IP address to the network interface, and then try the broadcast ping again.
For this example the radio and network interface both are assigned the IP address 192.168.10.1. Send a broadcast ping from
eth1.$ ping -I eth1 -c 5 -b 192.168.255.255
WARNING: pinging broadcast address
PING 192.168.255.255 (192.168.255.255) from 192.168.10.1 eth1: 56(84) bytes of data.

--- 192.168.255.255 ping statistics ---
5 packets transmitted, 0 received, 100% packet loss, time 4031ms
Use the
sudocommand to update the IP address of the network interface to 192.168.20.1 with subnet mask 255.255.0.0, and then try the broadcast ping again.$ sudo ifconfig eth1 192.168.20.1 netmask 255.255.0.0 $ ifconfig eth1
eth1      Link encap:Ethernet  HWaddr 8c:ae:4c:f4:f4:e5
          inet addr:192.168.20.1  Bcast:192.168.255.255  Mask:255.255.0.0
          inet6 addr: fe80::8eae:4cff:fef4:f4e5/64 Scope:Link
          UP BROADCAST RUNNING MULTICAST  MTU:1500  Metric:1
          RX packets:10129 errors:0 dropped:0 overruns:0 frame:0
          TX packets:13724 errors:0 dropped:0 overruns:0 carrier:0
          collisions:0 txqueuelen:1000
          RX bytes:763398 (745.5 KiB)  TX bytes:1733921 (1.6 MiB)
$ ping -I eth1 -c 5 -b 192.168.255.255
WARNING: pinging broadcast address
PING 192.168.255.255 (192.168.255.255) from 192.168.20.1 eth1: 56(84) bytes of data.
64 bytes from 192.168.10.1: icmp_seq=1 ttl=32 time=1.18 ms
64 bytes from 192.168.10.1: icmp_seq=2 ttl=32 time=1.19 ms
64 bytes from 192.168.10.1: icmp_seq=3 ttl=32 time=1.17 ms
64 bytes from 192.168.10.1: icmp_seq=4 ttl=32 time=1.27 ms
64 bytes from 192.168.10.1: icmp_seq=5 ttl=32 time=1.16 ms

--- 192.168.255.255 ping statistics ---
5 packets transmitted, 5 received, 0% packet loss, time 4005ms
rtt min/avg/max/mdev = 1.164/1.197/1.272/0.058 ms
Choose a static IP address in the same subnet of your radio (192.168.30.1 in this example), and use a subnet mask 255.255.255.0. Use the
sudocommand to update the network interface IP address, use theipconfigcommand to check the configuration, and ping the radio at 192.168.30.7 to verify the host-to-radio connection. In this example the ping was successful.$ sudo ifconfig eth1 192.168.30.1 netmask 255.255.255.0 $ ifconfig eth1
eth1      Link encap:Ethernet  HWaddr 8c:ae:4c:f4:f4:e5
          inet addr:192.168.30.1  Bcast:192.168.30.255  Mask:255.255.255.0
          inet6 addr: fe80::8eae:4cff:fef4:f4e5/64 Scope:Link
          UP BROADCAST RUNNING MULTICAST  MTU:1500  Metric:1
          RX packets:6123 errors:0 dropped:0 overruns:0 frame:0
          TX packets:9463 errors:0 dropped:0 overruns:0 carrier:0
          collisions:0 txqueuelen:1000
          RX bytes:462584 (451.7 KiB)  TX bytes:1303558 (1.2 MiB)
ping -c 5 192.168.30.7
PING 192.168.30.7 (192.168.30.7) 56(84) bytes of data.
64 bytes from 192.168.30.7: icmp_seq=1 ttl=32 time=1.11 ms
64 bytes from 192.168.30.7: icmp_seq=2 ttl=32 time=1.25 ms
64 bytes from 192.168.30.7: icmp_seq=3 ttl=32 time=1.20 ms
64 bytes from 192.168.30.7: icmp_seq=4 ttl=32 time=1.19 ms
64 bytes from 192.168.30.7: icmp_seq=5 ttl=32 time=1.15 ms

--- 192.168.30.7 ping statistics ---
5 packets transmitted, 5 received, 0% packet loss, time 4004ms
rtt min/avg/max/mdev = 1.119/1.183/1.251/0.063 ms
Run these shell commands to configure the network connection, and then check that the changes took effect.
%sudo ifconfig eth X 192.168.Y.Z
ifconfig ethX
For 192.168.
Y.Zuse the actual IP address to be assigned to the host computer, and forethuse the name of the host Ethernet port (usuallyXeth0,eth1, etc.).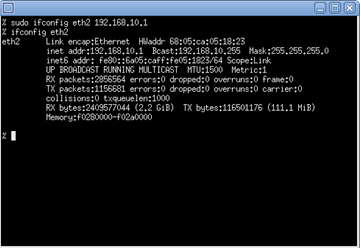
On Linux systems, unless you make network connection changes persistent, a system reboot resets network connection changes, and the host-to-radio connection is lost. To retain the host-to-radio connection after a computer reboot, see Make Changes Persistent on Linux.
The host computer configuration is complete. Continue to Verify USRP Hardware Connection.
For Macintosh
After running the Hardware Setup steps of the installer, if the radio is still not detected, you can attempt to configure the network interface manually via the Mac System Preferences or running commands in a terminal window.
Configure Ethernet Connection Via Mac System Preferences
Click Network from System Preferences. From the left pane, select the network connection that is connected to the USRP radio. If your Mac has only one network interface card (NIC), see Using One Ethernet Port.

The default IPV4 configuration is
Using DHCP. The default IP address 169.254.142.233 is a private IP address automatically assigned by the operating system. For more information, see https://tools.ietf.org/html/rfc3927.Set Configure IPv4 to
Manually. Set IP Address to192.168.10., whereXXis any integer from 1 to 255 except 2, and Subnet Mask to 255.255.255.0. Click Apply.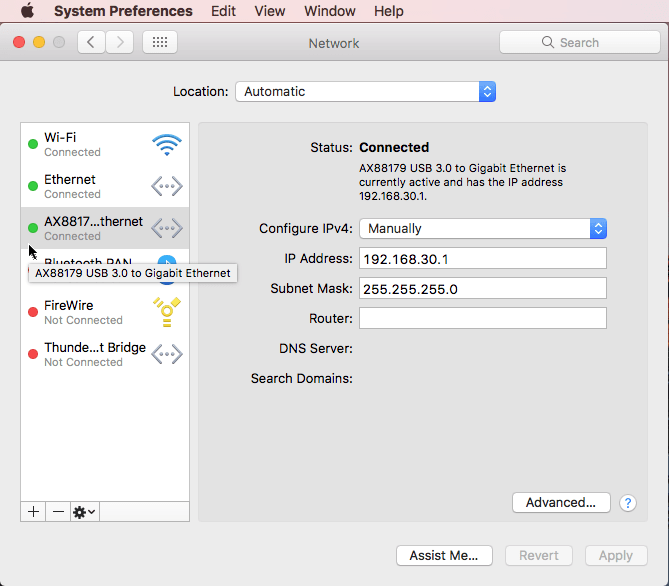
If your radio is on another subnet, meaning the first three octets of the IP address field are not 192.168.30, then enter the IP address values of your radio for the first three octets.
The host computer configuration is complete. Continue to Verify USRP Hardware Connection.
Configure Ethernet Connection Via Mac Terminal Window
Use these commands to determine the IP address of the radio. After determining the IP address for the radio, update the network interface IP address, and ping the radio to verify that the host-to-radio connection is working.
View the list of network services, by entering this command at the Mac command prompt.
For the host computer used in this example, this is the output.$ networksetup -listallnetworkservicesAn asterisk (*) denotes that a network service is disabled. Wi-Fi Ethernet AX88179 USB 3.0 to Gigabit Ethernet FireWire Bluetooth PAN Thunderbolt Bridge
Determine which Ethernet adapter is used for the internet connection by pinging the IP address associated with each network service returned. When you identify the connection name of the network adapter connected to the Internet, avoid selecting that network adapter for the radio. For more information, see Using One Ethernet Port.
For this example, the radio is attached to the
AX88179 USB 3.0 to
                  Gigabit Ethernet
. Run this command to find the IP address and Ethernet address associated withAX88179 USB 3.0 to Gigabit Ethernet.$ networksetup -getinfo "AX88179 USB 3.0 to Gigabit Ethernet"
DHCP Configuration
IP address: 169.254.142.233
Subnet mask: 255.255.0.0
Router: (null)
Client ID:
IPv6: Automatic
IPv6 IP address: none
IPv6 Router: none
Ethernet Address: 8c:ae:4c:f4:f4:e5
Run the
ifconfigcommand, and find the network interface corresponding to the Ethernet address 8c:ae:4c:f4:f4:e5.$ ifconfig
lo0: flags=8049<UP,LOOPBACK,RUNNING,MULTICAST> mtu 16384
	options=1203<RXCSUM,TXCSUM,TXSTATUS,SW_TIMESTAMP>
	inet 127.0.0.1 netmask 0xff000000
	inet6 ::1 prefixlen 128
	inet6 fe80::1%lo0 prefixlen 64 scopeid 0x1
	nd6 options=201<PERFORMNUD,DAD>
gif0: flags=8010<POINTOPOINT,MULTICAST> mtu 1280
stf0: flags=0<> mtu 1280
en0: flags=8863<UP,BROADCAST,SMART,RUNNING,SIMPLEX,MULTICAST> mtu 1500
	options=10b<RXCSUM,TXCSUM,VLAN_HWTAGGING,AV>
	ether 0c:4d:e9:b8:28:aa
	inet6 fe80::1431:de1f:143c:e8fe%en0 prefixlen 64 secured scopeid 0x4
	inet 172.21.152.123 netmask 0xffffff00 broadcast 172.21.152.255
	nd6 options=201<PERFORMNUD,DAD>
	media: autoselect (1000baseT <full-duplex,flow-control,energy-efficient-ethernet>)
	status: active
en1: flags=8863<UP,BROADCAST,SMART,RUNNING,SIMPLEX,MULTICAST> mtu 1500
	ether a8:8e:24:a2:10:6d
	inet6 fe80::140a:c54f:c99a:68a6%en1 prefixlen 64 secured scopeid 0x6
	inet 172.31.205.144 netmask 0xffffff00 broadcast 172.31.205.255
	nd6 options=201<PERFORMNUD,DAD>
	media: autoselect
	status: active
fw0: flags=8863<UP,BROADCAST,SMART,RUNNING,SIMPLEX,MULTICAST> mtu 4078
	lladdr 28:0b:5c:ff:fe:15:fc:32
	nd6 options=201<PERFORMNUD,DAD>
	media: autoselect <full-duplex>
	status: inactive
en2: flags=963<UP,BROADCAST,SMART,RUNNING,PROMISC,SIMPLEX> mtu 1500
	options=60<TSO4,TSO6>
	ether 32:00:11:5f:c3:20
	media: autoselect <full-duplex>
	status: inactive
p2p0: flags=8843<UP,BROADCAST,RUNNING,SIMPLEX,MULTICAST> mtu 2304
	ether 0a:8e:24:a2:10:6d
	media: autoselect
	status: inactive
awdl0: flags=8943<UP,BROADCAST,RUNNING,PROMISC,SIMPLEX,MULTICAST> mtu 1484
	ether de:27:8b:39:9e:74
	inet6 fe80::dc27:8bff:fe39:9e74%awdl0 prefixlen 64 scopeid 0xa
	nd6 options=201<PERFORMNUD,DAD>
	media: autoselect
	status: active
bridge0: flags=8863<UP,BROADCAST,SMART,RUNNING,SIMPLEX,MULTICAST> mtu 1500
	options=63<RXCSUM,TXCSUM,TSO4,TSO6>
	ether 32:00:11:5f:c3:20
	Configuration:
		id 0:0:0:0:0:0 priority 0 hellotime 0 fwddelay 0
		maxage 0 holdcnt 0 proto stp maxaddr 100 timeout 1200
		root id 0:0:0:0:0:0 priority 0 ifcost 0 port 0
		ipfilter disabled flags 0x2
	member: en2 flags=3<LEARNING,DISCOVER>
	        ifmaxaddr 0 port 8 priority 0 path cost 0
	nd6 options=201<PERFORMNUD,DAD>
	media: <unknown type>
	status: inactive
utun0: flags=8051<UP,POINTOPOINT,RUNNING,MULTICAST> mtu 2000
	inet6 fe80::7e23:4719:93e:b73c%utun0 prefixlen 64 scopeid 0xc
	nd6 options=201<PERFORMNUD,DAD>
en4: flags=8863<UP,BROADCAST,SMART,RUNNING,SIMPLEX,MULTICAST> mtu 1500
	options=b<RXCSUM,TXCSUM,VLAN_HWTAGGING>
	ether 8c:ae:4c:f4:f4:e5
	inet6 fe80::1433:8cb7:fc90:4c37%en4 prefixlen 64 secured scopeid 0xd
	inet 169.254.142.233 netmask 0xffff0000 broadcast 169.254.255.255
	nd6 options=201<PERFORMNUD,DAD>
	media: autoselect (1000baseT <full-duplex,flow-control>)
	status: active
The output shows, you can see that
en4is the network interface corresponding to the Ethernet address 8c:ae:4c:f4:f4:e5, and its IP address is 169.254.142.233.Set the last two numbers of the IP address 169.254.142.233 to 255, and send a broadcast ping from
en4. The output for this example shows a successful ping.$ ping -b en4 -c 5 169.254.255.255
The broadcast ping return shows the IP address currently associated withPING 169.254.255.255 (169.254.255.255): 56 data bytes 64 bytes from 169.254.142.233: icmp_seq=0 ttl=255 time=0.137 ms 64 bytes from 192.168.30.7: icmp_seq=0 ttl=32 time=1.268 ms 64 bytes from 169.254.142.233: icmp_seq=1 ttl=255 time=0.292 ms 64 bytes from 192.168.30.7: icmp_seq=1 ttl=32 time=1.488 ms 64 bytes from 169.254.142.233: icmp_seq=2 ttl=255 time=0.273 ms 64 bytes from 192.168.30.7: icmp_seq=2 ttl=32 time=1.422 ms 64 bytes from 169.254.142.233: icmp_seq=3 ttl=255 time=0.261 ms 64 bytes from 192.168.30.7: icmp_seq=3 ttl=32 time=1.322 ms 64 bytes from 169.254.142.233: icmp_seq=4 ttl=255 time=0.225 ms --- 169.254.255.255 ping statistics --- 5 packets transmitted, 5 packets received, +4 duplicates, 0.0% packet loss round-trip min/avg/max/stddev = 0.137/0.743/1.488/0.570 ms
en4and the IP address associated with the radio.Based on the discovered radio IP address 192.168.30.7, assign an IP address to the network interface on the host computer from the same subnet, such as 192.168.30.1. Use a subnet mask of 255.255.255.0.
$ sudo networksetup -setmanual "AX88179 USB 3.0 to Gigabit Ethernet" 192.168.30.1 255.255.255.0
Verify that the host computer can ping the IP address assigned to the radio.
$ ping -c 5 192.168.30.7
PING 192.168.30.7 (192.168.30.7): 56 data bytes
64 bytes from 192.168.30.7: icmp_seq=0 ttl=32 time=1.230 ms
64 bytes from 192.168.30.7: icmp_seq=1 ttl=32 time=1.388 ms
64 bytes from 192.168.30.7: icmp_seq=2 ttl=32 time=1.368 ms
64 bytes from 192.168.30.7: icmp_seq=3 ttl=32 time=1.450 ms
64 bytes from 192.168.30.7: icmp_seq=4 ttl=32 time=1.499 ms

--- 192.168.30.7 ping statistics ---
5 packets transmitted, 5 packets received, 0.0% packet loss
round-trip min/avg/max/stddev = 1.230/1.387/1.499/0.091 ms
See Also
Check USRP Radio Connection | Verify USRP Hardware Connection
You can also select a web site from the following list:
Americas
- América Latina (Español)
- Canada (English)
- United States (English)
Europe
- Belgium (English)
- Denmark (English)
- Deutschland (Deutsch)
- España (Español)
- Finland (English)
- France (Français)
- Ireland (English)
- Italia (Italiano)
- Luxembourg (English)
- Netherlands (English)
- Norway (English)
- Österreich (Deutsch)
- Portugal (English)
- Sweden (English)
- Switzerland
- United Kingdom (English)