Connect to Kinova Gen3 Robot and Manipulate the Arm Using MATLAB
This example demonstrates how to connect the Kinova Gen3 7-DoF Ultralightweight Robot arm to MATLAB® and Simulink®. This also helps you to get feedback from the robot and to send control commands.
Note: Execute the script section by section as mentioned in this example. Also, keep the E-STOP button close to you to stop any unnecessary movement of the robot.
Depending on the communication interface provided by the robot manufacturer, the robot can be connected to the MATLAB using different methods. For Kinova® Gen3 robot arm, Kinova provides a C++ API that uses the Ethernet port or Wi-Fi® to communicate with the robot. For more details, see Download MATLAB MEX APIs for Kinova Gen 3.
You can utilize the MEX Wrapper provided by Kinova robotics or use the system object to control the robot. Using system object allows you to utilize the same architecture for the Simulink implementation. In the following sections, In the following sections, the system object will be used in the MATLAB script to communicate with the robot. For more information on the ‘kortex’ system object, see GitHub page of Kinova Robotics.
Before proceeding further ensure that the robot hardware is setup completely and connected to the host computer. For more details, see Verify Connection to KINOVA Gen 3 Robot.
Clear all output in the live script by right clicking anywhere in the live script and then clicking ‘Clear All Output’ or navigate to VIEW > Clear all Output.
Required Products
Robotics System Toolbox™
Simulink
Robotics System Toolbox Support Package for KINOVA Gen3 Manipulators
Create an API instance to Connect to the Robot
Create an API instance using your robot's IP address to establish connection with the robot. You can create multiple instances that connect to the same robot or to multiple robots. Simulink.importExternalCTypes is used to import certain bus definitions from the external header file. This has to be done explicitly only in the MATLAB scripts. For Simulink models, the same command can be added in the Model Callbacks.
Simulink.importExternalCTypes(which('kortex_wrapper_data.h'));
gen3Kinova = kortex();
gen3Kinova.ip_address = '192.168.1.10';
gen3Kinova.user = 'admin';
gen3Kinova.password = 'admin';
Connect to the Robot
Use the created API instance to connect to the robot. While connecting, each MATLAB script must include a function call to CreateRobotApisWrapper at the beginning and DestroyRobotApisWrapper at the end of the script. Connect with the robot using CreateRobotApisWrapper command and if the connection is successful, the return flag isOk should be true.
isOk = gen3Kinova.CreateRobotApisWrapper();
if isOk
   disp('You are connected to the robot!');
else
   error('Failed to establish a valid connection!');
end
You are connected to the robot!
If the connection fails, see Troubleshooting Manipulator Support Package.
Get Sensor Data from the Robot
The Kinova Gen3 robot contains multiple sensor suites across the base, actuator, and end-effector. SendRefreshFeedback provides the data from these sensors in three structures corresponding to the base, the actuators, and the gripper(interconnect).
If the robot and MATLAB is configured correctly, the actuator feedback consists of numerically consistent nonzero values. Uncomment the display commands to see the values.
Note: Kinova API returns all angular values in degrees.
[isOk,baseFb, actuatorFb, interconnectFb] = gen3Kinova.SendRefreshFeedback();
0
if isOk
    disp('Base feedback');
    disp(baseFb);
    disp('Actuator feedback');
    disp(actuatorFb);
    disp('Gripper feedback');
    disp(interconnectFb);
else
    error('Failed to acquire sensor data.');
end
Control Command Modes
The MATLAB API for Kinova Gen3 robot supports these modes for sending commands to the robot:
High-Level commands: Use this mode to send the robot to a desired configuration, move the gripper, or to send a Cartesian command. The robot will internally interpolate to reach the desired configuration and there is no self-collision checking.
Prescribed trajectories: Use this method if you need the robot to follow a smooth trajectory (example: motion planning frameworks). You need to send an array of joint positions, velocities, and accelerations. For more information, see SendPreComputedTrajectory and the example, Track Pre-Computed Trajectory of Kinova Gen3 Robot End-Effector Using Inverse Kinematics and KINOVA KORTEX MATLAB API.
High-Level Commands
Send Joint Angles
Expected Motion of the robot (Assuming you are starting from the retract position)
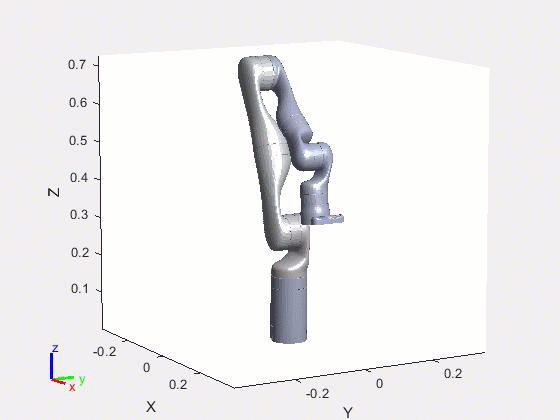
This section helps you to send the robot to the home configuration. SendJointAngles command can be used to move the robot to a particular position defined by a set of joint angles. Since the Kinova Gen3 robot has seven actuators, input to the function is a vector of size 1 X 7. Valid range of joint angle is 0 to 360 degrees.
jointCmd = [0 15 180 230 0 55 90];
Use default speed and duration constraints.
constraintType = int32(0);
speed = 0;
duration = 0;
Send joint command to the robot.
isOk = gen3Kinova.SendJointAngles(jointCmd, constraintType, speed, duration);

if isOk
    disp('Command sent to the robot. Wait for the robot to stop moving.');
else
    disp('Command error.');
end
Command sent to the robot. Wait for the robot to stop moving.
Move only the end effector of the robot.
Expected Motion of the robot
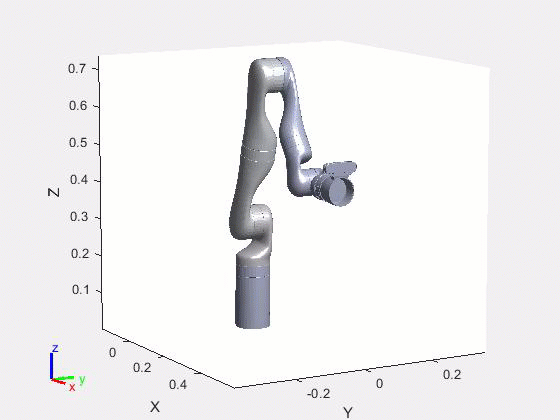
jointCmd = [0 15 180 230 0 55 180];
constraintType = int32(0);
speed = 0;
duration = 0;

isOk = gen3Kinova.SendJointAngles(jointCmd, constraintType, speed, duration);
if isOk
    disp('Command sent to the robot. Wait for the robot to stop moving.');
else
    disp('Command error.');
end
Command sent to the robot. Wait for the robot to stop moving.
Open and Close the Gripper
If your robot arm is equipped with a Robotiq 2F-85 gripper, then execute the following code to close and open the gripper using velocity command. Here, toolCommand depicts the type of control mode which is used. For the velocity control, the value should be set to 2. Also, toolCmd is used to set the speed of opening or closing the gripper. For more information on the SendToolCommand, see GitHub page from Kinova Robotics.
toolCommand = int32(2);    % Velocity control mode
toolDuration = 0;
toolCmd = -1; % Close the gripper with full speed
isOk = gen3Kinova.SendToolCommand(toolCommand, toolDuration, toolCmd);
if isOk
    disp('Command sent to the gripper. Wait for the gripper to close.')
else
    error('Command Error.');
end
Command sent to the gripper. Wait for the gripper to close.
Open the gripper using velocity command.
% Open gripper again in full speed
toolCmd = 1;
isOk = gen3Kinova.SendToolCommand(toolCommand, toolDuration, toolCmd);
if isOk
    disp('Command sent to the gripper. Wait for the gripper to open.')
else
    error('Command Error.');
end
Command sent to the gripper. Wait for the gripper to open.
Half close the gripper using position commands.
toolCommand = int32(3);    % position mode
toolDuration = 0;
toolCmd = 0.5;
isOk = gen3Kinova.SendToolCommand(toolCommand, toolDuration, toolCmd);
if isOk
    disp('Command sent to the gripper. Wait for the gripper to stop moving.')
else
    error('Command Error.');
end
Command sent to the gripper. Wait for the gripper to stop moving.
Open the gripper using position commands.
toolCmd = 0;
isOk = gen3Kinova.SendToolCommand(toolCommand, toolDuration, toolCmd);
if isOk
    disp('Command sent to the gripper. Wait for the gripper to stop moving.')
else
    error('Command Error.');
end
Command sent to the gripper. Wait for the gripper to stop moving.
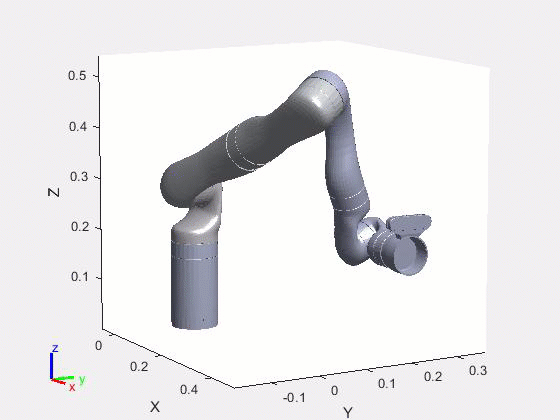
Send Cartesian Pose Command
Expected Motion of the robot


You can also send Cartesian commands to the robot using the function SendCartesianPose. The robot solves the inverse kinematics internally and calculates the joint angles required to achieve the position.
The orientation is represented with Euler angles and the convention used is Tait-Bryan, extrinsic ZYX.
Send Cartesian pose command to the robot without any constraints.
cartCmd = [0.6, 0.2, 0.2, 90, 0, 90];
constraintType = int32(0);
speeds = [0, 0];
duration = 0;

isOk = gen3Kinova.SendCartesianPose(cartCmd, constraintType, speeds, duration);

if isOk
    disp('Command sent to the robot. Wait for robot to finish motion and stop');
else
    error('Command Error.');
end
Command sent to the robot. Wait for robot to finish motion and stop
Change pose of the robot.
Expected Motion of the robot
cartCmd = [0.4, 0.2, 0.2, 90, 0, 45];
isOk = gen3Kinova.SendCartesianPose(cartCmd, constraintType, speeds, duration);
if isOk
    disp('Command sent to the robot. Wait for robot to finish motion and stop');
else
    error('Command Error.');
end
Command sent to the robot. Wait for robot to finish motion and stop
Send Robot back to Retract Configuration.
Expected Motion of the robot

jointCmd = [360 340 180 214 0 310 90];
constraintType = int32(0);
speed = 0;
duration = 0;

isOk = gen3Kinova.SendJointAngles(jointCmd, constraintType, speed, duration);
if isOk
    disp('Command sent to the robot. Wait for robot to finish motion and stop');
else
    error('Command Error.');
end
Command sent to the robot. Wait for robot to finish motion and stop
Disconnect from the Robot
Use this command to disconnect from Kinova Gen3 robot Robot.
isOk = gen3Kinova.DestroyRobotApisWrapper();
Clear workspace
clear;
You can also select a web site from the following list:
Americas
- América Latina (Español)
- Canada (English)
- United States (English)
Europe
- Belgium (English)
- Denmark (English)
- Deutschland (Deutsch)
- España (Español)
- Finland (English)
- France (Français)
- Ireland (English)
- Italia (Italiano)
- Luxembourg (English)
- Netherlands (English)
- Norway (English)
- Österreich (Deutsch)
- Portugal (English)
- Sweden (English)
- Switzerland
- United Kingdom (English)