Live 3-D Proximity Detection Using a Time-of-Flight Camera
R2026bThis example shows how to acquire a live point cloud stream from a Basler ToF blaze-101 camera, apply confidence-based filtering, and perform volumetric obstacle detection with real-time 3-D visualization.
The camera streams multiple data components simultaneously. This example uses two of them:
Range (480x640x3): XYZ point cloud coordinates in meters
Confidence (480x640): Per-pixel reliability measure
These components are used to detect objects within a user-defined safety zone and classify the scene as safe, warning, or danger based on proximity.
Requirements
This example requires the following add-ons:
Image Acquisition Toolbox™
Image Acquisition Toolbox Support Package for GenICam™ Interface
Connect to Camera
Create a videoinput object using the gentl adaptor for the Basler ToF blaze-101 camera. Retrieve the video source object to access camera-specific properties.
vid = videoinput("gentl", 1);
src = getselectedsource(vid);
Enable Multiple Components
Enable the Range and Confidence components. The Range component provides XYZ point cloud data directly. The Confidence component provides per-pixel reliability values used to filter unreliable measurements. The Intensity component is disabled because it is not needed for this example.
src.ComponentSelector = "Intensity";
src.ComponentEnable = "False";
src.ComponentSelector = "Range";
src.ComponentEnable = "True";
src.ComponentSelector = "Confidence";
src.ComponentEnable = "True";
Set the Confidence pixel format to Mono16 for 16-bit resolution. Since ComponentSelector is set to Confidence, setting the PixelFormat value changes the pixel format for the Confidence component
src.PixelFormat = "Mono16";Verify the component configuration.
componentInfo(src)
ans = 3×4 table
     "Intensity"    "False"            "Mono16"                                       "Mono16"
         "Range"     "True"    "Coord3D_ABC32f"    ["Mono16", "Coord3D_C16", "Coord3D_ABC32f"]
    "Confidence"     "True"            "Mono16"                     ["Mono16", "Confidence16"]
Configure for Live Streaming
Set up manual triggering to enable the getsnapshot-in-loop acquisition pattern described in the example Acquire Single Image in Loop Using getsnapshot.
triggerconfig(vid, "manual");Define Processing Parameters
Set thresholds for confidence filtering and proximity zone classification. This might change based on your application.
confidenceThreshold = 0.4;    % Normalized [0,1] — reject points below this
proximityThreshold  = 2.0;    % meters — outer boundary of "near" zone
warningThreshold    = 0.6;    % meters — WARNING zone boundary
safetyThreshold     = 0.2;    % meters — DANGER zone boundary
Acquire Initial Frame for Visualization Setup
Take a single snapshot to determine the point cloud extents, and configure the pcplayer axis limits.
start(vid);
data = getsnapshot(vid);
ptCloud = pointCloud(data.Range);
Create Point Cloud Player
Use pcplayer for live streaming visualization. Set axis limits from the initial frame extents.
player = pcplayer(ptCloud.XLimits, ptCloud.YLimits, ptCloud.ZLimits);
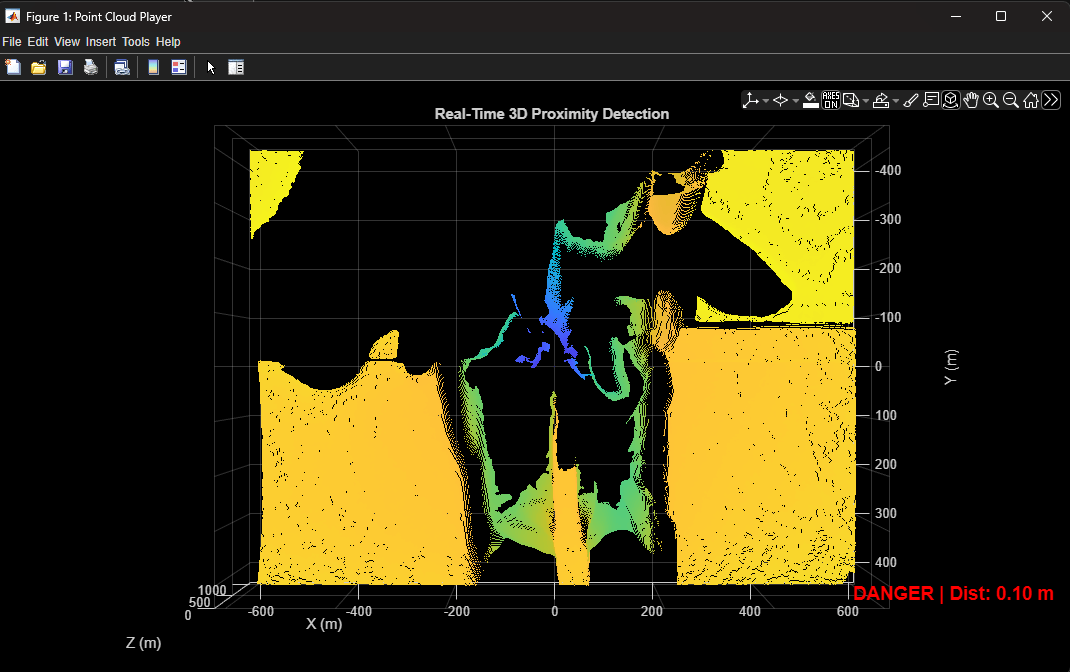
player.Axes.Title.String = "Real-Time 3D Proximity Detection";
player.Axes.XLabel.String = "X (m)";
player.Axes.YLabel.String = "Y (m)";
player.Axes.ZLabel.String = "Z (m)";
Add a text overlay for displaying the safety status in real time.
statusText = text(player.Axes, ...
    ptCloud.XLimits(2), ptCloud.YLimits(2), ptCloud.ZLimits(2), "", ...
    "FontSize", 14, "FontWeight", "bold", "Color", "w", ...
    "VerticalAlignment", "top");
Preallocate Metrics
Store per-frame distances and statuses for post-acquisition analysis.
maxFrames = 1000;
distances = NaN(maxFrames, 1);
statuses  = strings(maxFrames, 1);
Stream and Detect Obstacles
Acquire frames in a loop until the pcplayer window is closed. For each frame:
Filter unreliable points using the Confidence component.
Compute distance along optical axis from the camera origin for each valid point.
Classify the scene based on the nearest obstacle distance.
Color-code the danger and warning zones; use Z-based coloring elsewhere.
Update the point cloud display and status overlay.
frameIdx = 0;
while isOpen(player)
    frameIdx = frameIdx + 1;

    data = getsnapshot(vid);
    range      = data.Range;
    confidence = data.Confidence;

    % Normalize confidence to [0, 1] and create validity mask
    confNorm  = single(confidence) ./ single(max(confidence(:)));
    validMask = confNorm >= confidenceThreshold;

    % NaN out invalid points
    xyz = single(range/1000);
    xyz(repmat(~validMask, [1 1 3])) = NaN;

    % Use Z-depth (distance along optical axis) for proximity detection
    zDepth = xyz(:,:,3);

    % Determine nearest valid obstacle distance
    nearMask = zDepth < proximityThreshold & zDepth > 0 & validMask;
    validDistances = zDepth(nearMask);
    if ~isempty(validDistances)
        nearestDist = min(validDistances);
    else
        nearestDist = Inf;
    end

    % Classify safety status
    if nearestDist < safetyThreshold
        status = "DANGER";
        statusColor = "r";
    elseif nearestDist < warningThreshold
        status = "WARNING";
        statusColor = "y";
    else
        status = "SAFE";
        statusColor = "g";
    end

    % Update visualization
    ptCloud = pointCloud(range);
    view(player, ptCloud)

    % Update status overlay
    statusText.String = sprintf("%s | Dist: %.2f m", status, nearestDist);
    statusText.Color = statusColor;
    % Store metrics (grow arrays if needed)
    if frameIdx > maxFrames
        maxFrames = maxFrames * 2;
        distances(end+1:maxFrames) = NaN;
        statuses(end+1:maxFrames) = "";
    end
    distances(frameIdx) = nearestDist;
    statuses(frameIdx) = status;
end
Clean Up
Stop acquisition and release camera resources.
stop(vid);
delete(vid);
clear vid src;
Post-Acquisition Analysis
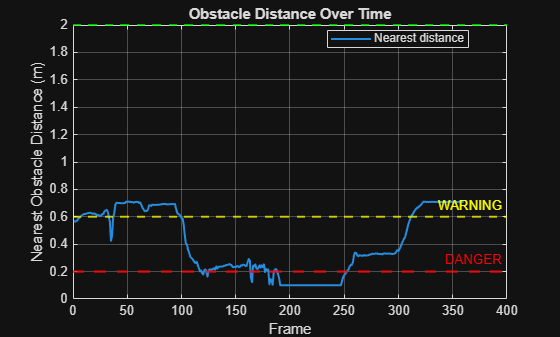
Once you have completed the acquisition, you must trim the metric arrays to the actual number of acquired frames and plot the nearest obstacle distance over time.
distances = distances(1:frameIdx);
statuses  = statuses(1:frameIdx);

figure;
plot(1:frameIdx, distances, "LineWidth", 1.5);
hold on;
yline(safetyThreshold, "r--", "DANGER", "LineWidth", 2);
yline(warningThreshold, "y--", "WARNING", "LineWidth", 1.5);
yline(proximityThreshold, "g--", "PROXIMITY", "LineWidth", 1.5);
hold off;
xlabel("Frame");
ylabel("Nearest Obstacle Distance (m)");
title("Obstacle Distance Over Time");
legend("Nearest distance", "Location", "best");
grid on;