Deploy CNN-Based Drowsiness Detection Model on Infineon AURIX PPU
R2026bThis example shows how to generate code for a convolutional neural network (CNN) and deploy it on the parallel processing unit (PPU) of Infineon® AURIX™ TC4xx microcontrollers.
The PPU is a specialized hardware accelerator designed to speed up highly parallel vector computations commonly used in deep learning applications. The example uses processor-in-the-loop (PIL) simulation to validate the generated code on the target hardware. It also compares execution performance with and without code replacement library (CRL) functionality.
Required Hardware
Infineon AURIX TC4xx hardware board with PPU support
Drowsiness Detection Network
In this example, the CNN you deploy to hardware is a drowsiness detection network. The example includes the file QDrowsyDetection.mat containing a pretrained network trained on the Driver Drowsiness Dataset (DDD). This data set contains more than 41,790 images labeled as drowsy or non-drowsy. The data set is split into 80% training data and 20% validation data. The following image shows one sample from each class.

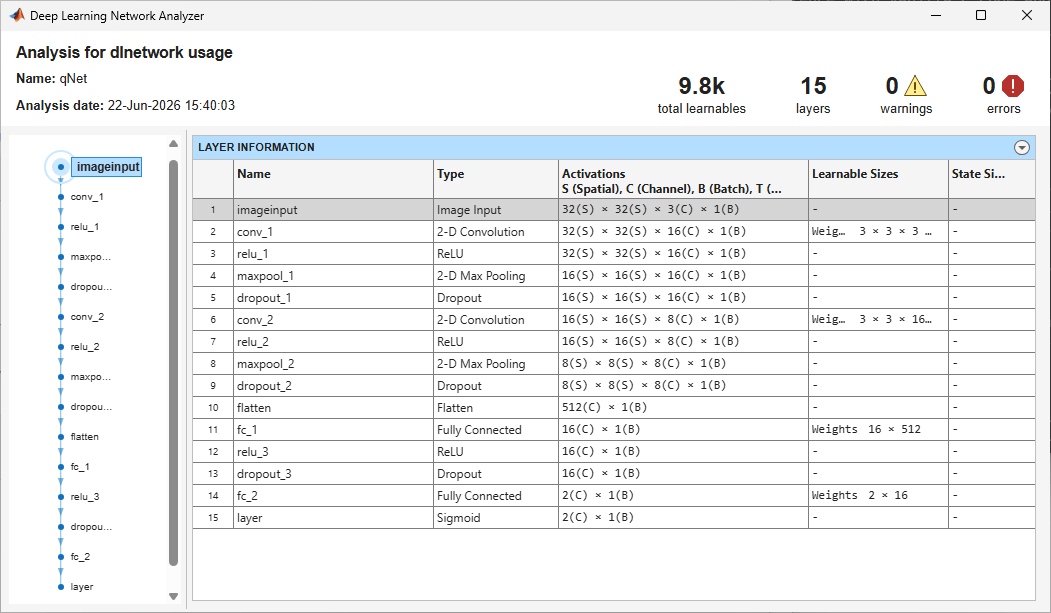
Load the pretrained network and examine the network architecture in the Deep Learning Network Analyzer app.
load("QDrowsyDetection.mat");
info = analyzeNetwork(qNet);
Preprocess Input Images
As the first line of layer information in Network Analyzer shows, the network expects a 32⨯32⨯3⨯1 single-precision image as input. The example includes Drowsy and NonDrowsy images that you can use to test the network. To prepare this image for the model, the Drowsy image, detect the face using vision.CascadeObjectDetector (Computer Vision Toolbox), resize the detected face, and format the image for neural network processing.
classes = {'Drowsy','Non Drowsy'};
I = imread('Drowsy.png');
faceDetector = vision.CascadeObjectDetector();
bbox = step(faceDetector, I);

if ~isempty(bbox)
    face = imcrop(I, bbox(1,:));
else
    error("No face detected");
end

face = imresize(face, [32 32]);

data = {face};
data = castToSingle(data);
face = data{1};

InputData = reshape(face, [32 32 3 1]);
Configure Simulink Model
Open the DrowsyDetectionModel model. You can view and analyze the network layers inside the DrowsyDetectionModel subsystem block.
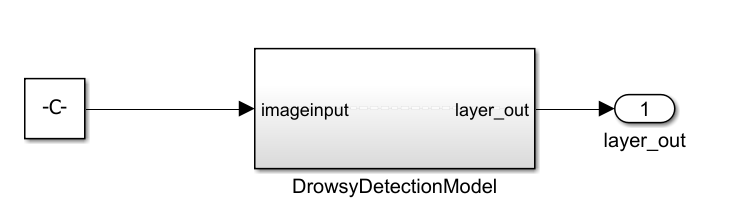
Configure the model for simulation and code generation on an Infineon AURIX TC4x hardware board. For more information on deploying a Simulink® model to an Infineon AURIX hardware board, see Getting Started with Embedded Coder Support Package for Infineon AURIX TC4x Microcontrollers.
1. Open the Configuration Parameters dialog box. In the Simulink editor, on the Modeling tab, click Model settings.

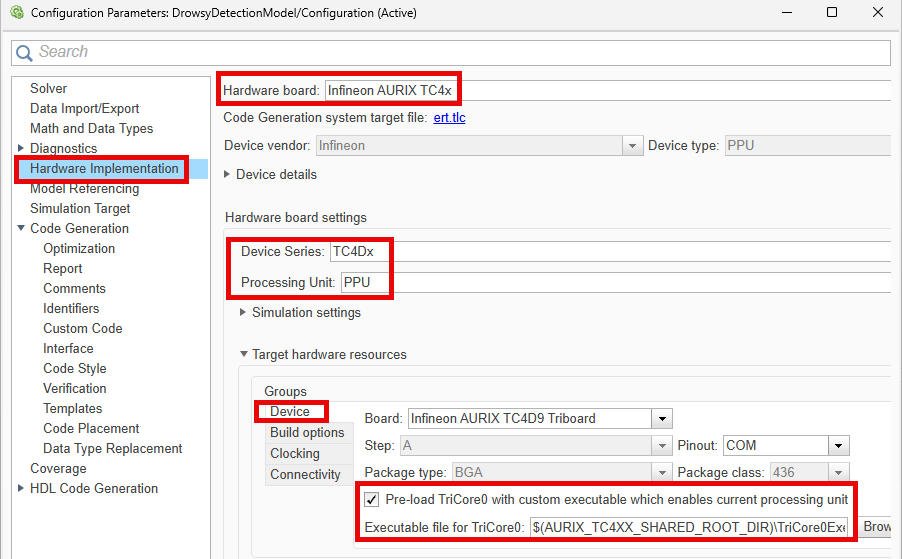
2. In the Hardware Implementation pane, set Hardware board to Infineon AURIX TC4x, Device Series to TC4Dx, and Processing Unit to PPU.
TriCore® 0 is the principal processing unit that handles system initialization, boot processes, and critical control tasks in the AURIX microcontrollers.To initialize the PPU with an executable file of TriCore 0, enable Pre-load TriCore0 with custom executable which enables current processing unit.
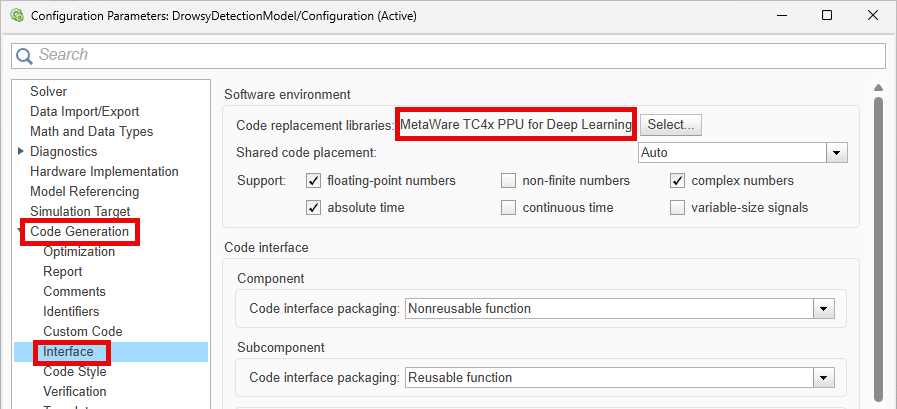
3. To generate optimized code using the CRLs, expand Code Generation pane, and click Interface. On the Software environment pane, click Select, then choose MetaWare TC4x PPU for Deep Learning from the CRL list. For more information about deep learning CRL for the PPU, see Generate Optimized Code for Deep Learning Networks on Infineon AURIX Microcontrollers and Parallel Processing Unit for Optimized Code Generation.
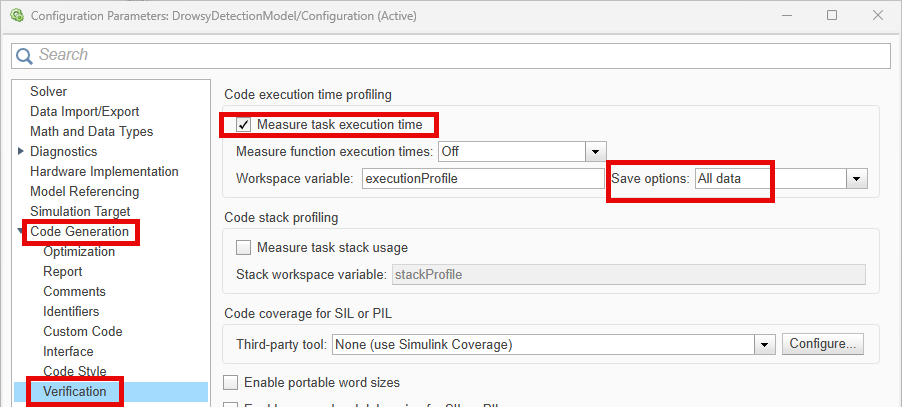
4. To observe the effect of using the CRLs, configure the model to measure execution time on the target hardware. Click Verification to view the Code execution time profiling pane. Enable Measure task execution time and set Save options to All data.
Run PIL Simulation
Use the SIL/PIL manager to verify the numerical accuracy of the generated code against the simulation output. Perform PIL simulation with CRL and without CRL to see the difference in execution time. For more information on PIL simulation on the PPU, see Code Verification and Validation with PIL Using PPU.
1. Connect the Infineon AURIX hardware board to your host computer.
2. To specify a communication interface for the PIL simulation, in the Hardware Implementation pane, expand Target hardware resources. On the Connectivity tab, specify the Serial port in MATLAB preferences parameter. Click Refresh to view the available ports.
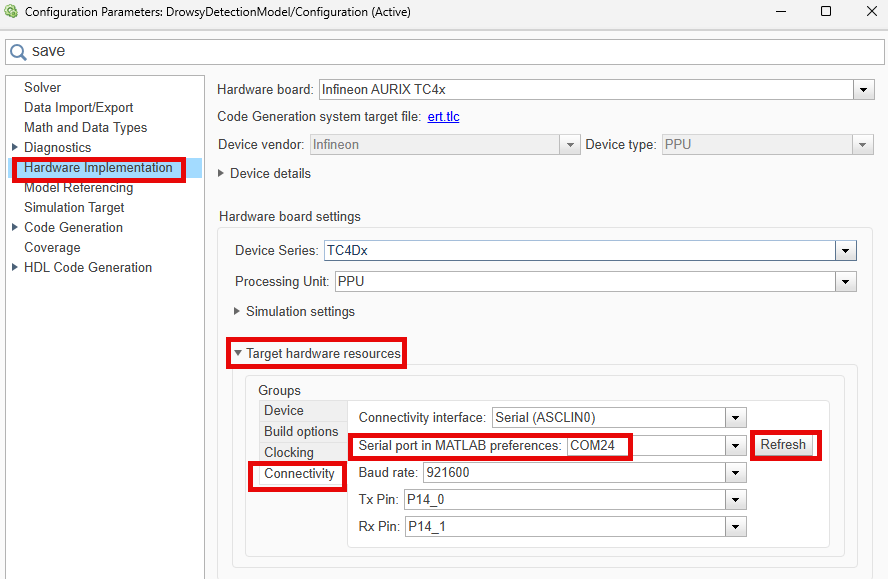
You can update the COM port number according to the port information available in the device manager of your host compute. To find the COM port number of the USB Serial Port on your host computer, navigate to Device Manager > Ports (COM & LPT) > Infineon DAS JDS COM to find the COM port.
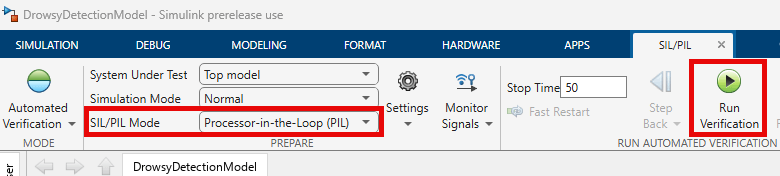
3. To open the SIL/PIL tab, in the Simulink editor, on the Apps tab, select SIL/PIL Manager. To start the PIL simulation, in the SIL/PIL tab, set SIL/PIL Mode to Processor-in-the-loop (PIL), and click Run Verification.
4. When the PIL simulation completes, Simulink creates an out variable in the Workspace. This variable contains the PIL simulation results which you can use to classify the input image.
Use the getPrediction function provided in the example to classify the input image. To view the predicted label, execute these commands in the Command Window.
CRLprediction = getPrediction(out);
disp("Classification result using CRL functionality : " + CRLprediction);

The output confirms that the network correctly classifies the input image as Drowsy.
Next, disable the CRL and run the simulation again.
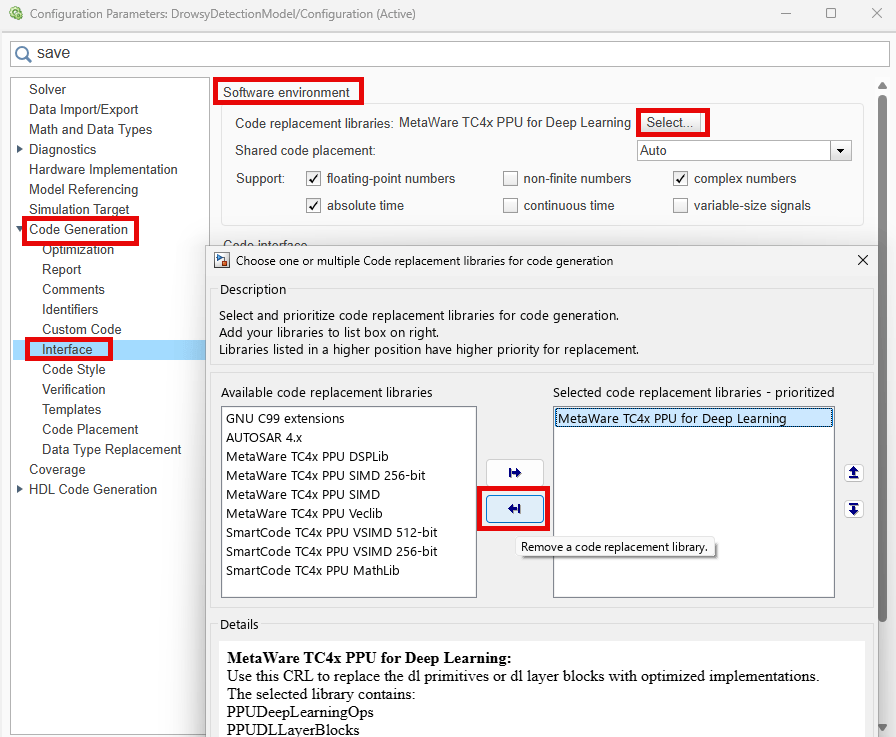
1. In the Configuration Parameters dialog box, on the Software environment pane, click Select. This action opens a dialog box, in which you can specify code replacement libraries. In the right-hand side pane, select Metaware TC4x PPU for Deep Learning, and click . Click OK to apply the changes to the model.
2. To start PIL simulation without CRL, in the SIL/PIL tab, set SIL/PIL Mode to Processor-in-loop (PIL), and click Run Verification. To view the predicted label, execute these commands in the Command Window.
PlainCprediction = getPrediction(out);
disp("Classification result without CRL functionality : " + PlainCprediction);

The output confirms that the network correctly classifies the input image as Drowsy.
Compare Execution Performance With and Without CRL
The example includes the plotTimeComparision function to compare the execution performance of the code generated with and without CRLs. To visualize the execution time for both PIL simulations, run this command.
plotTimeComparison(PlainCOutput,CRLOutput)
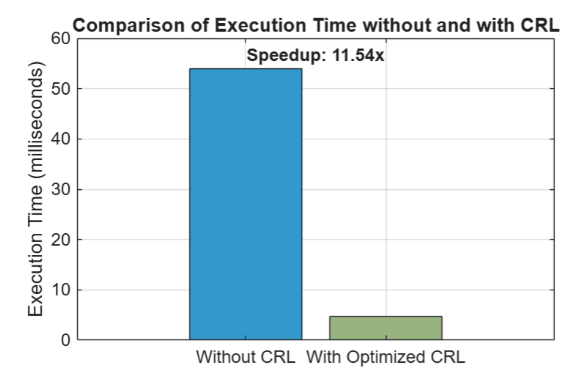
The plot shows that the generated code with CRLs executes 11.54 times faster than code generated without CRLs.
Copyright 2026 The MathWorks, Inc.
See Also
Blocks
- ReLU Layer (Deep Learning Toolbox) | Convolution 2D Layer (Deep Learning Toolbox) | Max Pooling 2D Layer (Deep Learning Toolbox) | Fully Connected Layer (Deep Learning Toolbox) | Sigmoid Layer (Deep Learning Toolbox) | Dropout Layer (Deep Learning Toolbox) | Flatten Layer (Deep Learning Toolbox) | Data Type Conversion
Functions
vision.CascadeObjectDetector(Computer Vision Toolbox) |imresize

